Life Group Leader Question Instructions

Here are some step by step instructions of how to add questions to the weekly Life Group Leader Email in MailChimp.

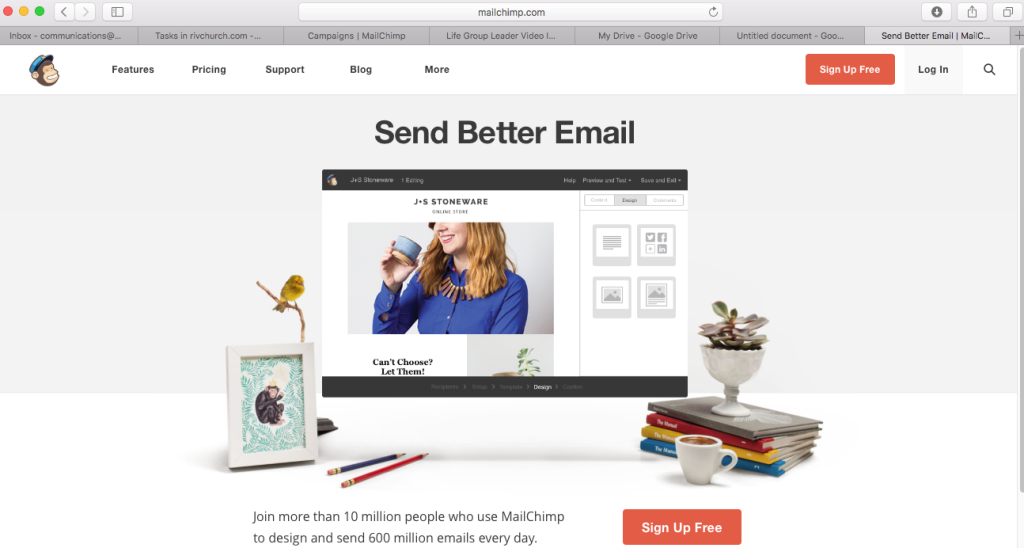
  • Step 1: Navigate to http://mailchimp.com
  • Step 2: Login to MailChimp
    Username: rivchurch
    Password: (Ask James or Nora)

    Step 2

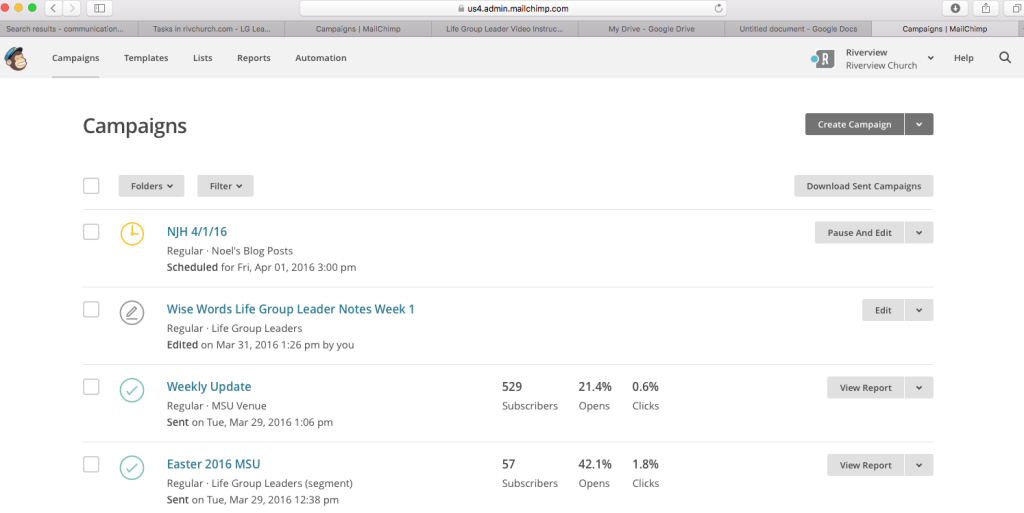
  • Step 3: Click Campaigns in the upper left corner

    Step 3

  • Step 4: Click the current Life Group Leader Note Campaign
    *[SERIES NAME] Life Group Leader Notes Week [NUMBER]*
    *This will be close to the top of the campaigns listed on the screen*

    Step 4

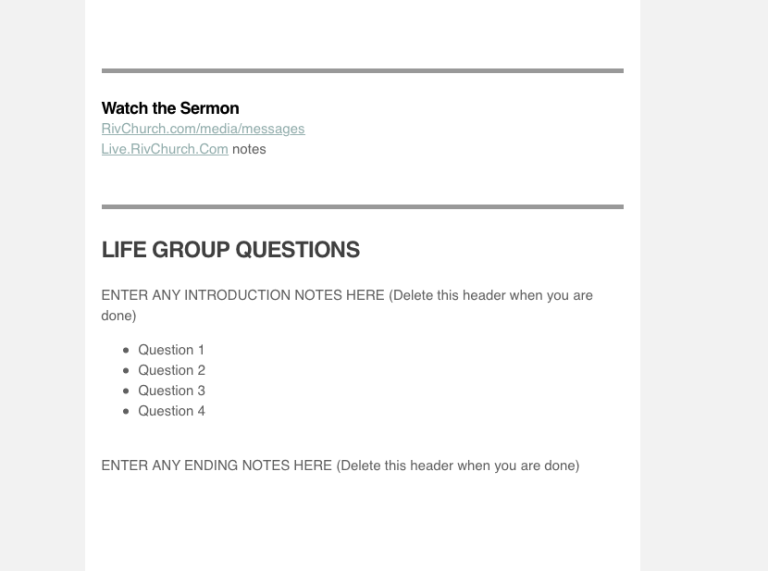
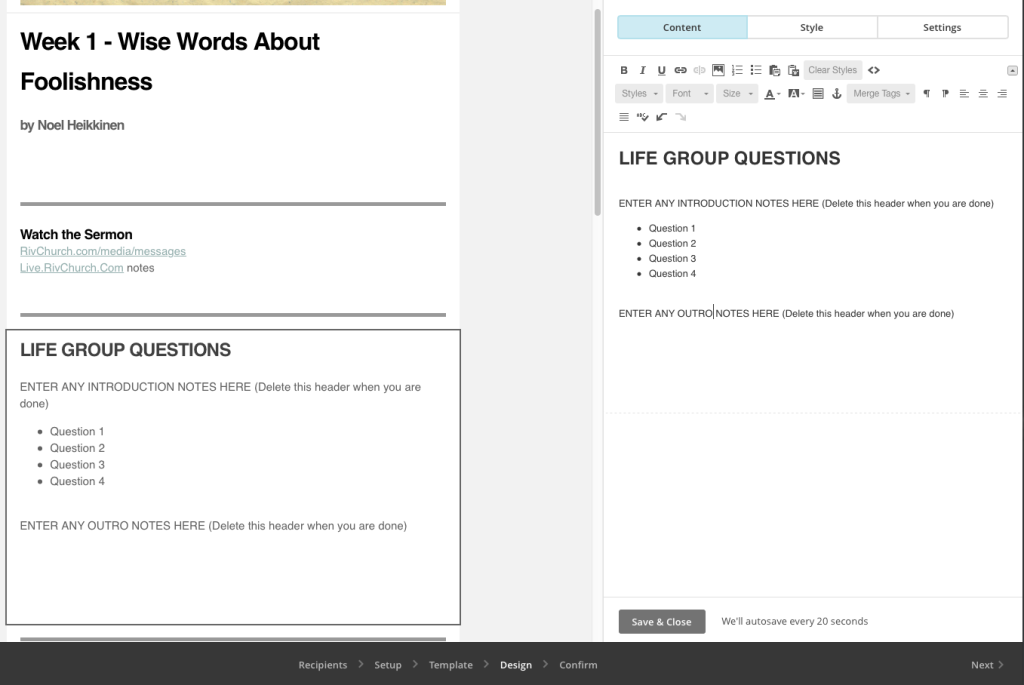
  • Step 5: Scroll down and click into the “Life Group Questions” text box.

    Step 5

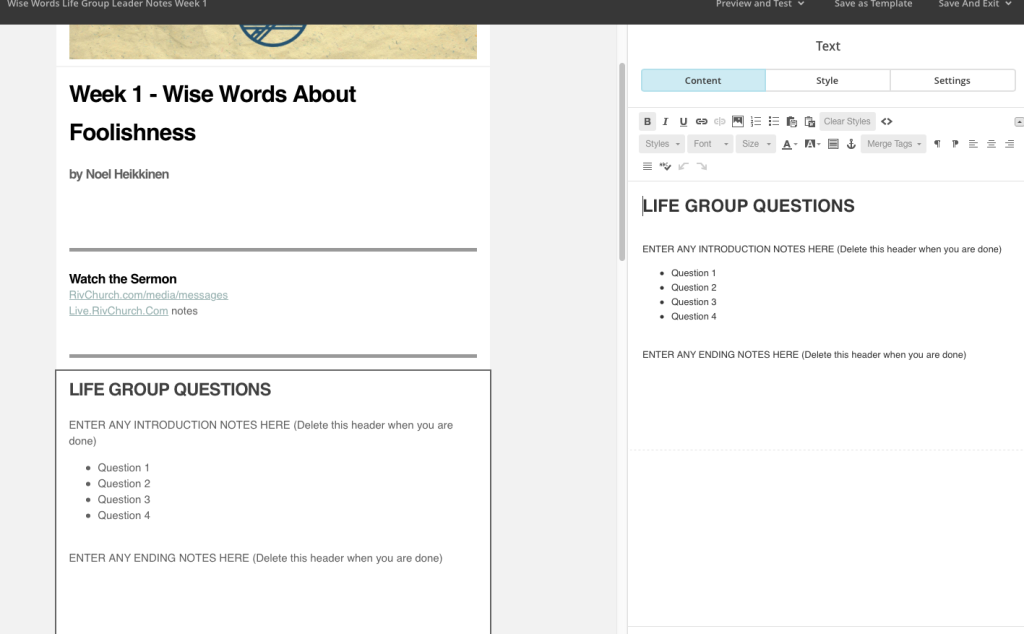
  • Step 6: On the right side of the screen, type any intro question, and outro text that you would like to include.
    *Please be watchful of spelling, typos, and grammar.*

    Step 6

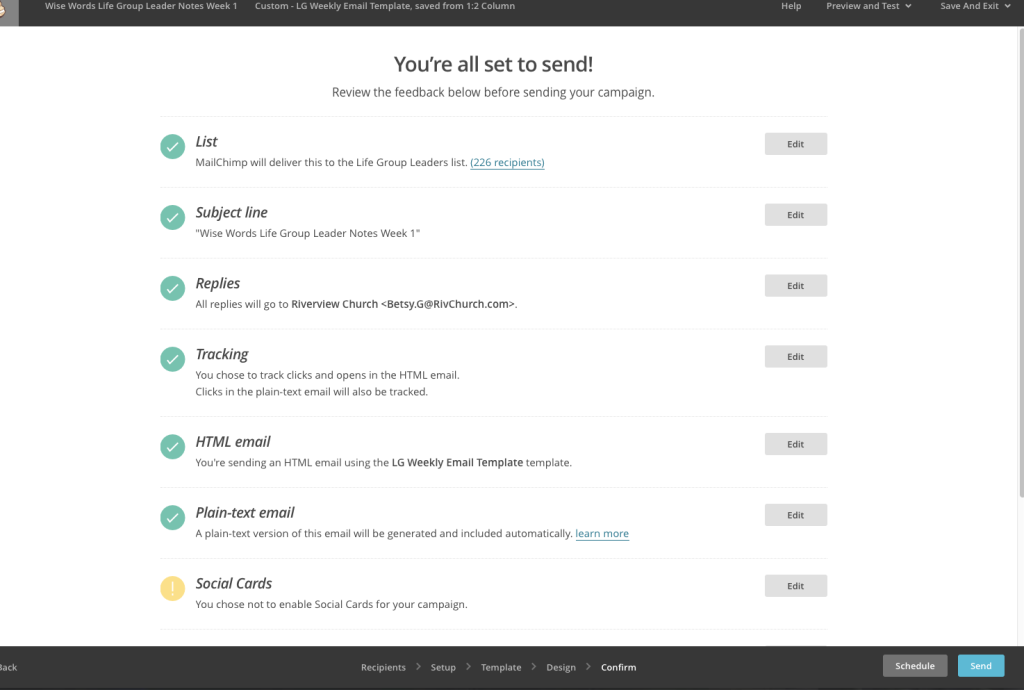
  • Step 7: When done typing questions, click “Next” on the lower right side of the screen.

    Step 7

  • Step 8: Click send on the lower right side of the screen.

    Step 8

  • Step 9: Click through the confirmation screen.

    Step 9

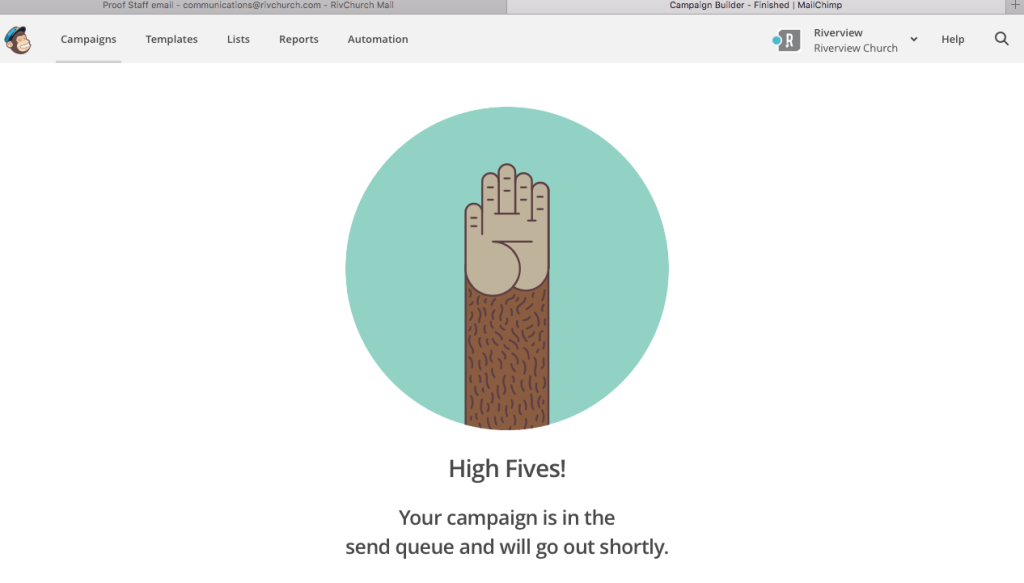
  • Step 10: You will receive a high-five from a monkey letting you know your email was sent. 🙂

    Step 10

Video Editing Workflow

UPDATE! There are new video editing instructions available here:


Podcast Team Video Editing Instructions


The Following information is for archival purposes only.

Starting October 27th we are going to be using a new editing software for our weekend messages.  Below is the new workflow for editing the video and audio for our weekend services.

Use the video from the 11:30 service unless the pastor lets you know otherwise.  Noel likes to pick which sermon he uses and will circle his choice on the dry erase board at the top of the stairs in the A/V booth.

  1. Login to the video capture iMac.
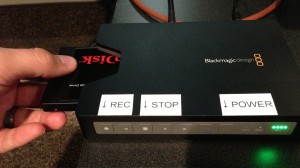
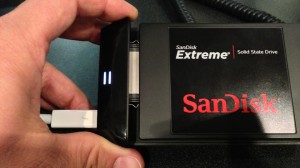
  2. Check to make sure the BlackMagic SSD recorder is stopped and turned off.  (There are 4 green lights that always stay on, but the power button should not be lit)
  3. Pull the drive out of the left side of the recorder

Blackmagic SSD Recorder

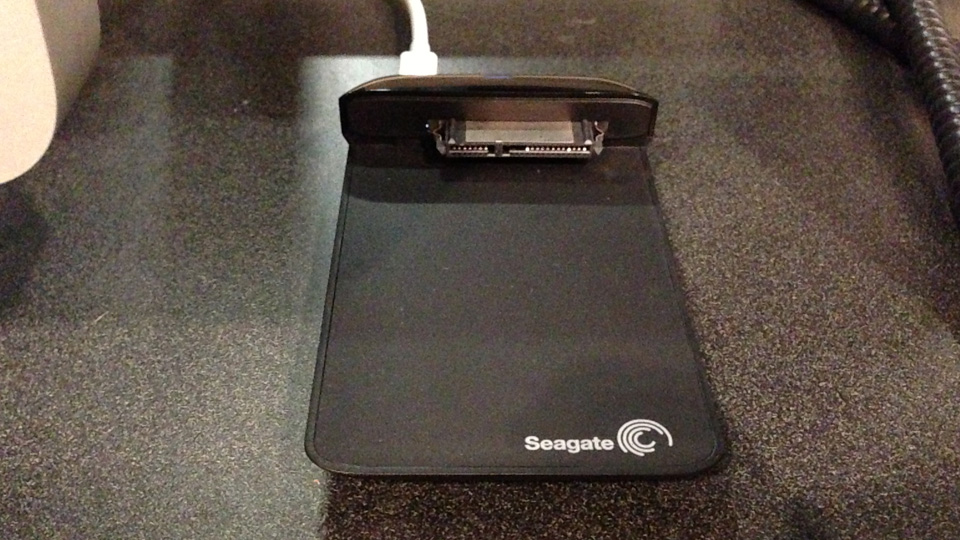
  1. Carefully plug the drive into the SATA Dock to the right of the iMac.

SSD in Dock

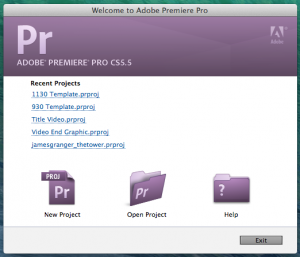
  1. Open Premiere Pro on the iMac
  2. Open the 1130, 930, or 7 template file based on which service you need to edit

 New Video Edit 01

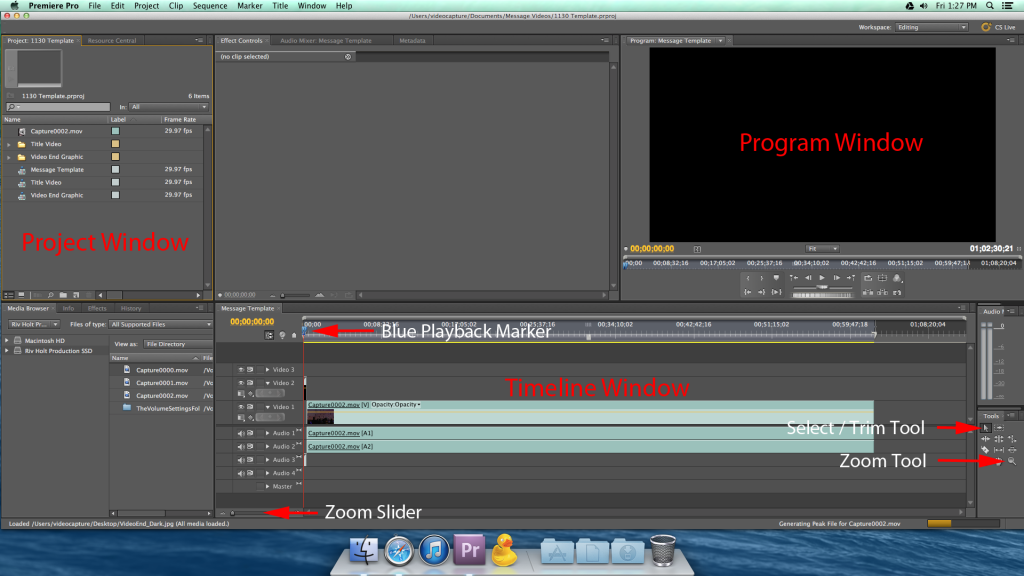
Premiere Pro Layout

New Video Edit 02

  1. In Premiere use the Select tool to click on the Capture.mov in the timeline.
  2. Move the mouse over to the beginning of the Capture.mov clip and the cursor will change to a Trim tool. (Looks like [ )
  3. Click and drag to the right to trim the clip to just before the beginning of the teaching.
  4. Use the Zoom tool to zoom in closer by clicking and dragging a box around the beginning of the clip.
  5. Click the blue marker at the top of the red line and drag to find the exact beginning of the teaching.
  6. Use the Select tool (trim tool) to trim the clip to the exact start point.
  7. Press the “\” key on the keyboard to zoom out.
  8. Click the middle of the Capture.mov clip and drag to the left until it bumps into the clip before it.  The program should cause the clip to snap into the correct location.  There will be little white arrows that appear where the clips line up.
  9. Repeat steps 2 – 7 except starting at the end of the Capture.mov clip and trimming to the left.
  10. Once you trimmed the Capture.mov clip to the correct start and end points, drag the “Video End Graphic” sequence from the Project window onto the “Video 1” track at the end of the Capture.mov clip.  There will be little white arrows that appear when the clip is lined up correctly.
  11. Click the blue marker at the top of the red line and drag to just before the end of the clips.  Press the space bar to start playing the end of the video.  The video should stop automatically at the end of the closing graphic.  Once this happens press the “O” (oh) key on the keyboard.
  12. Click the blue marker at the top of the red line and drag it all the way to the left.  Press the “I” (eye) key on the keyboard.
  13. Press the spacebar to start playback.  Watch to make sure the intro video and message video start and transition nicely.  If the 2 videos overlap, you’ll need to use the select tool to line them up again.
  14. Add any images (maps, photos) the pastor specifically refers to in their teaching.  Images are found under the message slides folder on the desktop, series name, and date.  You can add images by dragging them into the project window area in premiere, and then dragging them onto video track 2 in the timeline.  Click and drag to line images up with the correct spot in the teaching, and the length can be changed by using the trim tool.  Once the clip is in the correct location and the correct length, drag it onto video track 1.  Graphics can be resized in the program window at the top right of the screen.
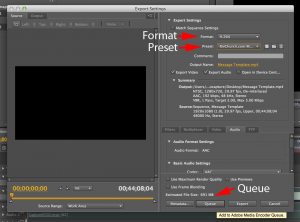
  15. Now that the intro video, teaching, and end graphic are all in the correct place click File -> Export -> Media
  16. At the top right of the export settings window make sure the format is “H.264” and the preset is “RivChurch.com Message”

New Video Edit 03

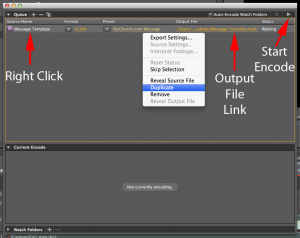
  1. Click the “Queue” button at the bottom of the export window.  This will open the Media Encoder application.
  2. In the Media Encoder window click the Output file link to change the name.  Name the file all lowercase “speakerfirstandlastname_messagetitle.”  Click “Save.”
  3. Right click on “Message Template” and click duplicate.
  4. Change the format to “MP3” and the Preset to “RivChurch.com Audio Only.”  Click the Output file link and remove the “_1” from the end of the name.
  5. Press the play button at the top right to start the export process.  This should take about 45 minutes to 1 hour.

New Video Edit 04

Upload and Archive

  1. FTP upload the mp4 and mp3 files from the desktop using Cyberduck to: rivwarehouse.com/resources/messages/[series]/.
  2. While the files are uploading, create the archive versions of the video using the Media Encoder application.
    • Right click on the top “Message Template” and click duplicate.
    • Click on the output file link and add the prefix “H.264_” to the filename.
    • Change the format to “H.264” and the Preset to “H.264 Message Archive.”
    • Right click on the top “Message Template” and click duplicate.
    • Click on the output file link and add the prefix “ProRes_” to the filename.
    • Change the format to “Quicktime” and the Preset to “ProRes Message Archive.”
    • Click the play button to start the archive video encodes.
  3. Once the archive versions are finished encoding, open the Video Archive external drive and drag the archive H.264 & ProRes files into the “Weekend Messages/[series]” folder.
  4. Once the upload is finished, quit Cyberduck, Media Encoder, and Premiere Pro.  Do NOT save changes to the template file.

Create a New Message Post in WordPress

Follow the instructions in the following link: WordPress Message Posting Instructions


If you have any questions about this process, please contact [email protected]

MSU Venue Video Setup

Here’s step by step instructions on how to copy and setup the teaching video for the MSU venue.

Step 1: The teaching video is recorded on an SSD.  Make sure the unit is turned off before pulling out the drive.  There are 4 green battery lights that always stay on, but the power button should not be lit.
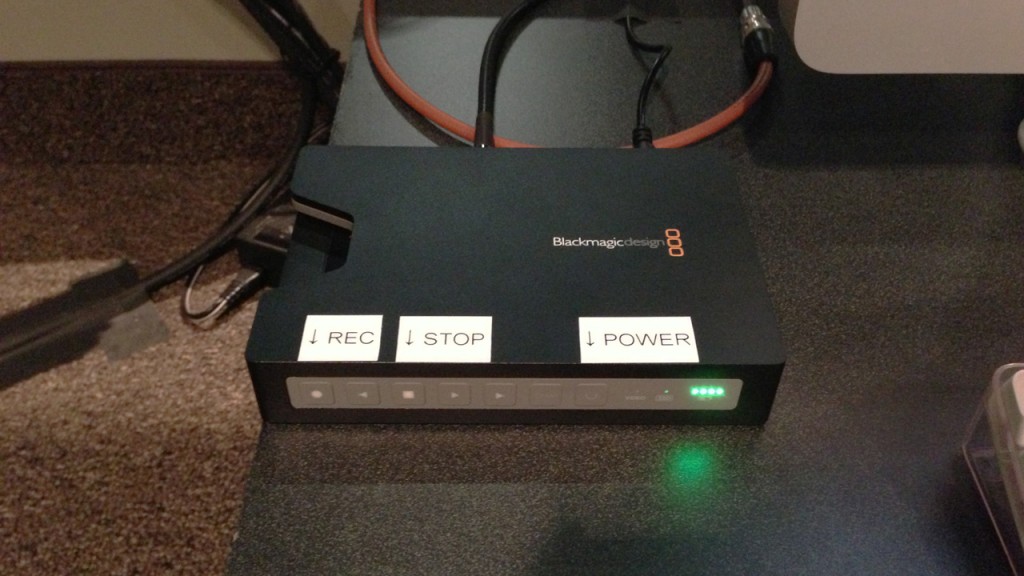
Blackmagic Recorder

Step 2: Pull the drive out the left side of the recorder
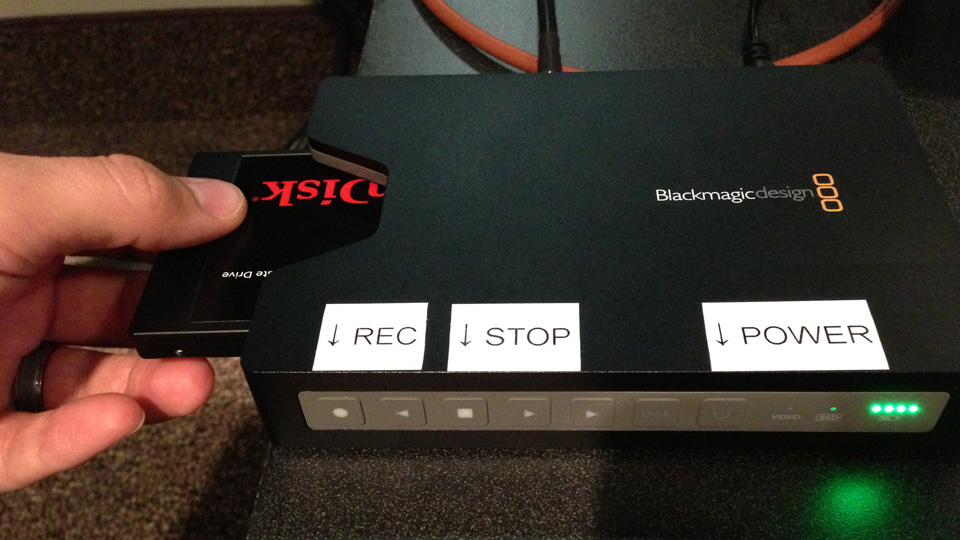
Blackmagic SSD Recorder

Step 3: Carefully plug the drive into the SATA dock to the right of the iMac
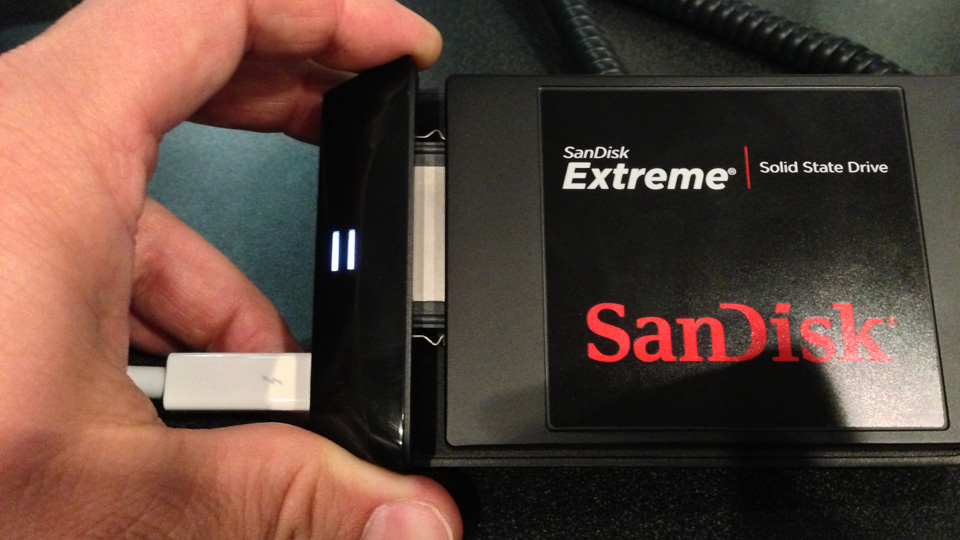
SSD in Dock

Step 4: Plug the blue ethernet cable into the MSU Macbook labeled “center screen.”  Turn the computer on.  Double click the “Mount Message Video” desktop icon.
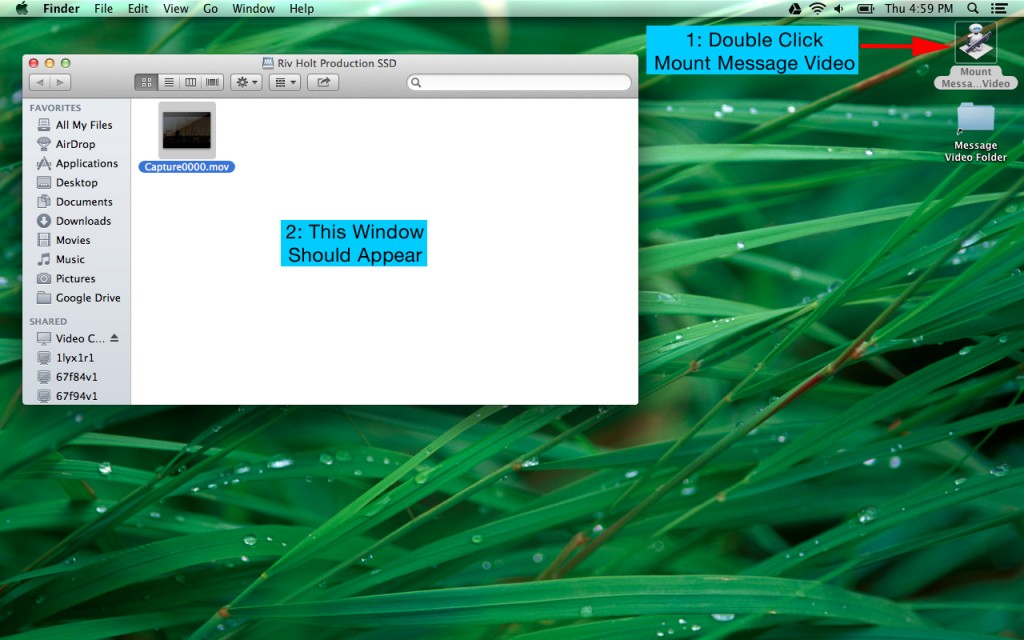
Venue Video Step 04

Step 5: Drag the file “Capture0000.mov” onto the message video folder.
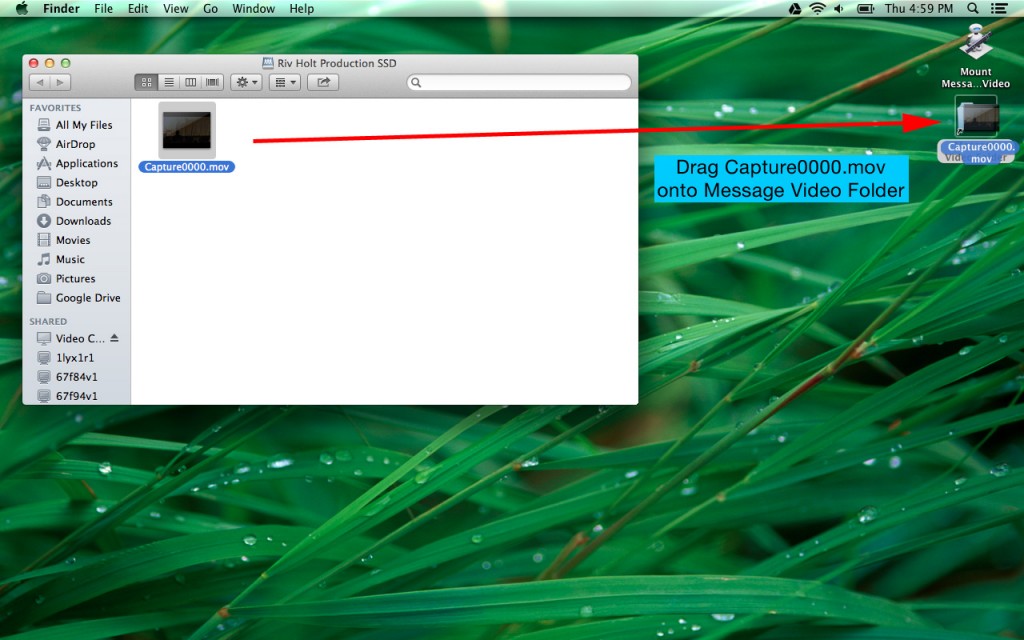
Venue Video Step 05

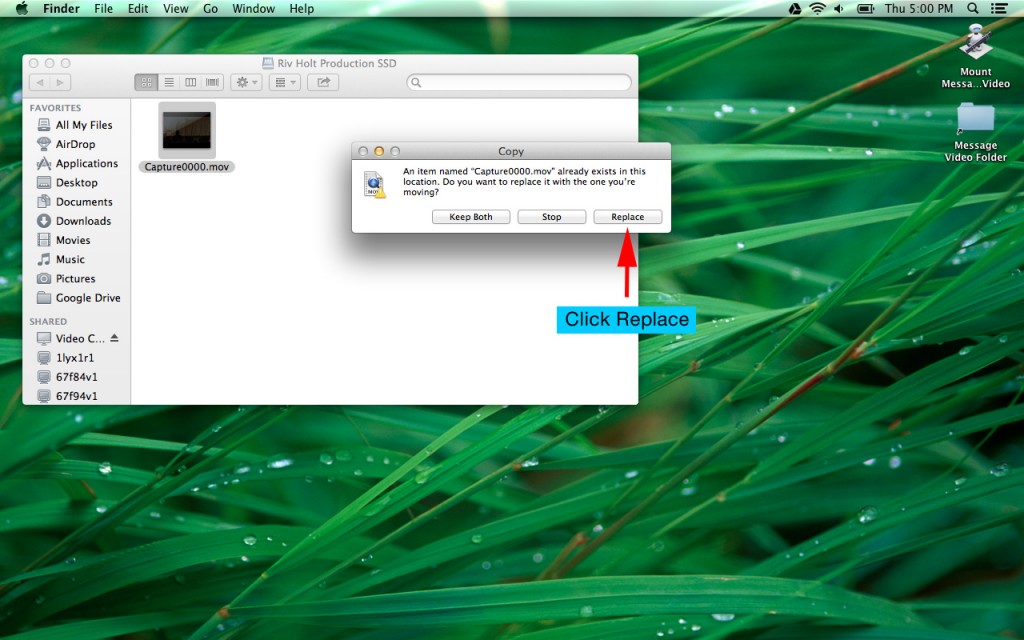
Step 6: Click Replace

Venue Video Step 06

Step 7: Wait for file to copy before continuing.  This should take about 15 minutes to complete.
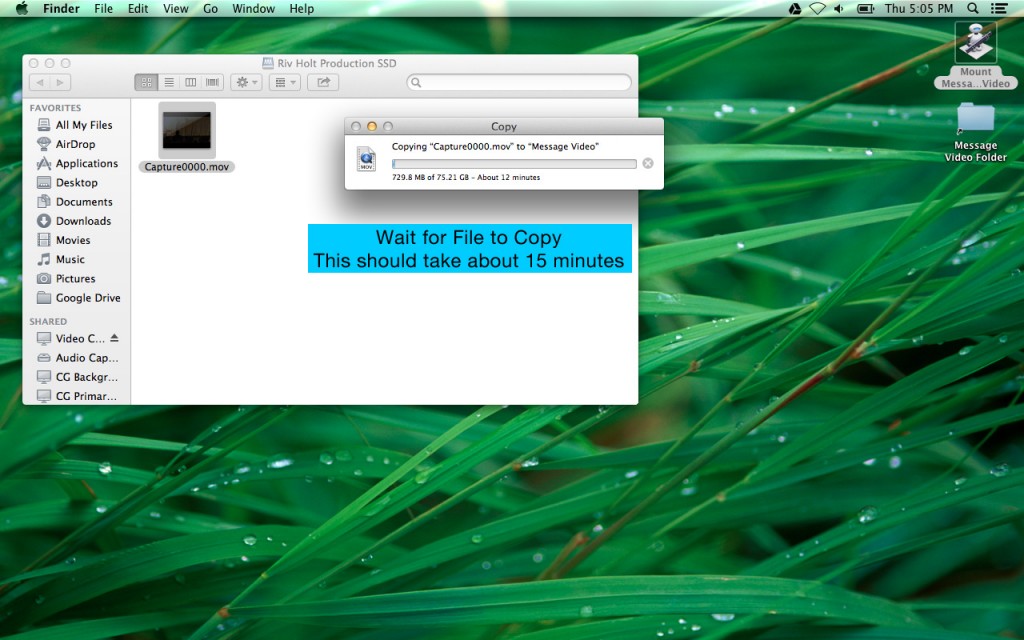
Venue Video Step 07

Step 8: Hover mouse over the bottom of the screen for dock to appear.  Open ProPresenter 5.
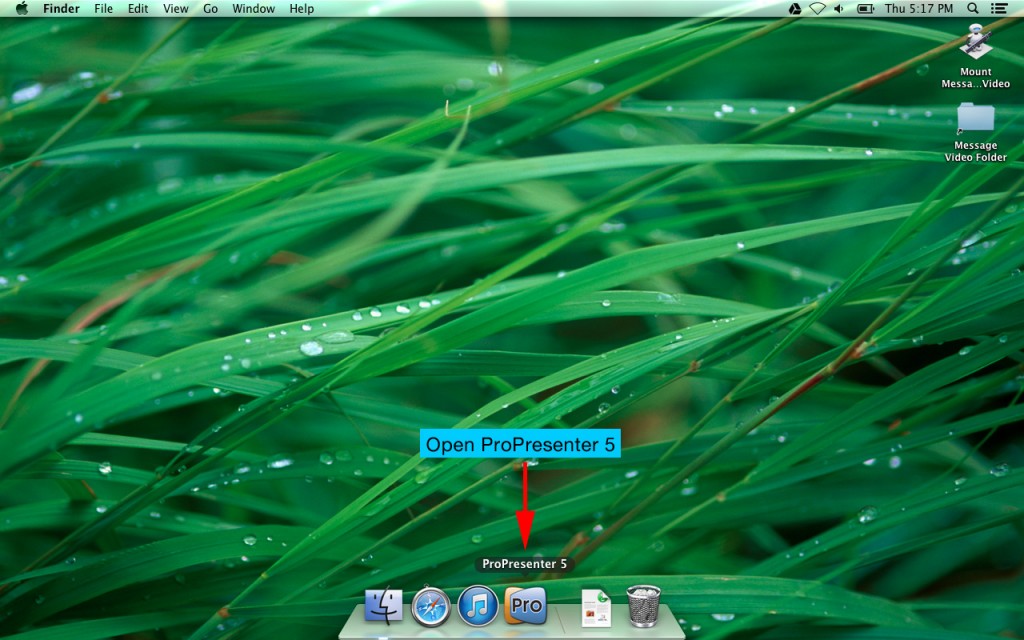
Venue Video Step 08

Step 9: Click on the “Message” playlist item.  Find the slide that contains the teaching video.  Control Click (or Right click) on the video slide.  Click on Media Properties.
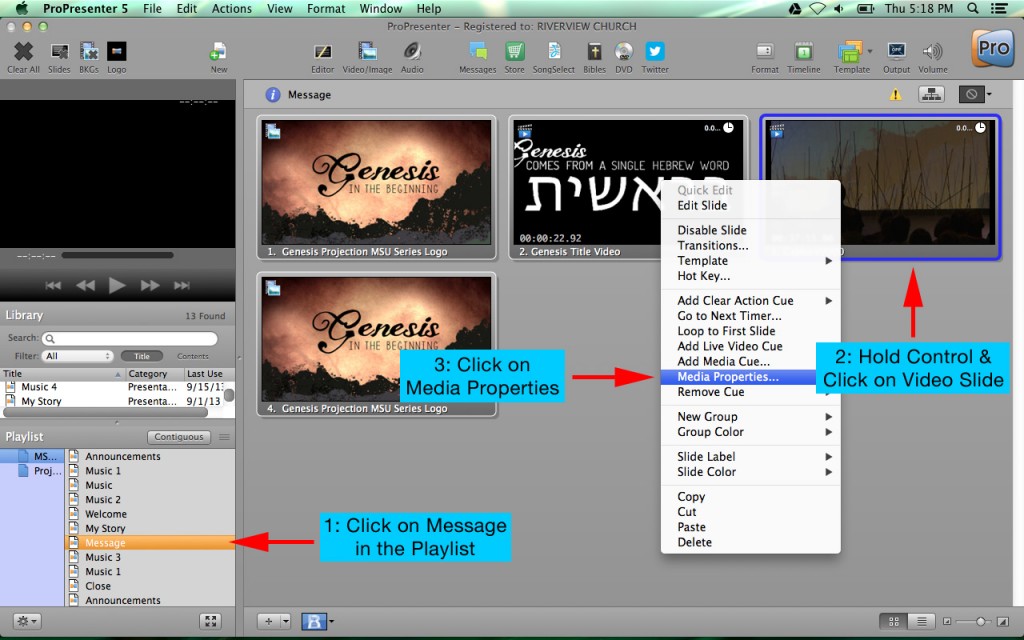
Venue Video Step 09

Step 10: Click on the settings tab (gear icon).  Select “stop” from the behavior drop down menu.  Drag the grey bar forward to just before the beginning of the message.  Using the play and pause controls, pause the video before Noel starts to talk.  Normally a good place to pause is when he sets down his coffee mug, or reaches behind his back to turn on his microphone.  Once you are paused at a good starting place, click the “In” button.  Drag the grey bar to the end of the message.  Play the video and pause at the end of the closing prayer.  Click the “Out” button.  Close the media properties window.
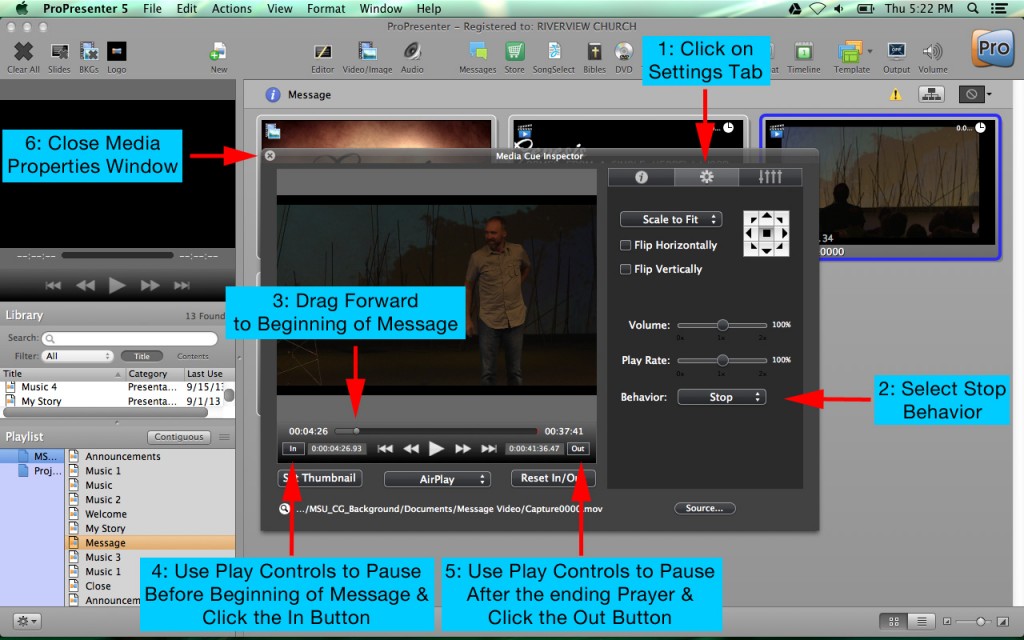
Venue Video Step 10

Step 11: Click File, Save All to save your changes.  Quit ProPresenter and shutdown the computer.
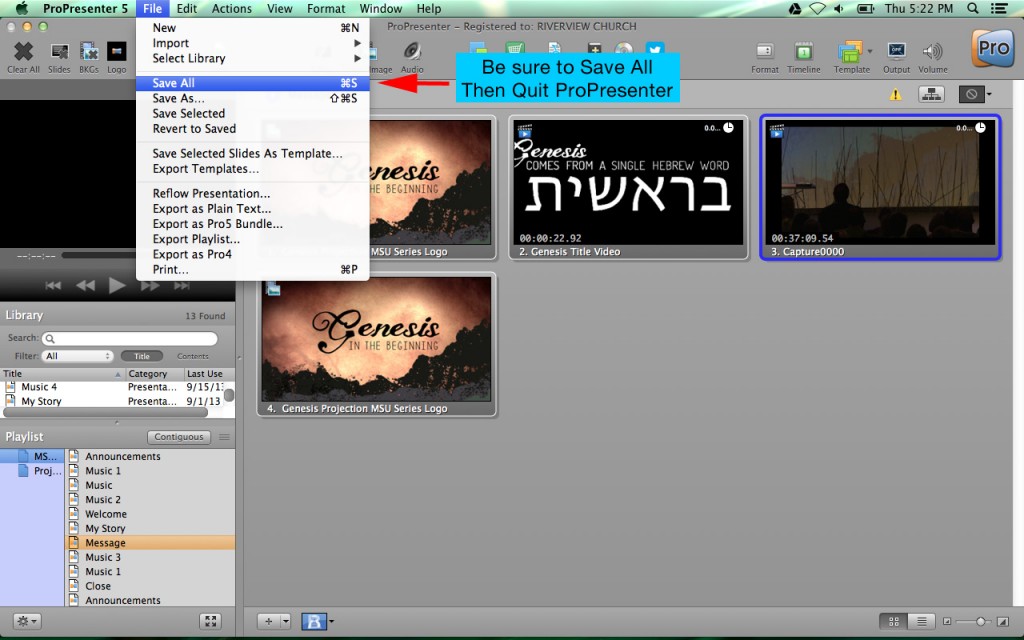
Venue Video Step 11

Step 12: On the iMac, hold control and click on the SSD drive on the desktop.  Click Eject “Riv Holt Production SSD.”  Remove drive from dock and return to SSD recorder on the left of the iMac.
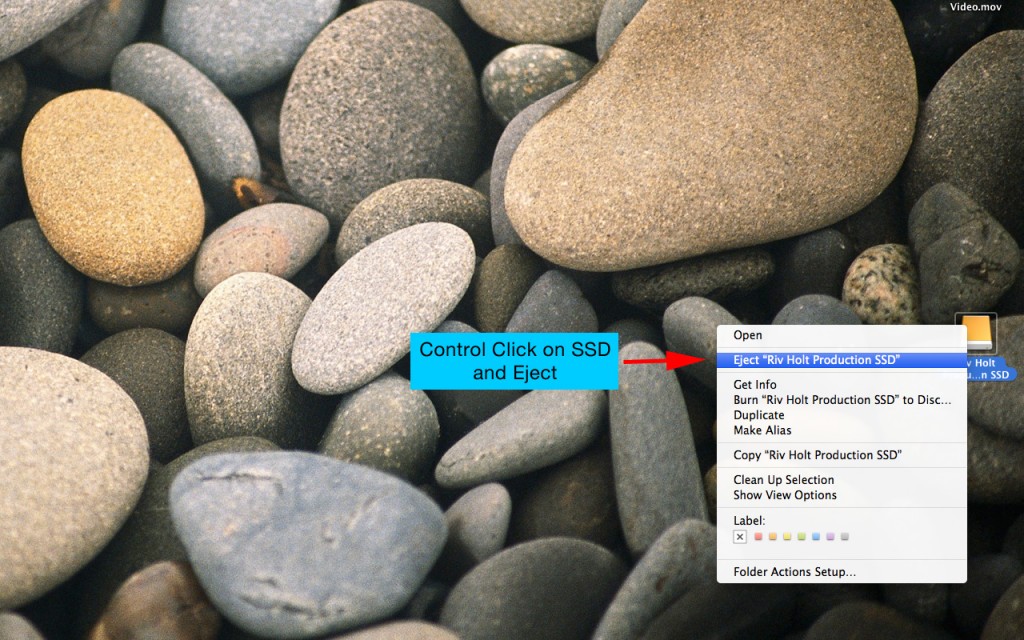
Venue Video Step 12

Once this process is complete, place the center screen macbook in the blue handled laptop bag along with the other MSU macbook.  The laptop bag goes in the blue marked wire rack cart backstage for transport to the MSU venue on Sunday morning.  If you have any questions, please contact [email protected].
Life Group Leader Video Instructions

Here are some step by step instructions of how to record and upload the weekly life group leader videos.

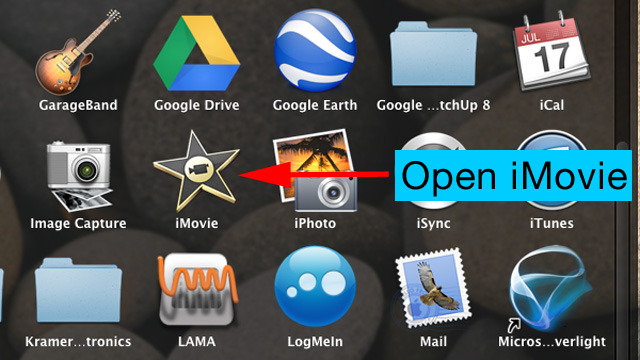
Step 1. – Open iMovie

Step 01

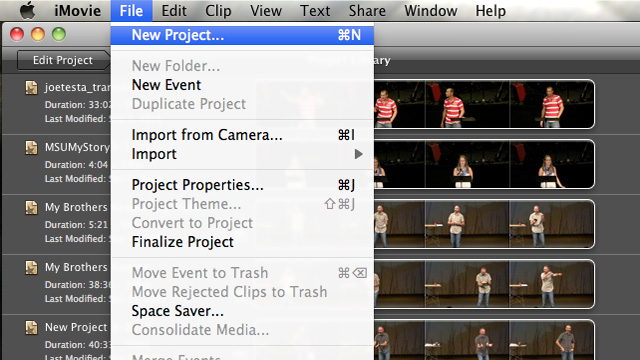
Step 2. – Create a new project in iMovie

Step 02

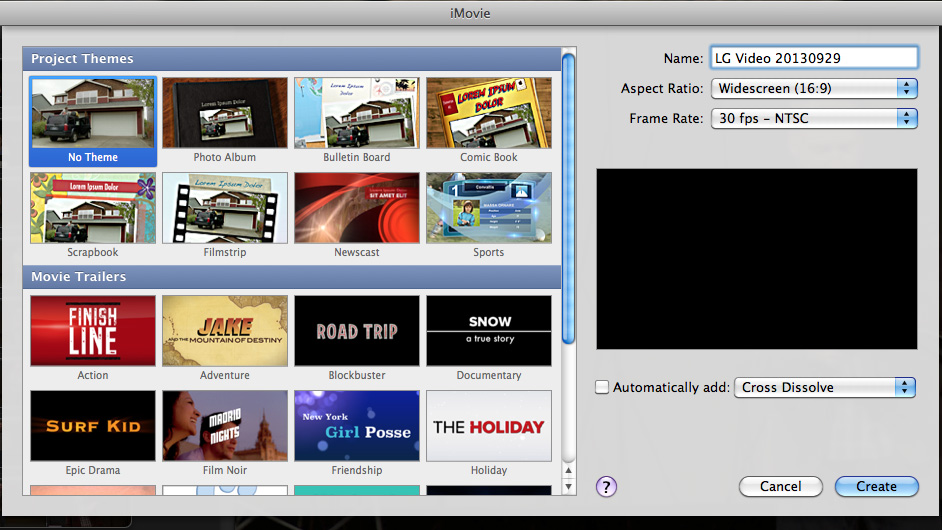
Step 3. – Name iMovie Project and Click “Create”

Step 03

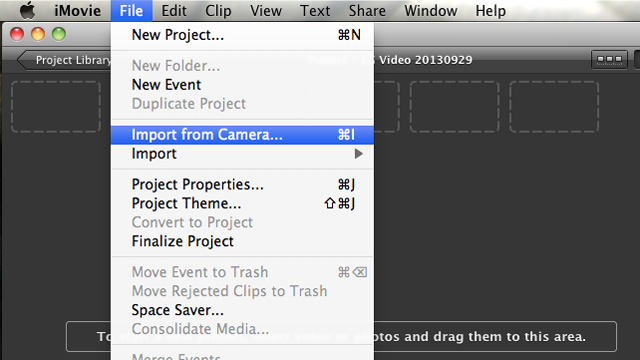
Step 4. – Record video in iMovie (Import from Camera)

Step 04

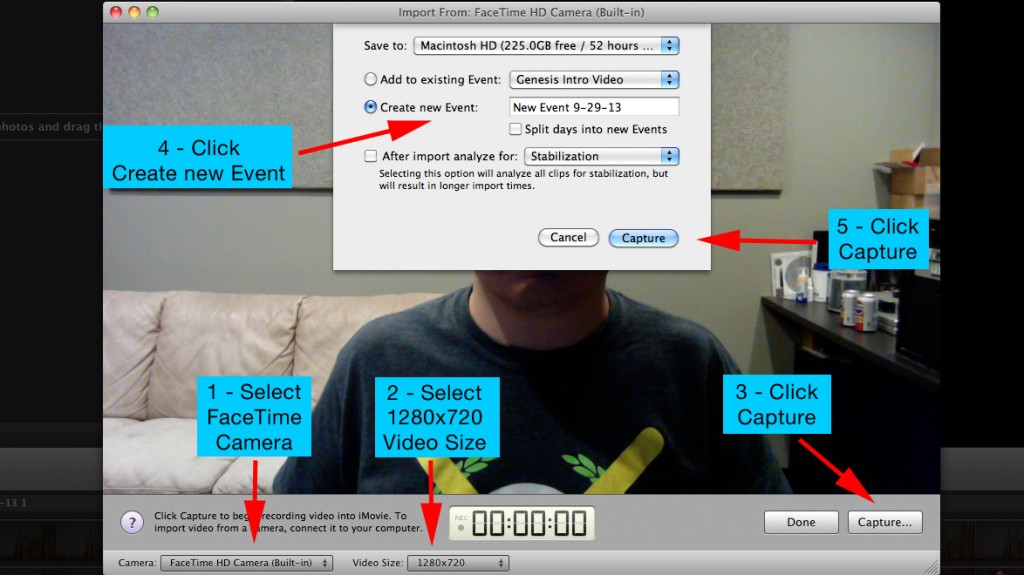
Step 5. – Capture movie in iMovie.  When finished recording click “Stop” then “Done”

Step 05

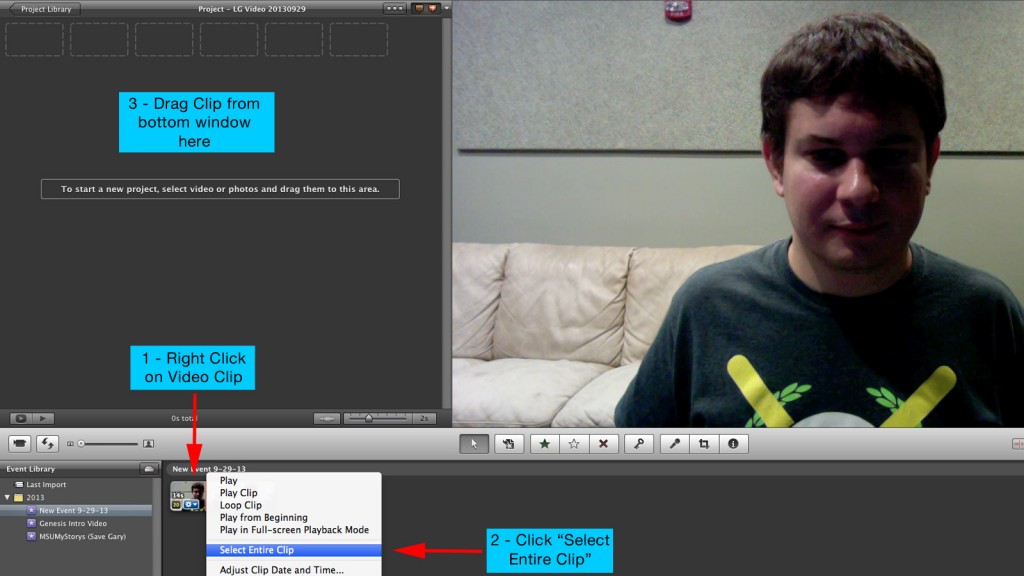
Step 6. – Drag recorded movie into project window

Step 06

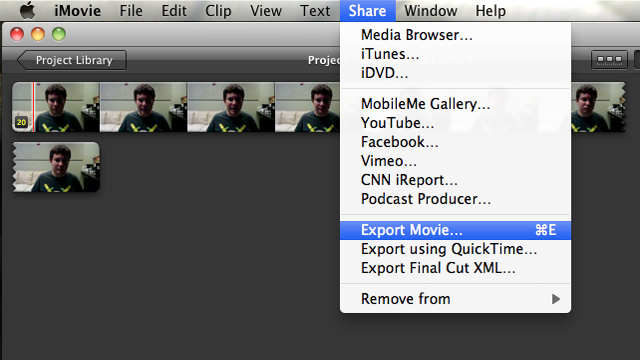
Step 7. – Export movie (Share)

Step 07

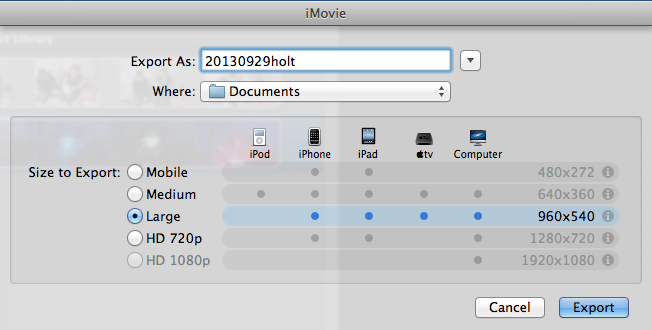
Step 8. – Name video “yyyymmddvenue”  Be sure to use the full 8 digit Sunday date and venue in lowercase.  (ie. “20130929holt” or “20130929msu”)  Using the wrong naming will keep the video from being displayed in the Life Group email.  Select “Large” size and click export.

Step-08a

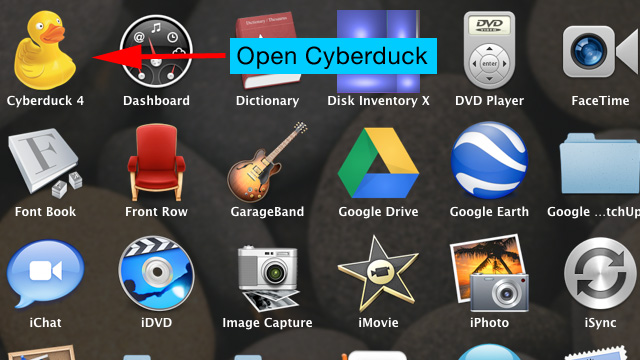
Step 9. – Open Cyberduck

Step 09

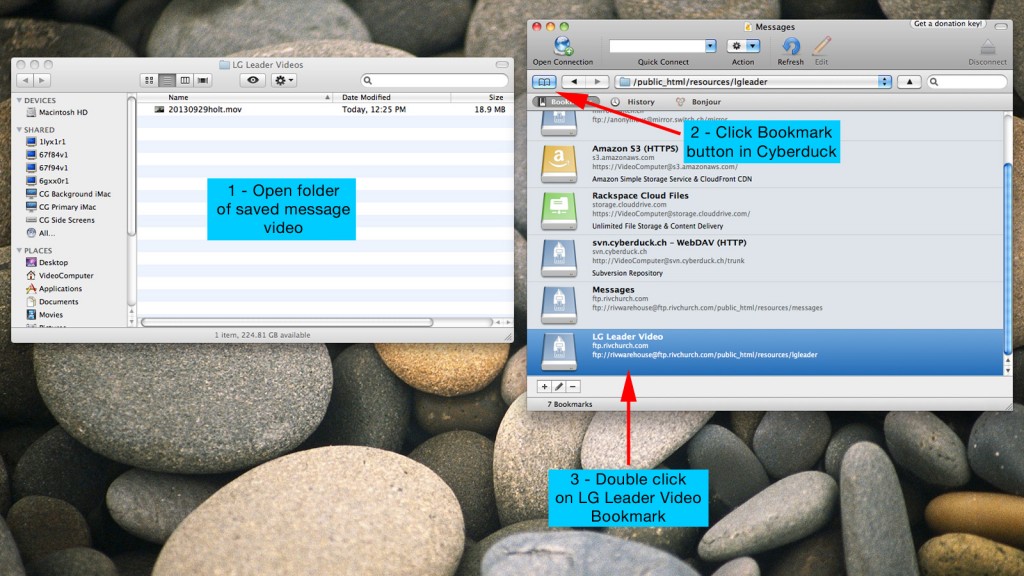
Step 10. – Open finder folder with saved movie and open Cyberduck LG Leader video bookmark

Step 10

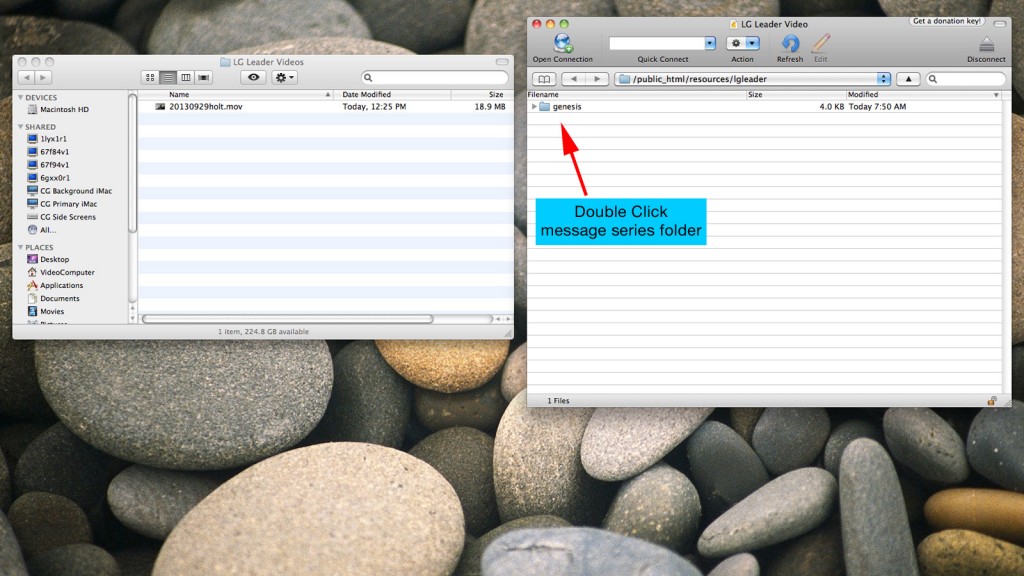
Step 11. – Open Cyberduck series folder (ie. genesis)

Step 11

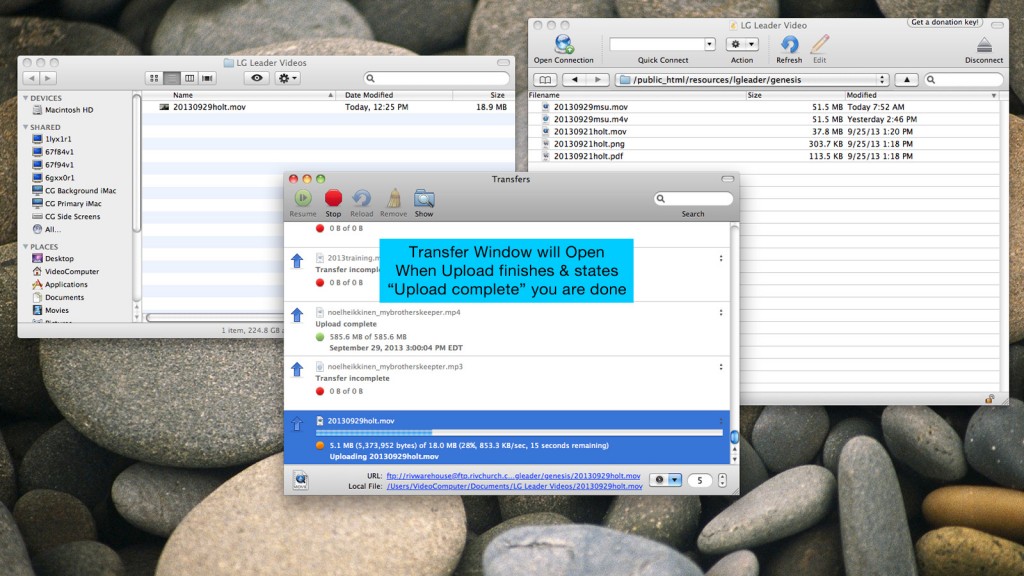
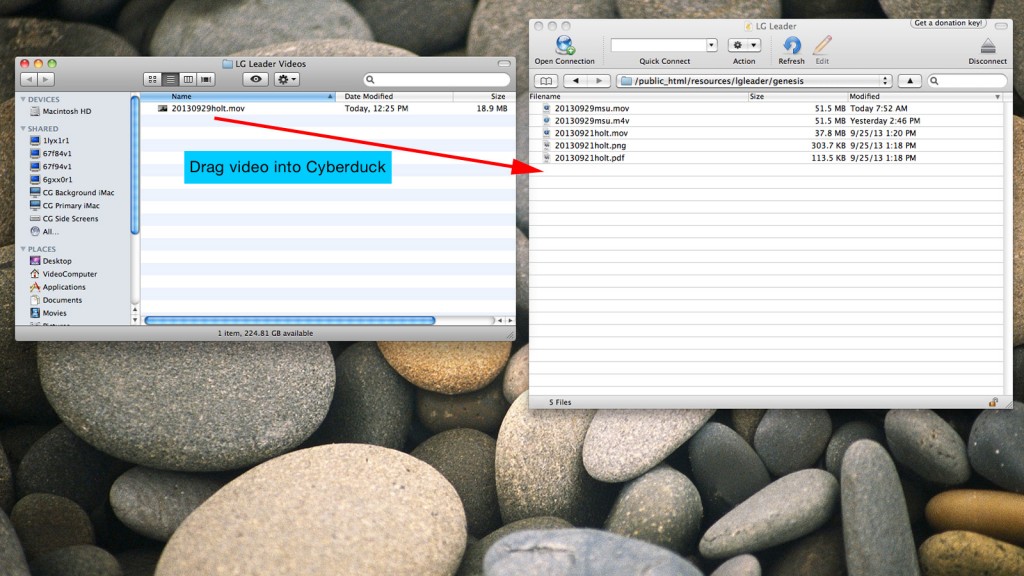
Step 12. – Drag movie from computer folder to Cyberduck folder

Step 12

Step 13. – Wait for transfer to complete.  When upload finishes you are done.  Quit Cyberduck application, iMovie, and close finder window.

Step 13

This completes the instructions for recording and uploading the weekly life group leader videos.  If you have any questions, please contact [email protected].
WordPress Message Posting Instructions

UPDATE! There are new video editing instructions available here:


WordPress Message Posting Instructions


The Following information is for archival purposes only.
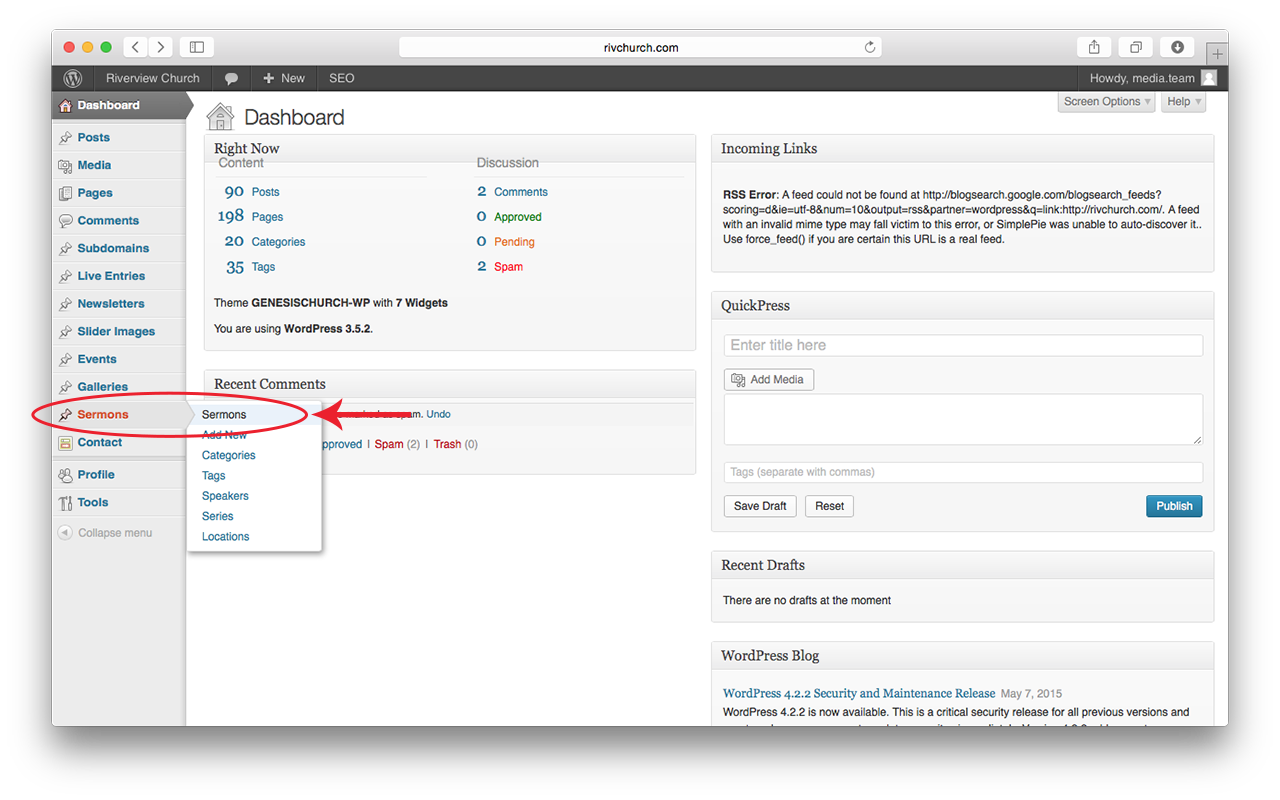
Log in to WordPress: http://rivchurch.com/wp-admin

Select Sermons>Sermons from the Dashboard navigation menu.

Wordpress01

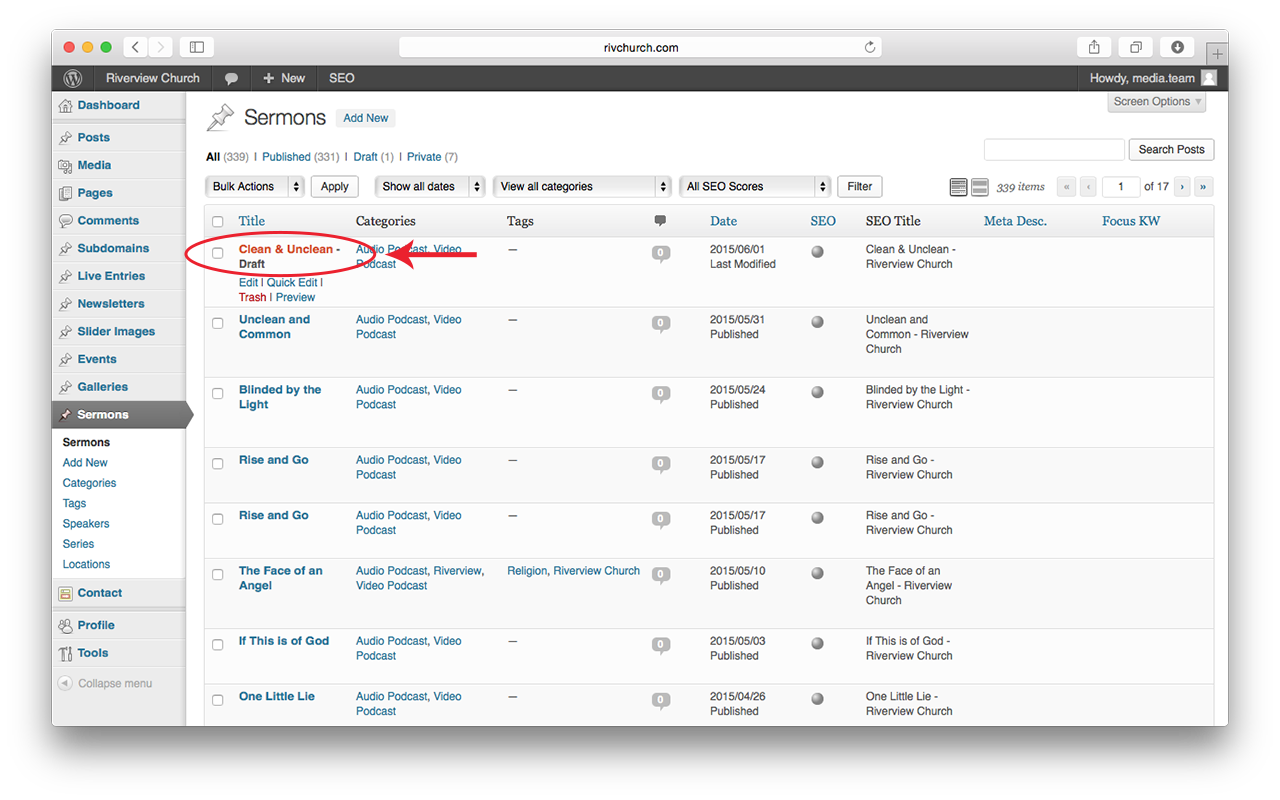
Click on the message Draft matching the weekend message title.

Wordpress02

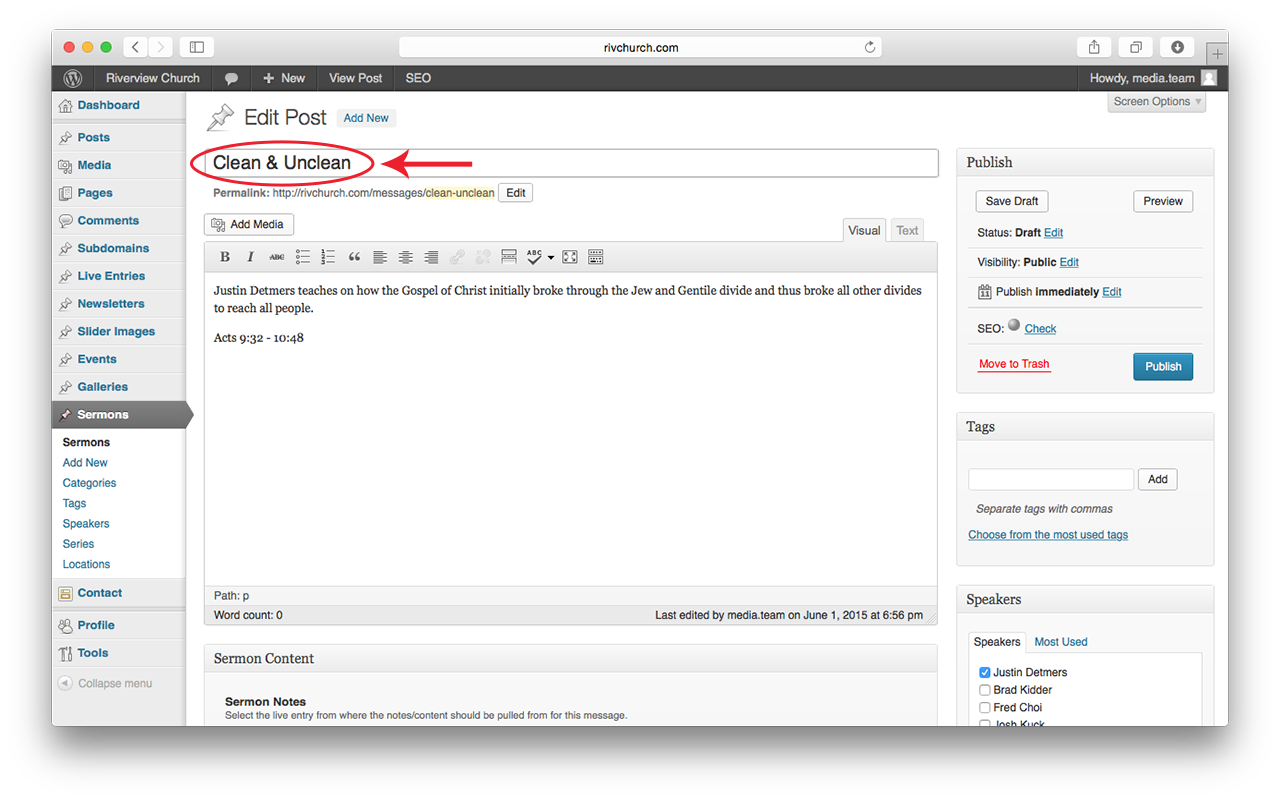
If no matching sermon exists, click on the Add New button at the top.

Fill in the Message title.

Wordpress03

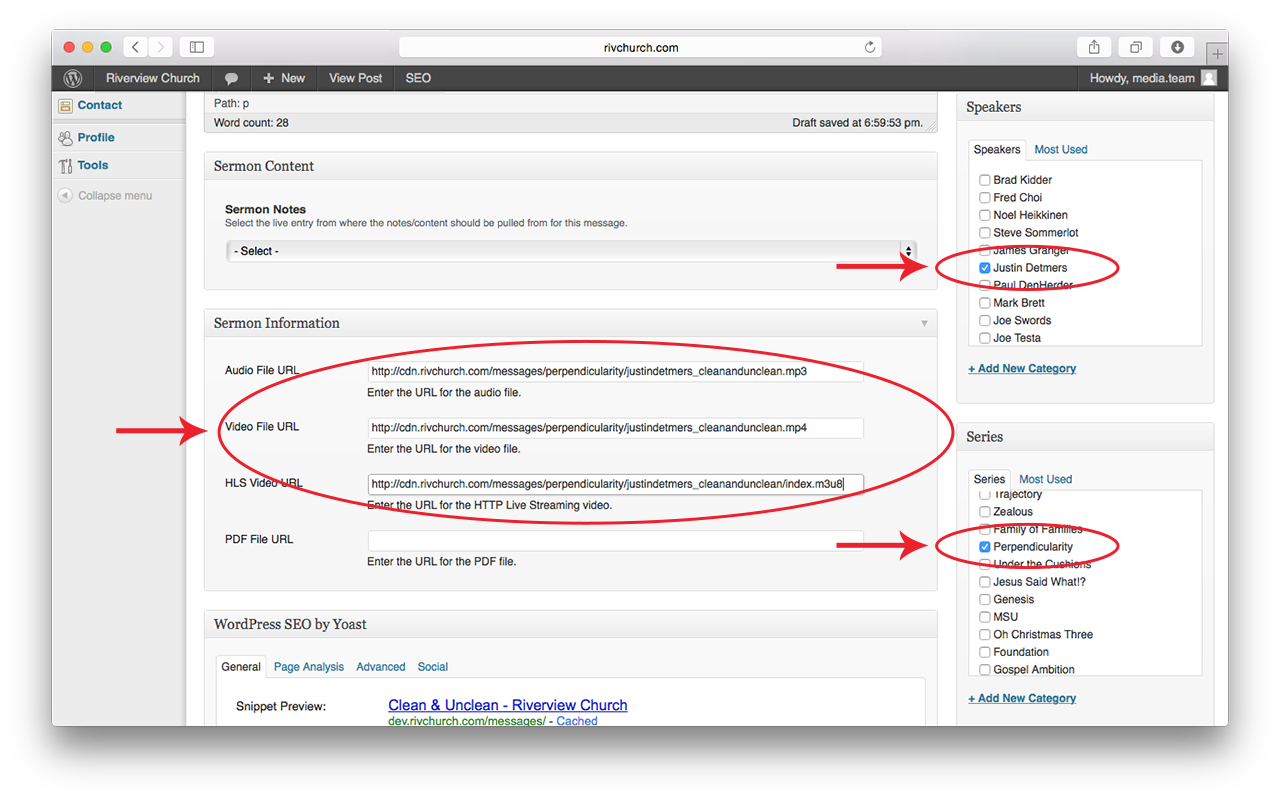
Scroll down & fill in the Audio, Video, & HLS Video File URLs under Sermon Information.
(http://cdn.rivchurch.com/messages/SERIESNAME/SPEAKER_MESSAGENAME.mp3)
(http://cdn.rivchurch.com/messages/SERIESNAME/SPEAKER_MESSAGENAME.mp4)
(http://cdn.rivchurch.com/messages/SERIESNAME/SPEAKER_MESSAGENAME/index.m3u8)
Select the Speaker from the Speakers list.
Select the Series from the Series List.

Wordpress04

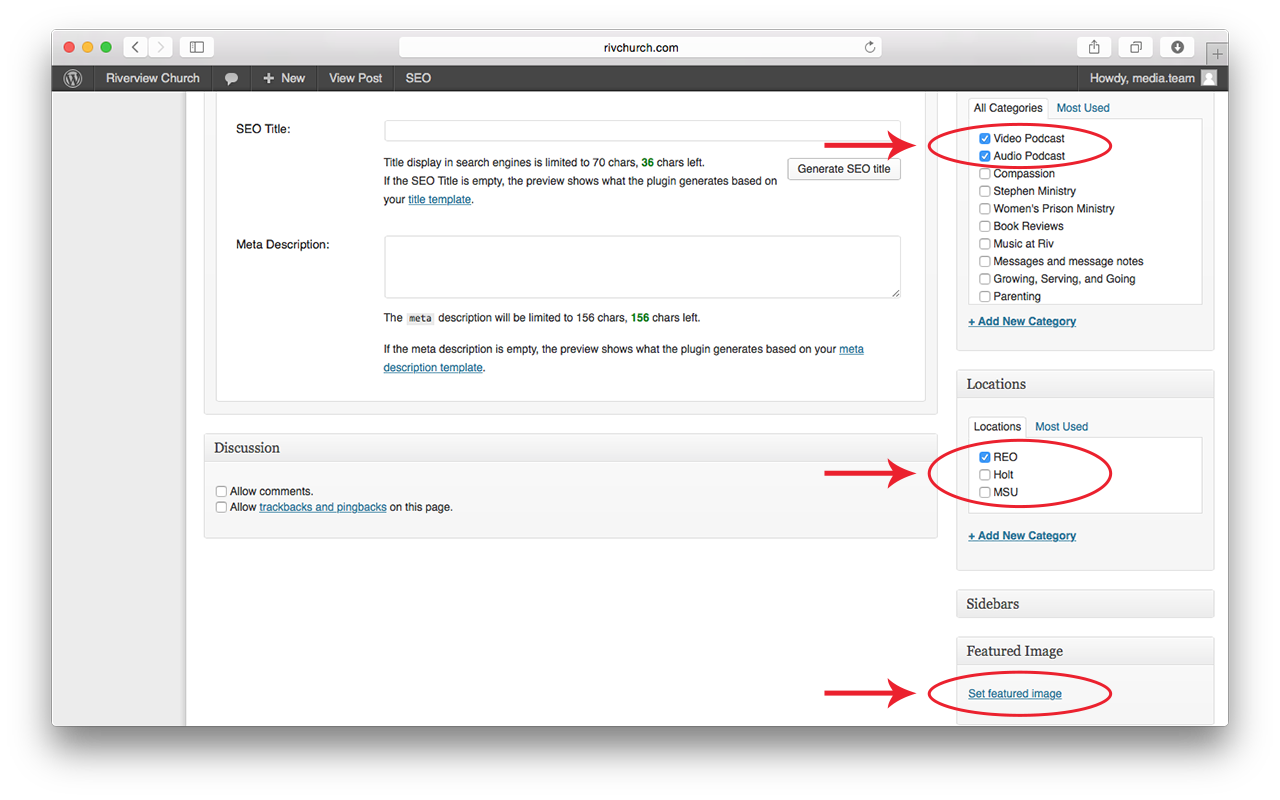
Scroll down & click the Audio & Video Podcast boxes under Categories.
Select the Venue(s) from the Locations list.
Click the Set Featured Image link

Wordpress05

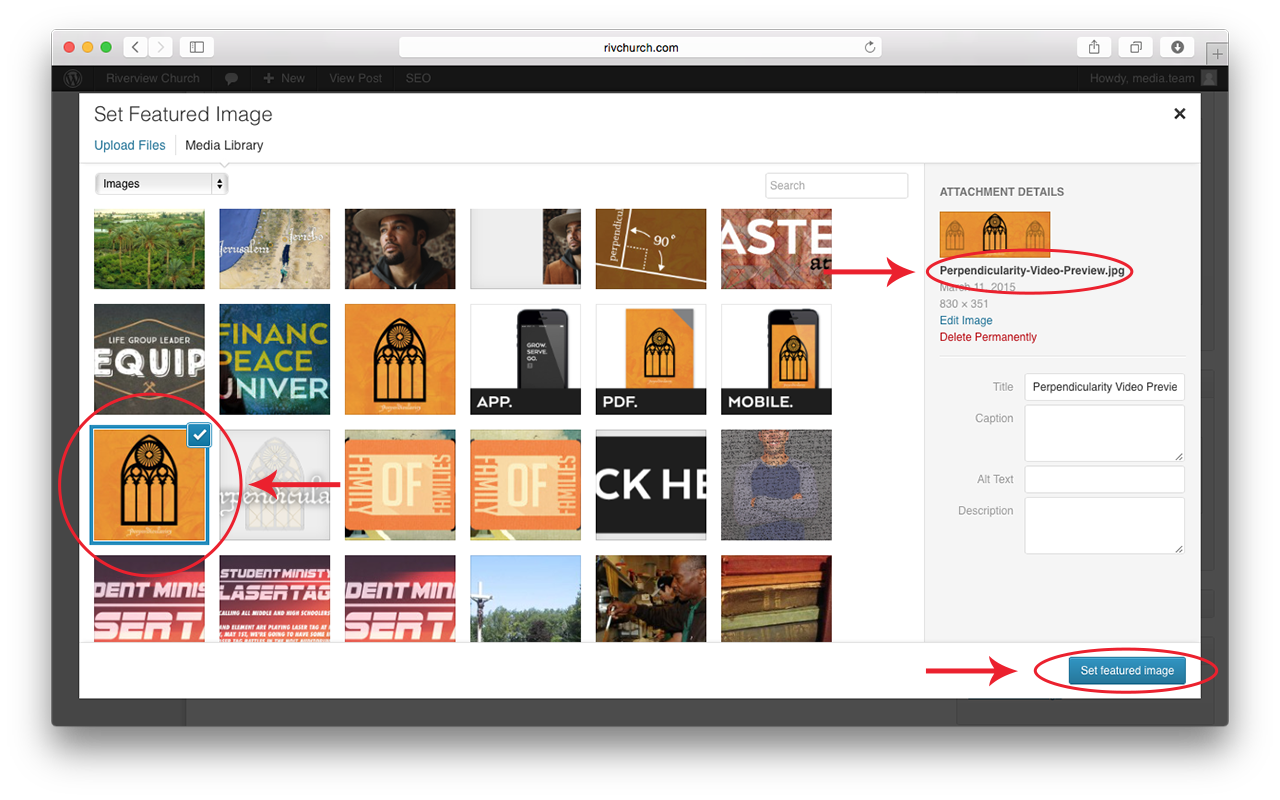
Select the Series Image & click on Set Featured Image. Be sure to use the "Video Preview" version.

Wordpress06

Scroll to the top of the page & click the Publish button.

Check the Audio & Video Players to make sure the links are working.
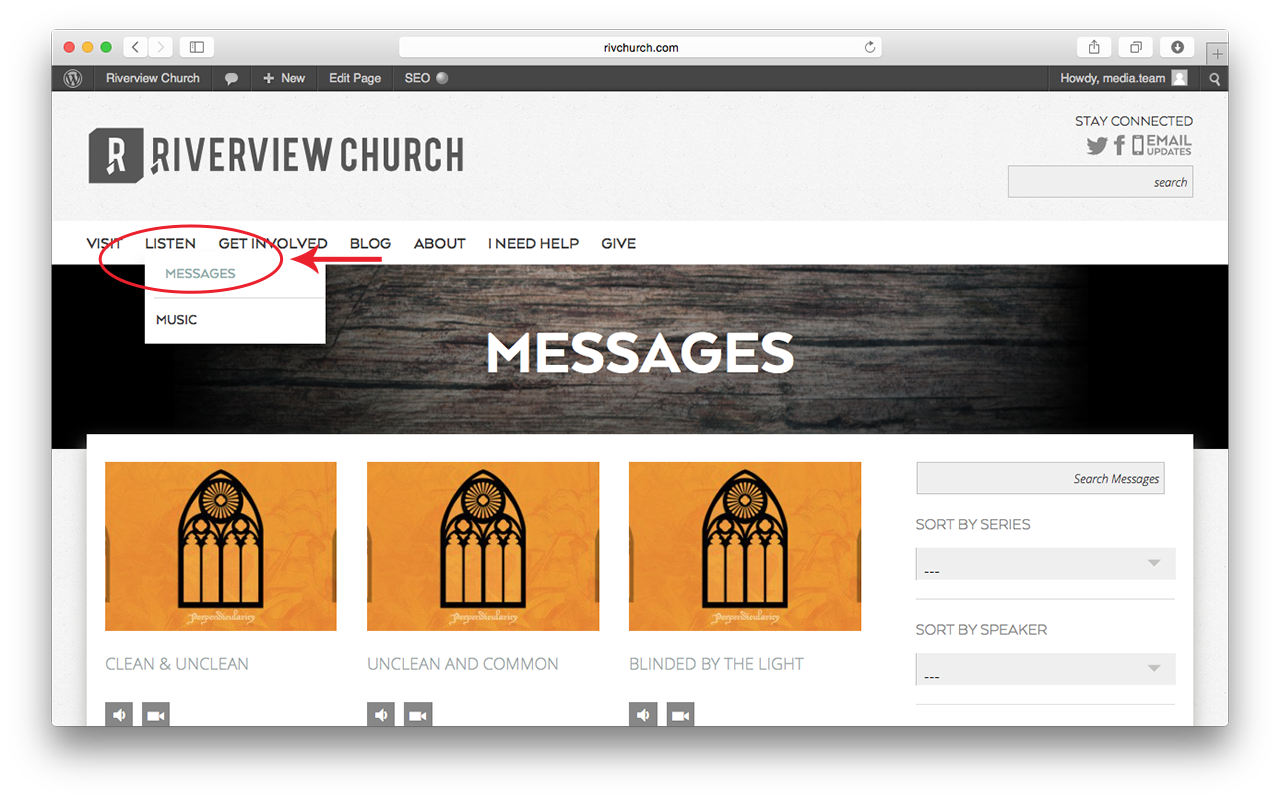
Open the rivchurch.com website & click on Listen>Messages at the top of the page.
Click on the Message you just posted.

Wordpress07

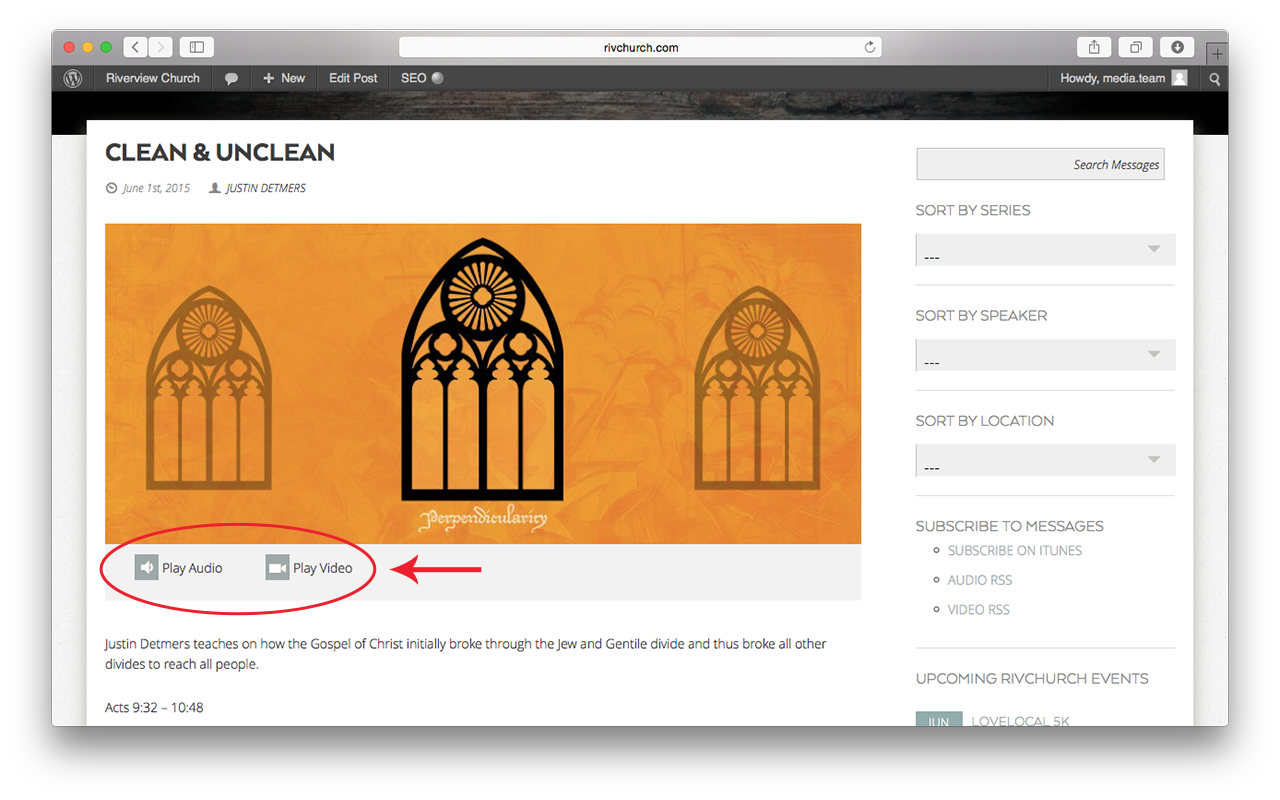
Click on the Play Audio & Play Video buttons to open the players.

Wordpress08

Notes:

For the first message in a series, if the series name isn’t in the list, create a new series by selecting Sermons>Series from the Dashboard menu.
If the person teaching isn’t in the Speakers list, add a new speaker by selecting Sermons>Speakers from the Dashboard menu.

Sony Camera Workflow

There’s a small change to the video editing workflow now that we have a new camera to record the message.  We will no longer be doing imports directly from the camera.  Here’s what you need to know.

 1. Video is now recorded on an SSD.  Make sure the until is off before pulling the drive.  (There are 4 green lights that always stay on, but the power button should not be lit)
2. Pull the drive out of the left side of the recorder.
3. Carefully plug the drive into the Sata Dock to the right of the iMac.
4. Open iMovie
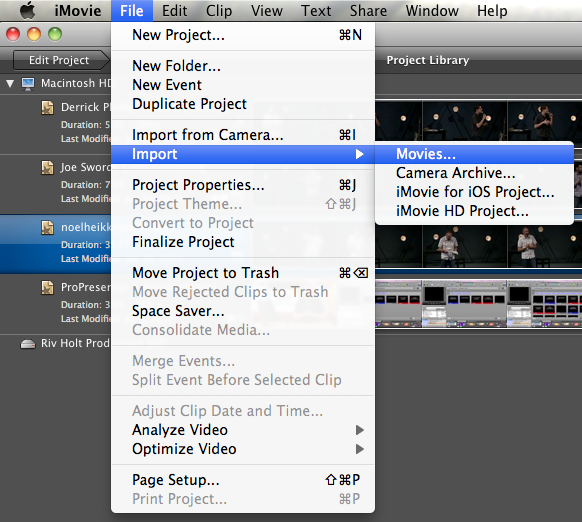
5. Select File -> Import -> Movies…
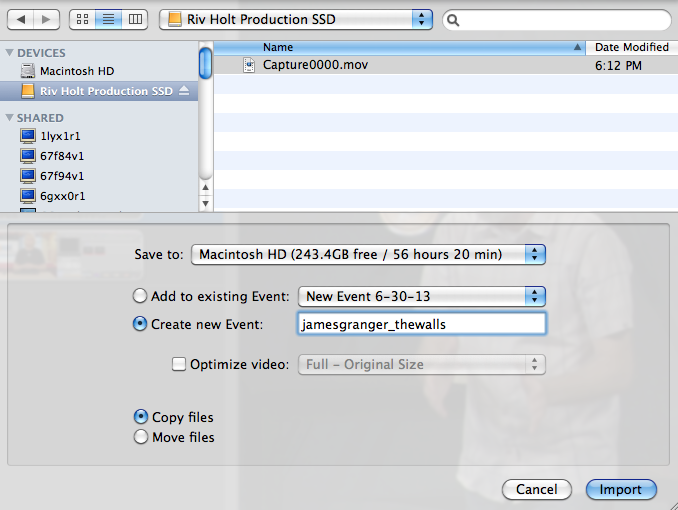
6. Select Riv Holt Production SSD Device (Top left corner)
7. There should be 3 files starting with the suffix 0000.mov.  0000.mov is Saturday Night, 0001.mov is Sunday 930, 0002.mov is Sunday 1130.
8. Click the Create New Event and Copy Files Options, Name the Event, and Click Import.
Blackmagic SSD Recorder

Blackmagic SSD Recorder

Seagate SSD Dock

Seagate SSD Dock

SSD in Dock

SSD in Dock

iMovie Import Movie

iMovie Import Movie

iMovie Select SSD Capture

iMovie Select SSD Capture