2nd Service at REO

If you have not yet heard the news, we’re excited to announce that we’re adding a 2nd service at REO! After many weeks of overflowing capacity, we’re excited to open up additional space to reach more people in REO town with this 2nd service.

Starting on February 8th our new service times will be 9:30ish and 11:30ish.

For all production volunteers this now means a call time of 8:30am, and prayer/production meeting at 9am.  We ask that you commit to both services, so plan on serving from 8:30am to 1pm-ish on Sundays.  Please adjust your calendars accordingly!

Thank you all for your service in helping the gospel go forward in Lansing!

Camera Post Service Saturday

We’re now adding a few post service procedures for camera on Saturday night. These steps will make sure that the recorded message from Saturday makes it to our venues on Sunday morning. Here’s the steps to make that possible.

1. Unplug the Westside SSD, REO Town SSD, MSU SSD, and LCCC SSD from the rack mounted Blackmagic Recorders and put them in the Westside, REO Town, MSU, and LCCC SSD cases. Take the SSD cases and place them in the Westside, REO Town, and MSU bins next to the couch in the AV Booth. Leave the LCCC SSD on the counter next to the iMac computers.

SatEve01b

2. Remove the Holt SSD from its case and insert it into the left dock of the top rack mounted Blackmagic Recorder. Remove the Backup SSD from its case and insert it into the left dock of the 2nd rack mounted Blackmagic Recorder. The docks will briefly glow green when the drives have been properly inserted.

Once the SSD drives are taken care of, we need to load the backup message video onto the MSU Message MacBook. There’s a few simple steps to load up the backup video.

1. Turn on the MSU Message MacBook.

camsun_01

2. On the MSU MacBook desktop, double click the Mount Message Video icon.

camsun_02

3. Drag the message video file (Untitled 01.mp4) from the window that pops up to the Video Backup folder. Click Apply, and then Replace on the dialog box that pops up. This should start the copy process, which takes about 3 minutes.

camsun_03
camsun_04

4. When the video file (Untitled 01.mp4) finishes coping on the MSU Background Macbook, click the Apple icon and Shut Down the computer.

camsun_05

5. Put the MSU MacBook in the laptop case located in front of the file cabinet. Press down on the lid and turn the butterfly latches to securely close the case.  Take the laptop case and place it on the floor in from of the file cabinet in the A/V Booth. Someone will come by on Sunday morning to transport the laptops and bin to MSU.

SatEve11a

SatEve12a

That is everything that the venues need for video teaching. Thank you for serving! Double check that the cameras and screens are off, and you’re done.

Headset Microphone Placement Guide

Here is a simple guide to help with placement of headset microphones. Microphone placement for speaking is very important as a small change in placement can make a big difference in the tone of someone’s voice. Spending a few seconds to check and double check proper placement will help achieve the most natural sound, which in turn eases the ability for people to focus in on what is being taught.

The boom should be adjusted to rest as close to the face as possible with the microphone capsule about an inch behind the corner of the mouth. Rotate or bend the microphone boom (depending on model) to achieve optimal positioning. Leave a little room for facial hair as necessary.

Here is an example of what proper microphone placement should look like. A few seconds to make these adjustments will help achieve the best sound quality and make the headsets comfortable to wear.

Proper Placement

Below is a guide of adjustments for the different style of headset microphones at Riv.

The Shure Beta53 headset’s adjustments are as follows.

Shure Beta53 01

Shure Beta53 02

The DPA 4088 headset adjustments include adjusting the headband width, adjusting the boom length, and bending the boom position. Be sure to always bend the boom over a gentle surface, like a finger. The boom can be bent for both horizontal and vertical optimal positioning.

DPA 4088 01

The DPA FIOF10 headset adjustments include the headband width, the boom length, and boom roll. The ear loops should be placed with the flat section fully under AND behind the earlobe.

DPA FIOF10 01

The boom can be adjusted in length by sliding forward or backwards inside the flat section.

DPA FIOF10 02

To reverse which side the boom is on, simply rotate both ear loops.

DPA FIOF10 03

Then roll the boom to the correct position.

DPA FIOF10 04

Setting up a basic mix

To help establish some best practices, I thought I’d share these few steps to getting at least half way to a good sounding mix.

1. Start with your inputs. Make sure everything is plugged in correctly. Identify devices that need phantom power. Check good, close microphone placement for instruments and vocals. Remember that good input = good output. You can not fix a bad sounding input, or poorly placed microphone from behind the FOH desk. Make sure to check your monitors and ears are plugged in correctly too.

2. Check your patching and assignments. Before everything else, confirm that your inputs are patched to the correct channels, outputs are patched to the correct aux’s, and any VCA or group assignments are correct. Getting this step out of the way first ensures that you can spend time crafting your mix, not stumbling over why levels aren’t balanced, or musicians can’t hear properly.

3. Gain structure, gain structure, gain structure! I can’t tell you how many times I’ve heard problems with a mix that could be easily fixed with proper gain structure. Before setting your monitor or main mixes, make sure to get the gain structure correct. This means checking and double checking your preamp levels, matching instrument/vocal gains, and being consistent across the board. Aim for -3dBu levels on everything to start. Set all the input faders at 0dB and bring up the master to 0dB. Match the levels of your subgroups or VCA’s. You should have a good balance of everything. If you don’t, adjust the preamps of each input until they balance. Be sure to check gain before and during rehearsal. Sometimes things change after a song or 2. Make corrections as necessary.

4. Set your monitor mixes. Spend time talking with the musicians to make sure they have a good mix so they know what they need to play. Great sound comes from great performances. Do whatever you can to help the musicians play their best. Remember, a great monitor mix doesn’t need to include everything. The less instruments you put in a mix, the more level you can give of those few instruments. Make sure to leave the house on while setting monitor levels. Musicians will hear some of the house mix, which decreases the need of monitor level.

5. Set your house mix. Balance levels between instruments. Know who leads what songs, and make that the loudest vocal / instrument. Don’t be afraid to make changes. Use EQ, gating, and compression to help improve the sound of each input, and how those inputs interact with each other. Be sure to start from the bottom up. Set your drums, bass, and rhythm instruments first. Add lead instruments like guitars and keyboards. Finish with vocals so they stay on top of everything else.

Following these 5 steps will get you up and running with a decent mix. Additional time spent on EQ, compression, and effects can round everything out nicely. Don’t forget however to establish these 5 things first.

REO Venue Launch

This has been an exciting year at Riv with the opening of our 3rd location in the Lansing area. After a few delays getting approval to purchase the old Cadillac club, we were able to jump into the remodel right at the beginning of 2014. We knew from the start we were going to have to get a little creative with the design of the space because of the limited trim height in the room. We also wanted to provide a way to connect with the teaching via video that felt natural in a smaller space. The ability to accommodate our largest bands at Riv and provide quality sound for worship was also important. This lead in some new directions that we hadn’t taken with our other venues in the past.

First the space was drawn up in sketchup to provide a 3D model of what it would look like when finished.

REO 01

Next we planned out the lighting, video, and audio rigging relaying mostly on a 2″ pipe grid. This was done to accommodate flexibility in set design, stage lighting, and keeping the fixtures as close to the finished ceiling as possible.

REO 02

After the rigging was planned, we could mock up a basic lighting plot.

REO 03

Once we had the rigging and electrical figured out, it was on to plotting out all the cabling.

REO CAT6 and DMX Plan

And the equipment racks.

REO 05

Then it was finally time to start putting it all together. We had to wait for the new stage and walls to be framed in.

REO 06

Once everything was framed and the drywall was up, it was time to start assembling the pipe grid.

REO 07

Followed by pulling a few miles of cable throughout the building and into the equipment racks.

REO 08

And finally connecting up all the equipment.

REO 09

The last piece came together 2 days before opening.

REO 10

The finished venue looked and sounded great for opening on Easter 2014.

REO 11

And now people can worship and hear the Gospel every week in REO Town!

REO 12

Thanks to everyone who helped with the construction, cable pulling, termination, and assembly of equipment! Easter was a huge success, we had 810 people attend REO for our opening weekend. We never could have made our opening date without all your help!

Media Express

With the addition of our 3rd venue, we’re switched to using the iMac to capture from Sony lock down camera instead of the JVC IMAG camera. There is a new capture software that accompanies this switch. This does NOT replace the recording on the Blackmagic SSD decks, so please continue to do that as well.

Here’s what you need to know:

  • To record on the iMac, open the Media Express program in the dock. (Round stopwatch icon)
  • Click the “Log and Capture” tab at the bottom of the preview window.
  • Click the “Capture” button during the last song before the message.
  • The display should change to “Capturing to Disk”
  • After the prayer at the end of the message, Click the “Capture” button to stop recording.
  • The program automatically saves the recording, so there is no save option.

MediaExpress

That’s all for the iMac recording now. If you have any questions, please contact [email protected].

Sola13

After almost a year of planning Sola13 finally came together. I’m so thankful for everyone that put in the long hours and gave up their weekend to help make this conference a reality. It was by far the largest conference we’ve done to date. Here’s some of the stats for Sola13.

11 months of planning
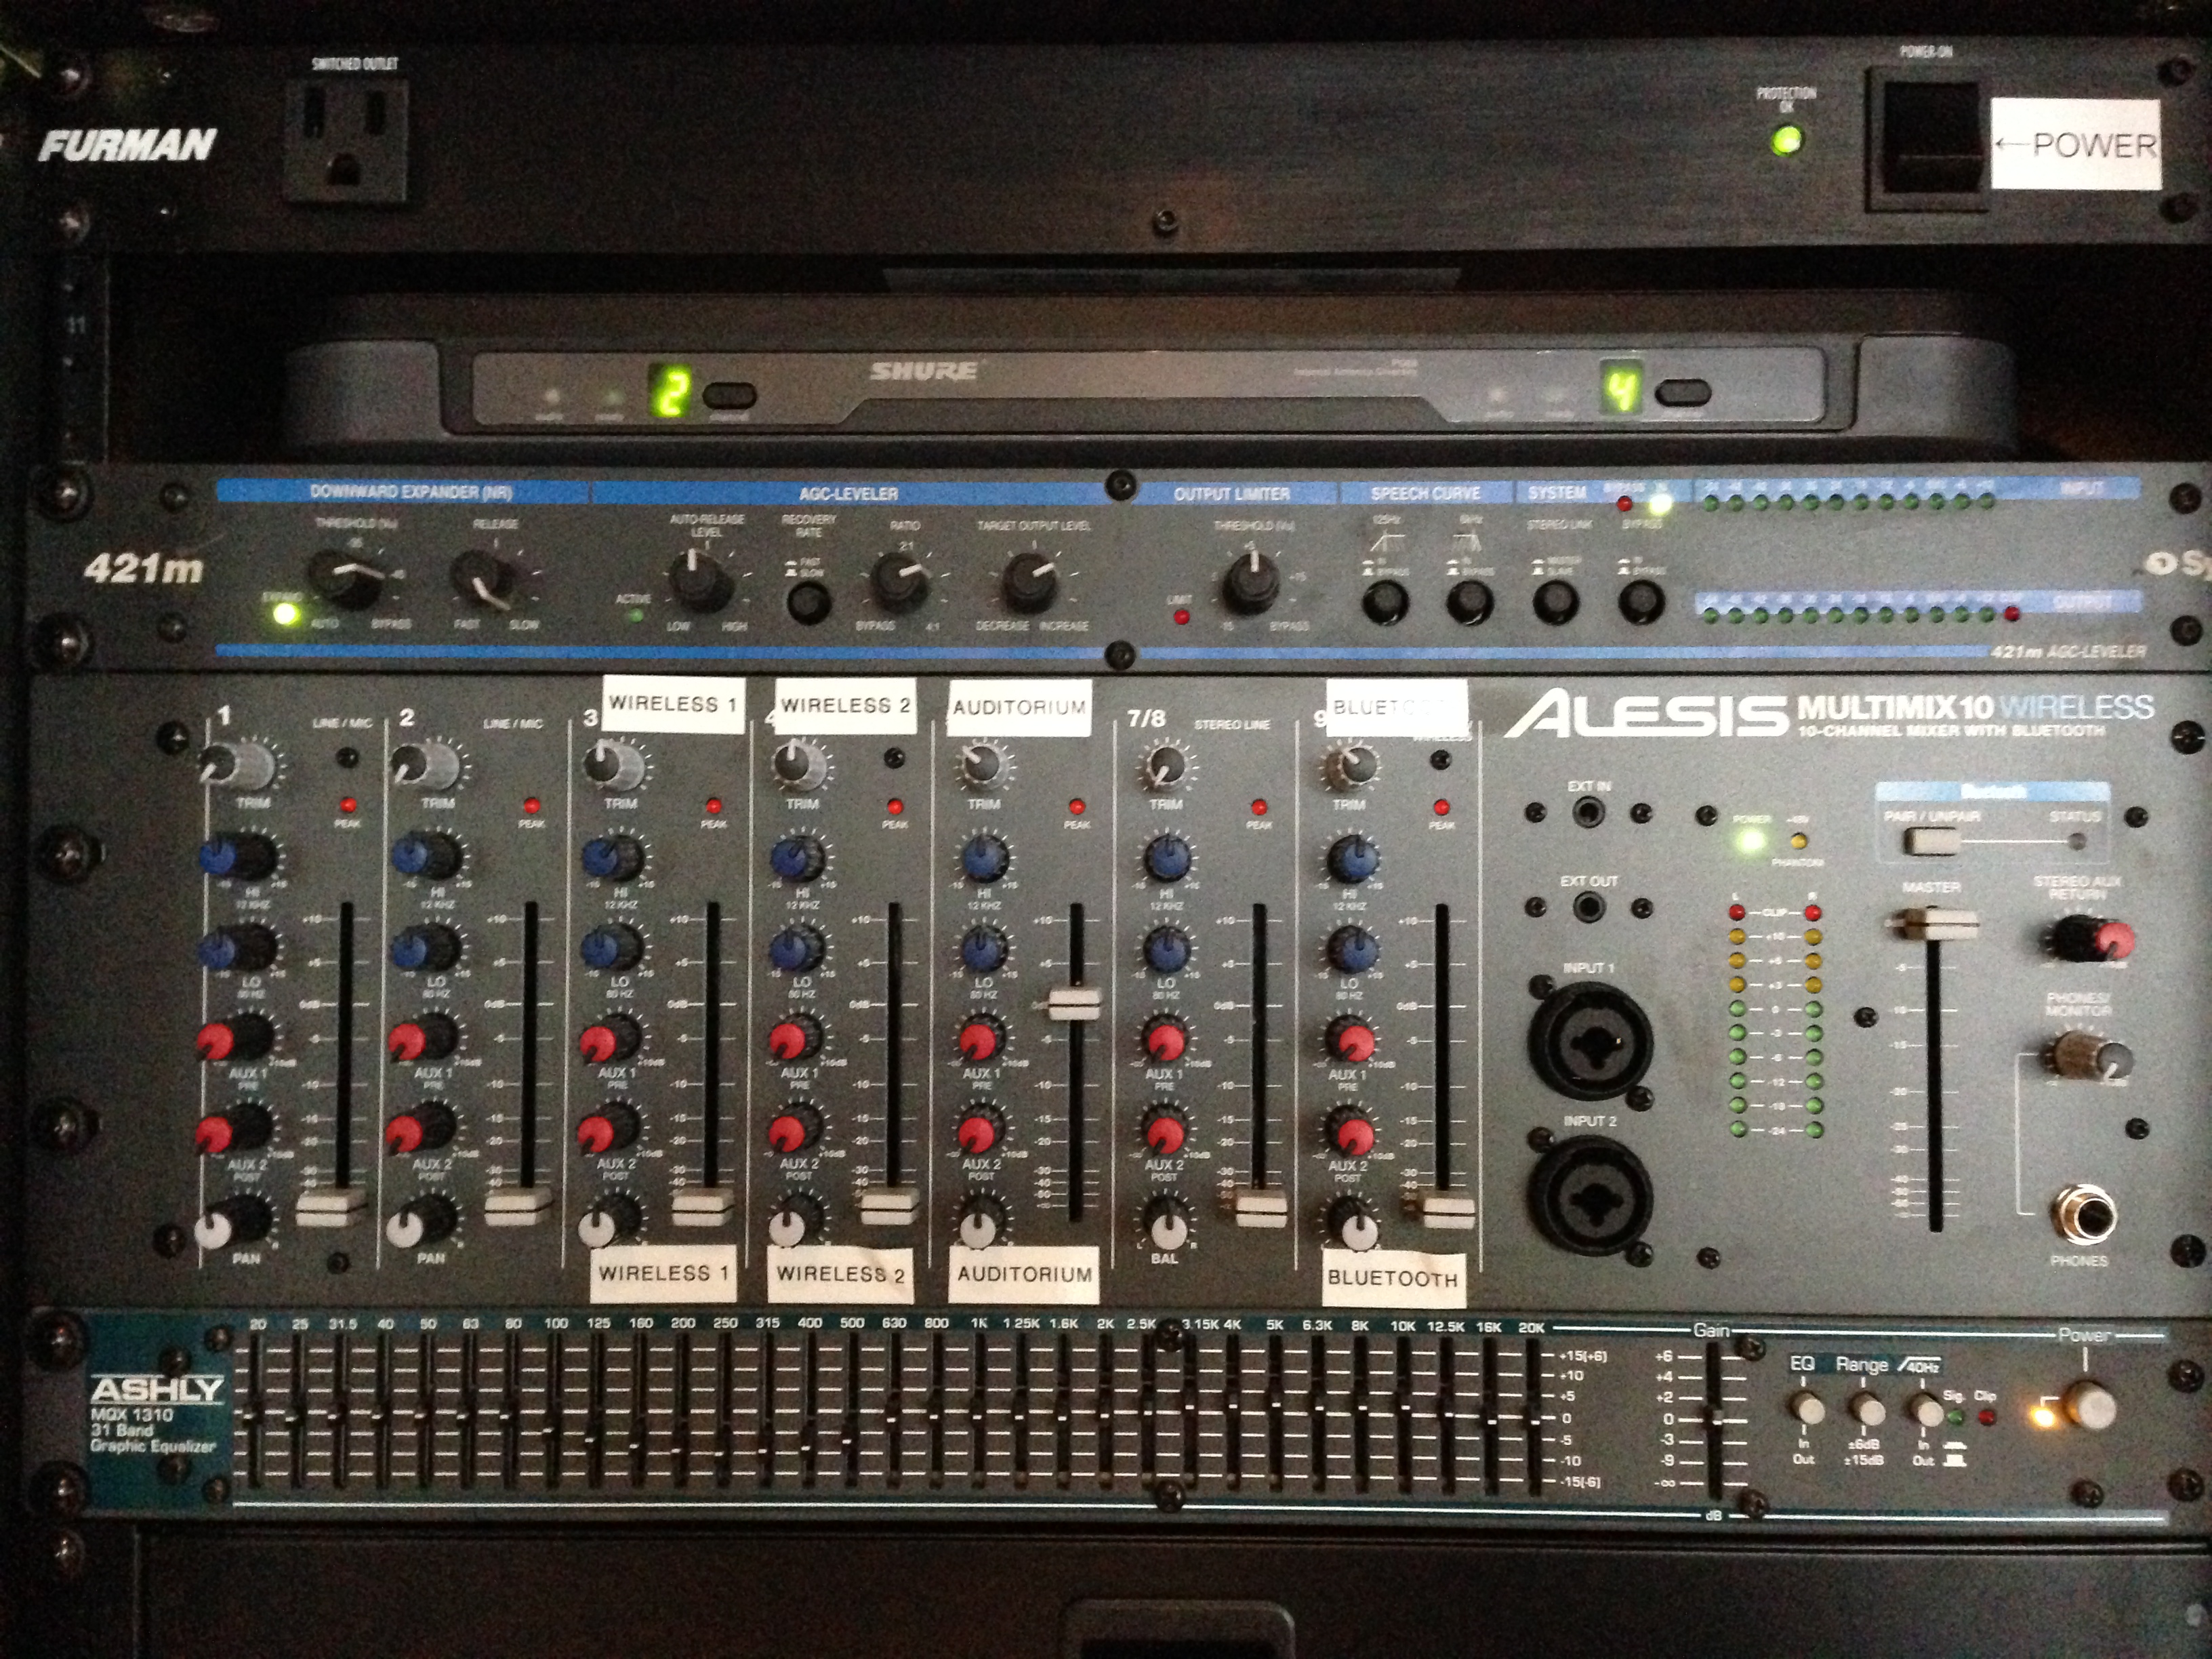
3 truck loads of gear
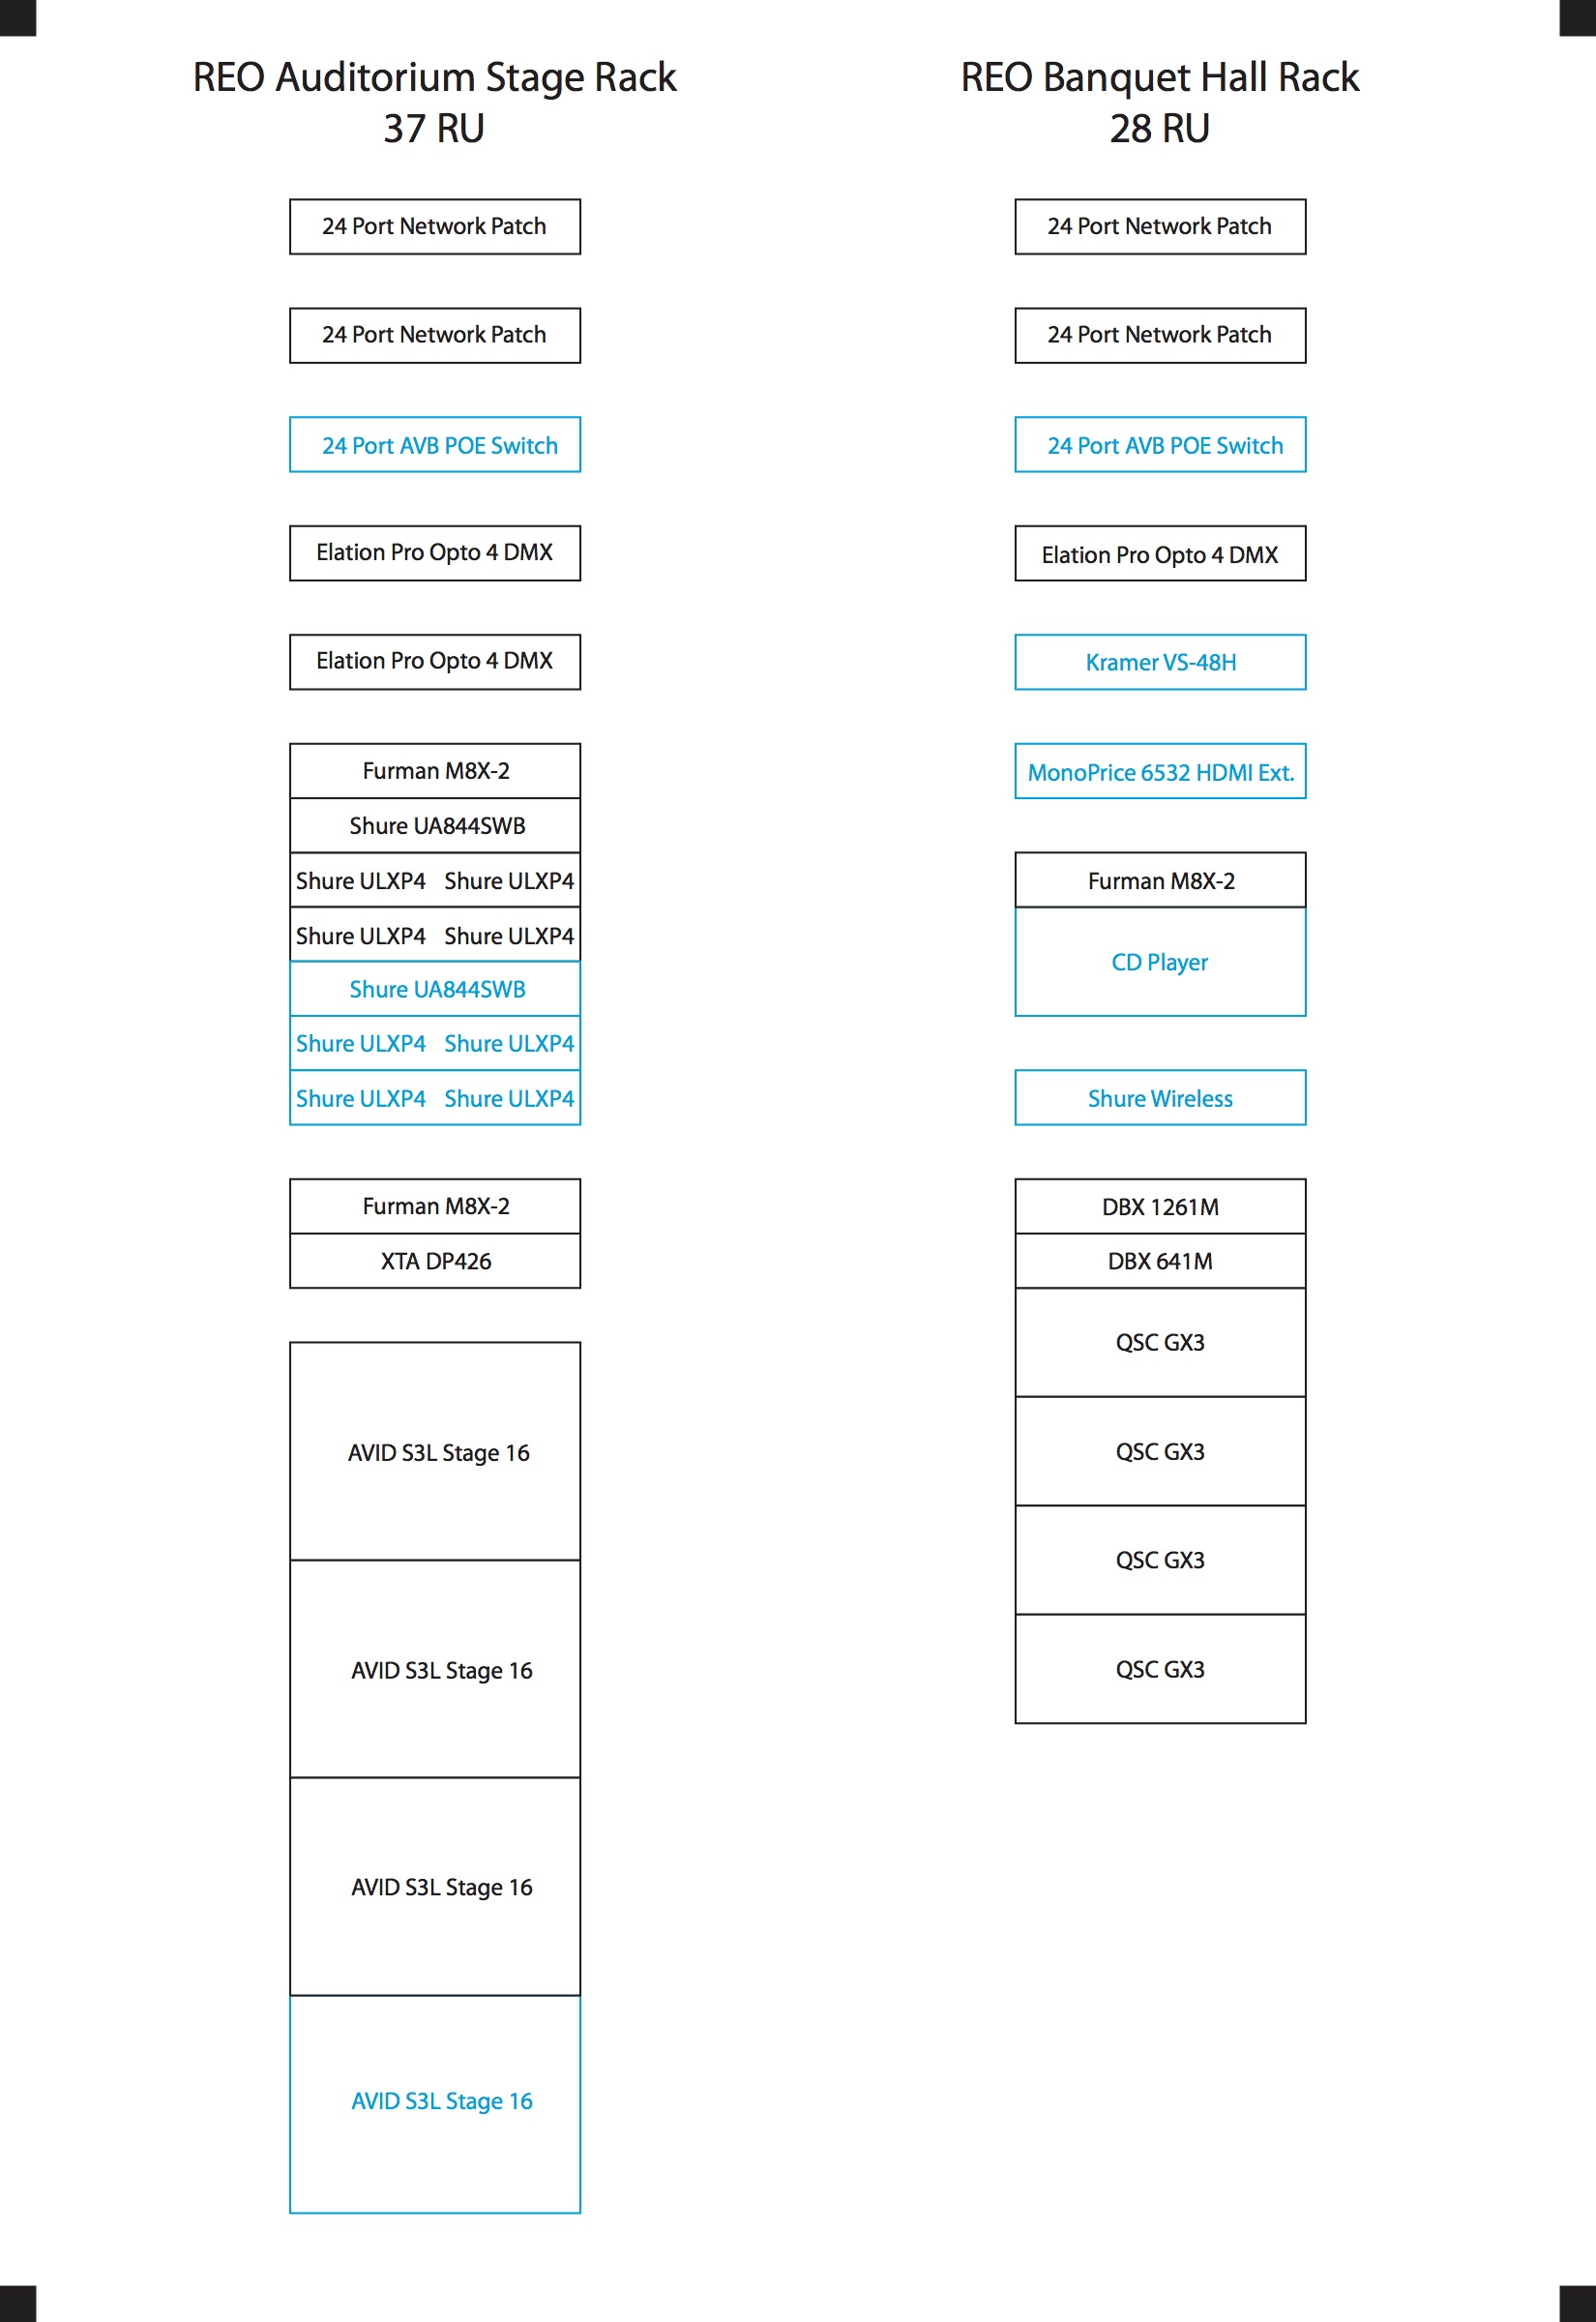
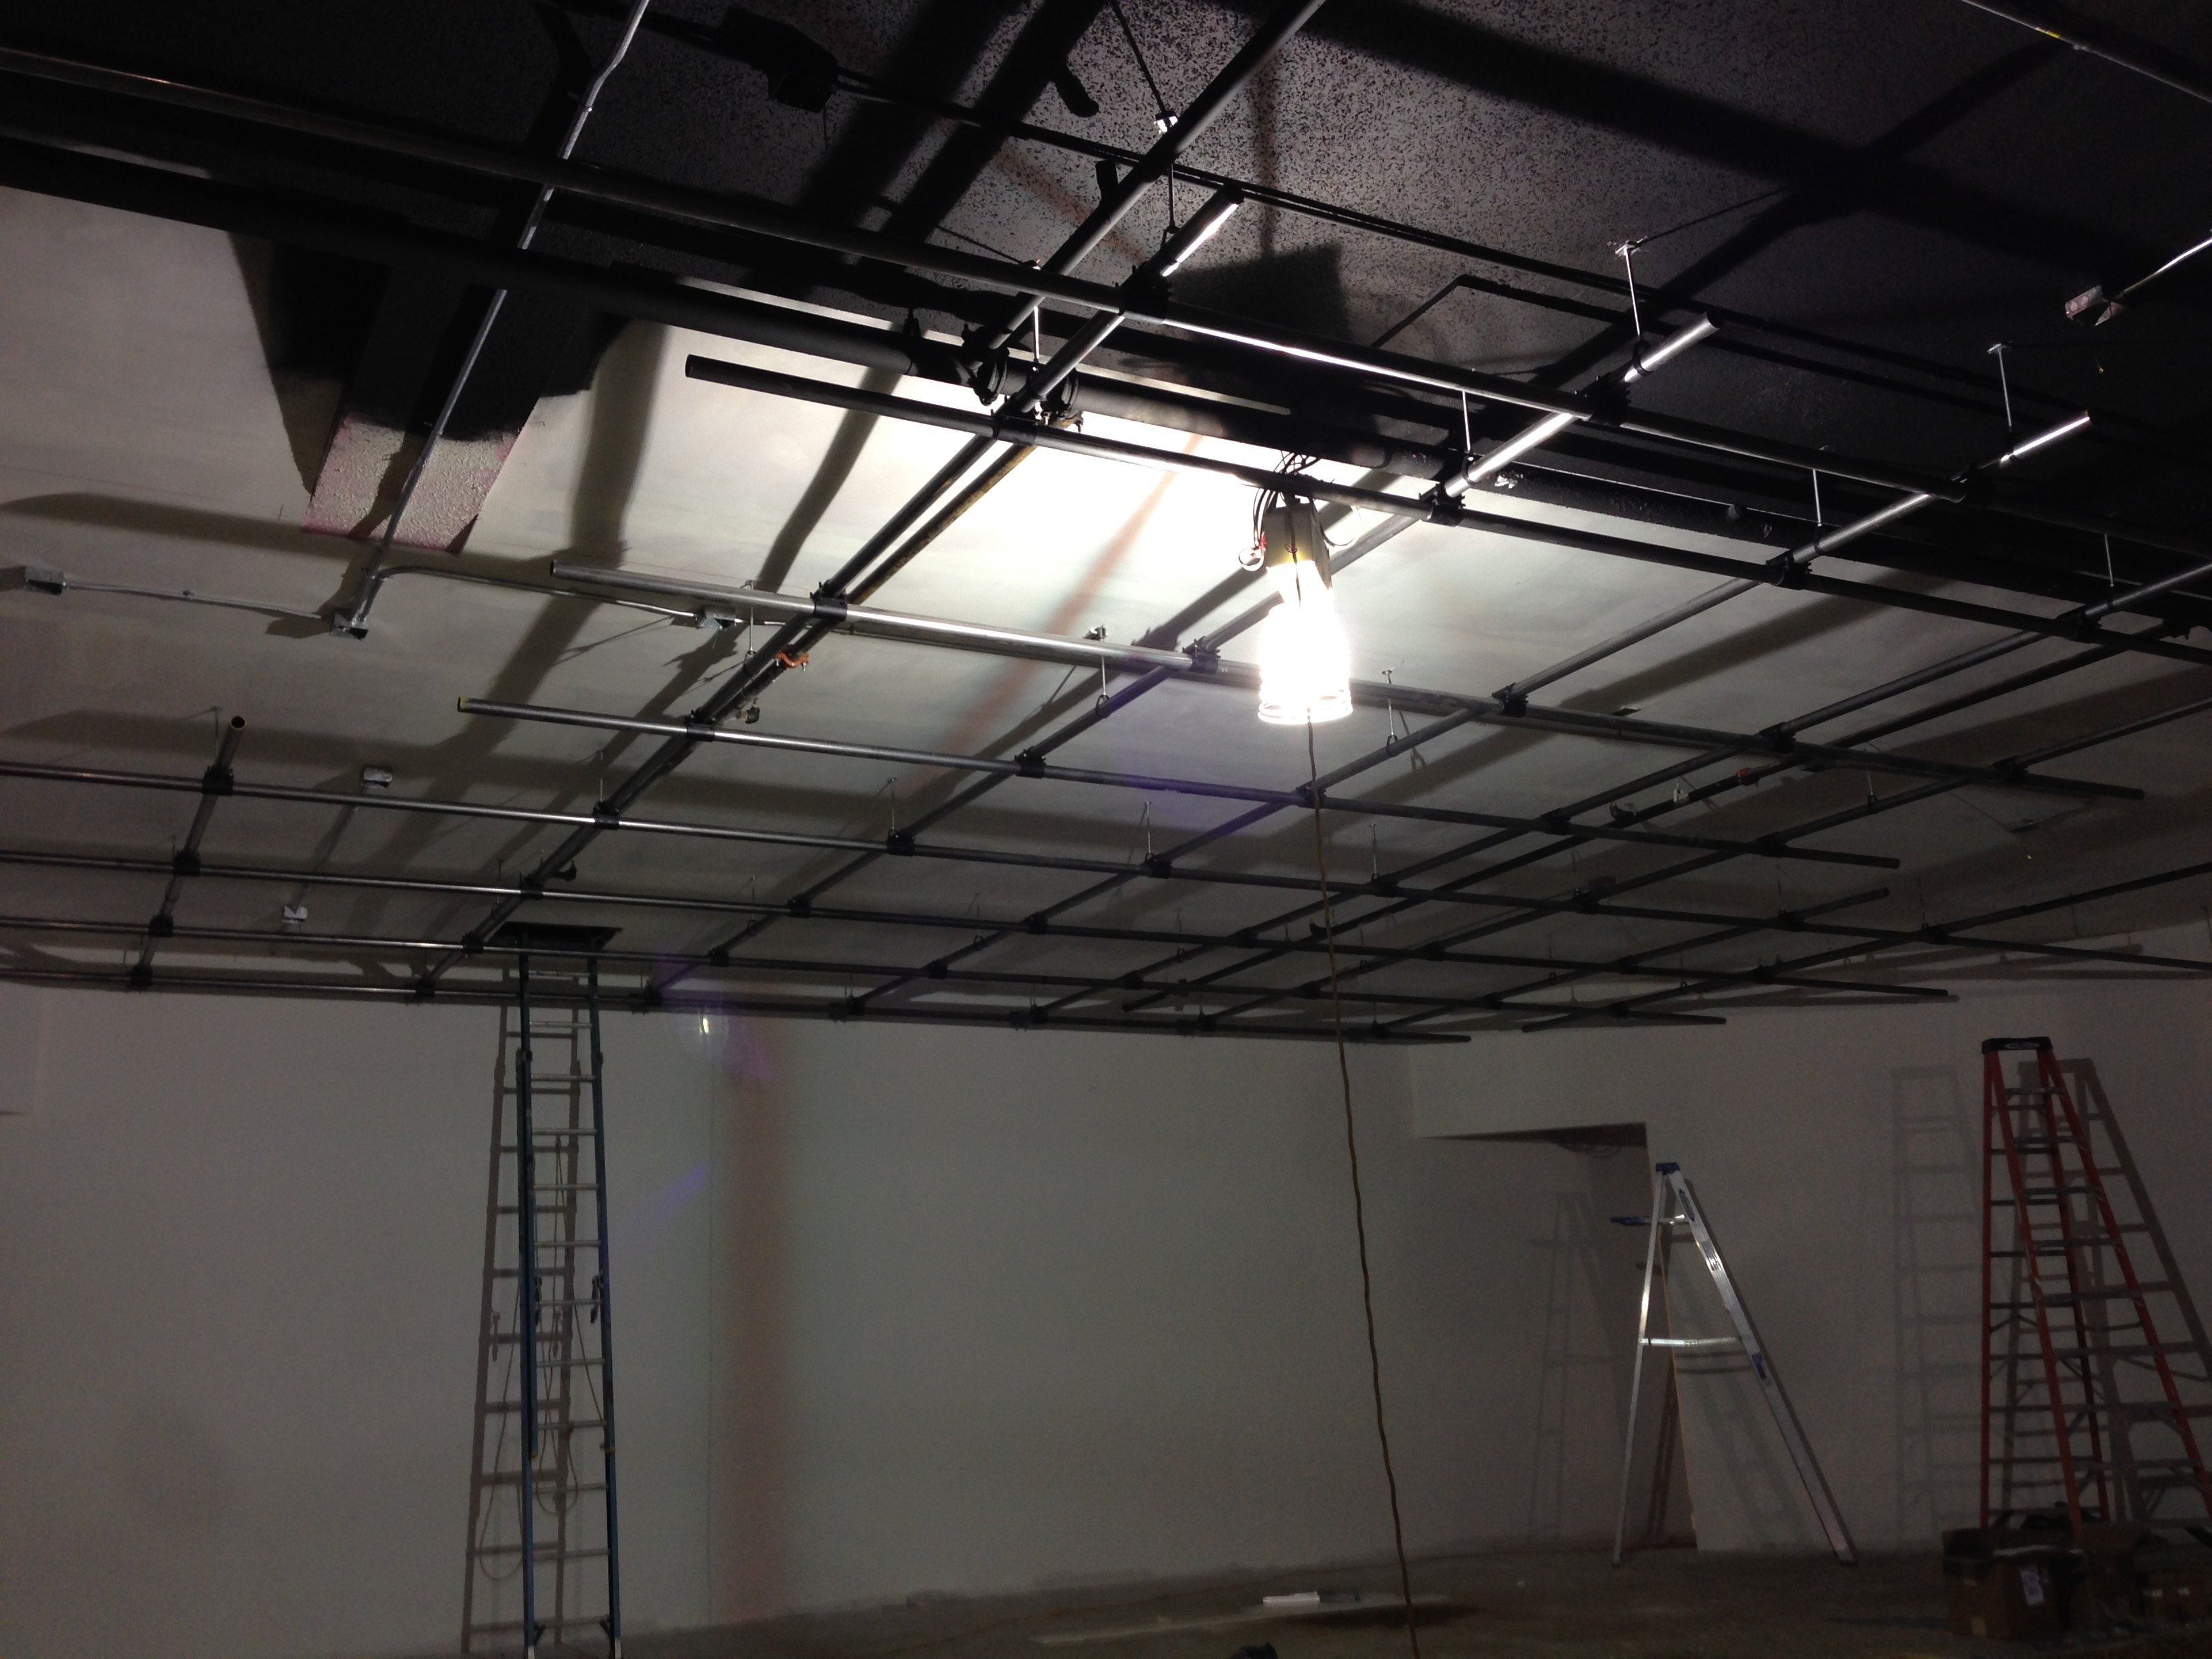
28 rigging points
120 man hours of setup
15 person live production crew
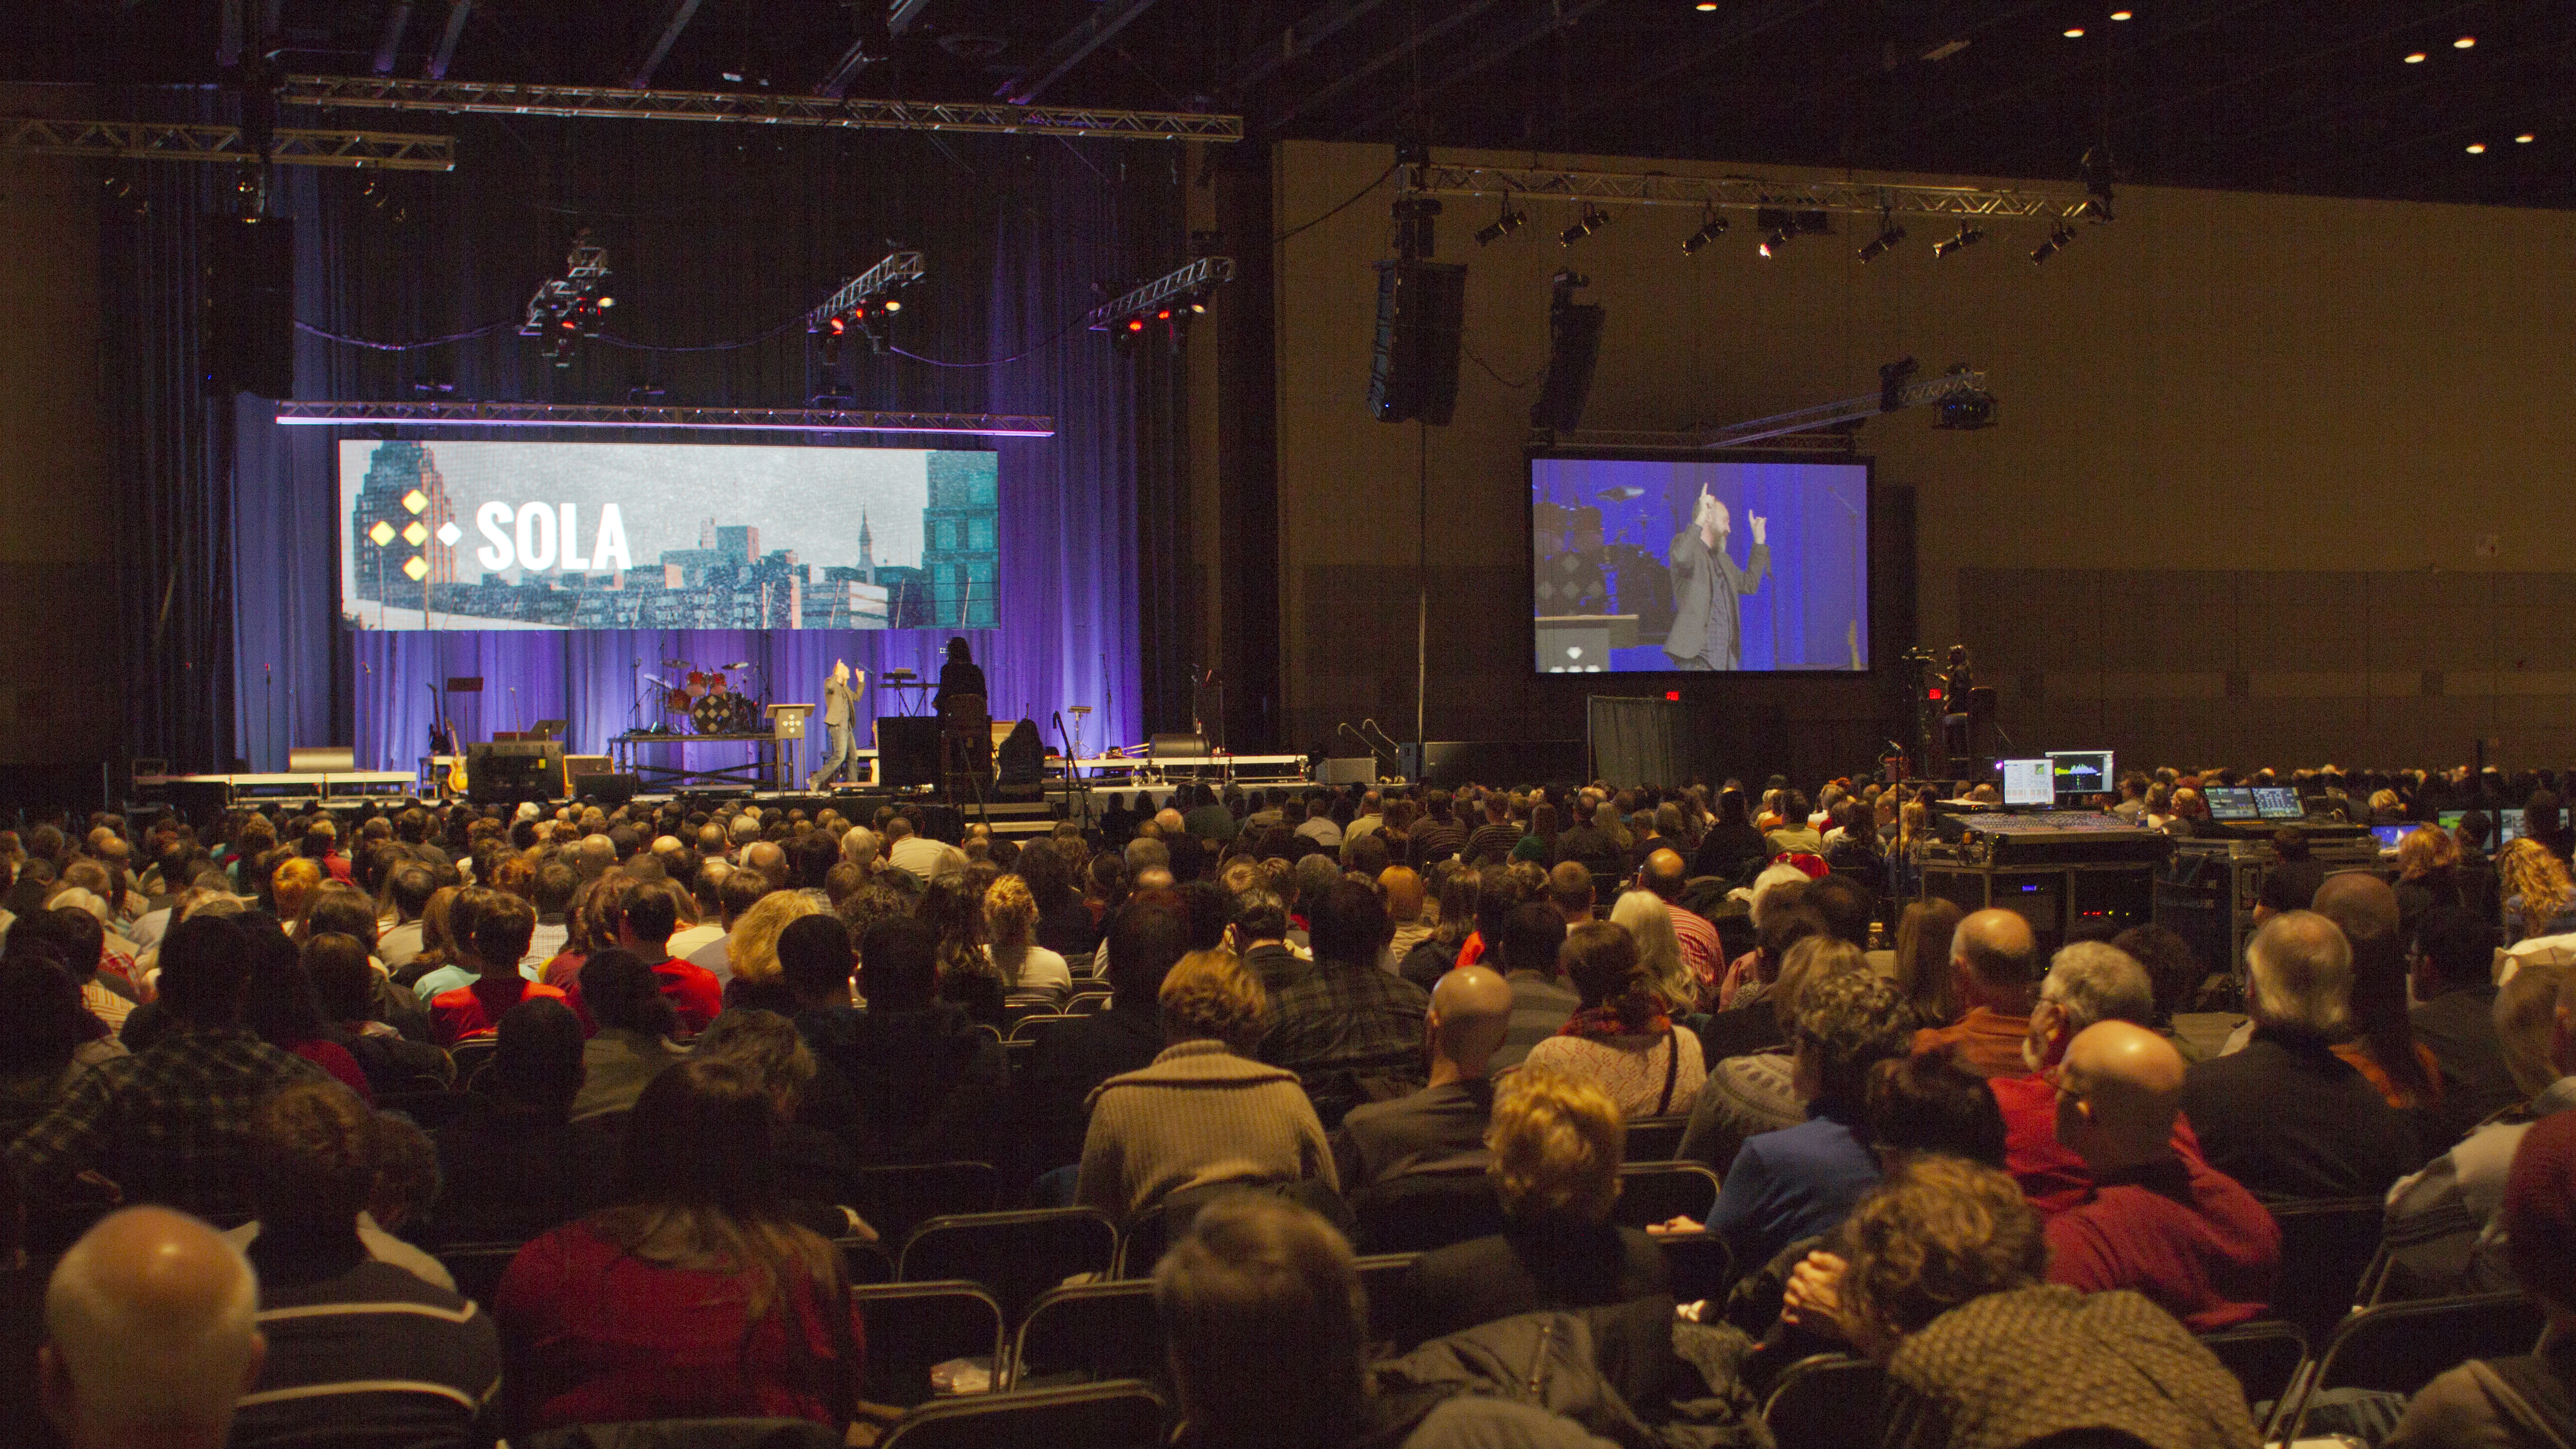
3000 in attendance
1100 watched live online
People in 47 states and 24 countries joined the simulcast

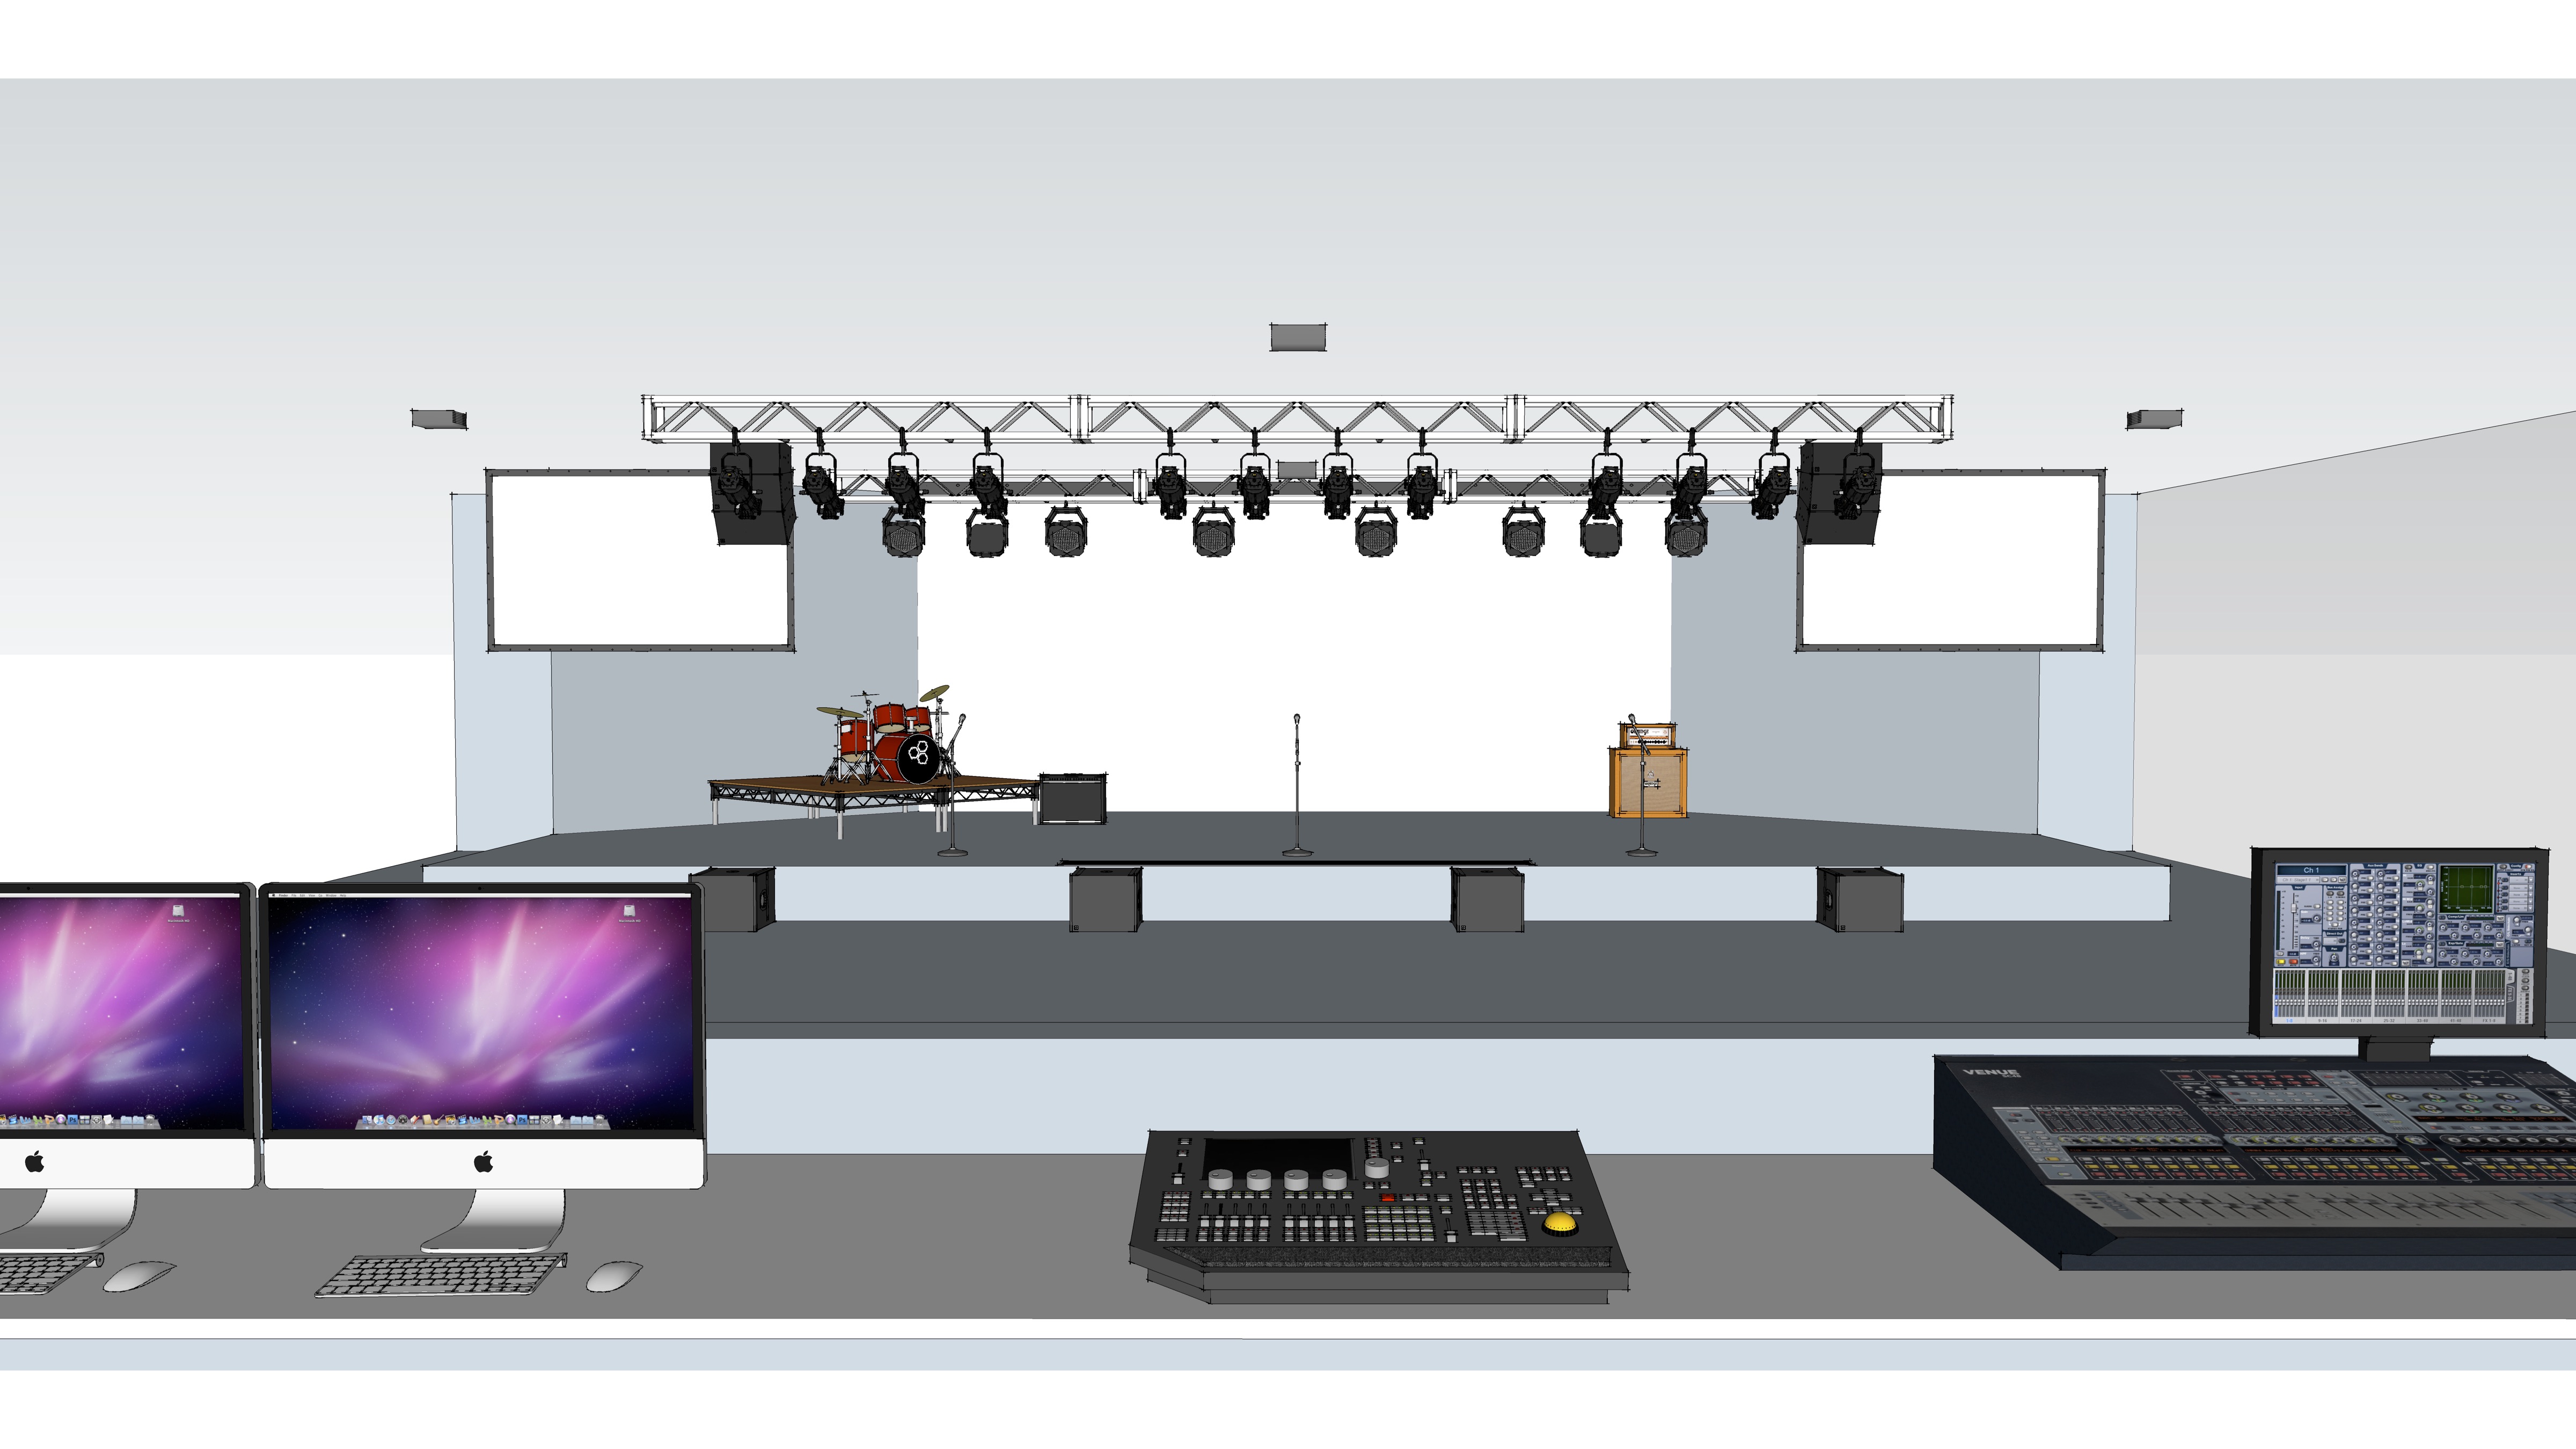
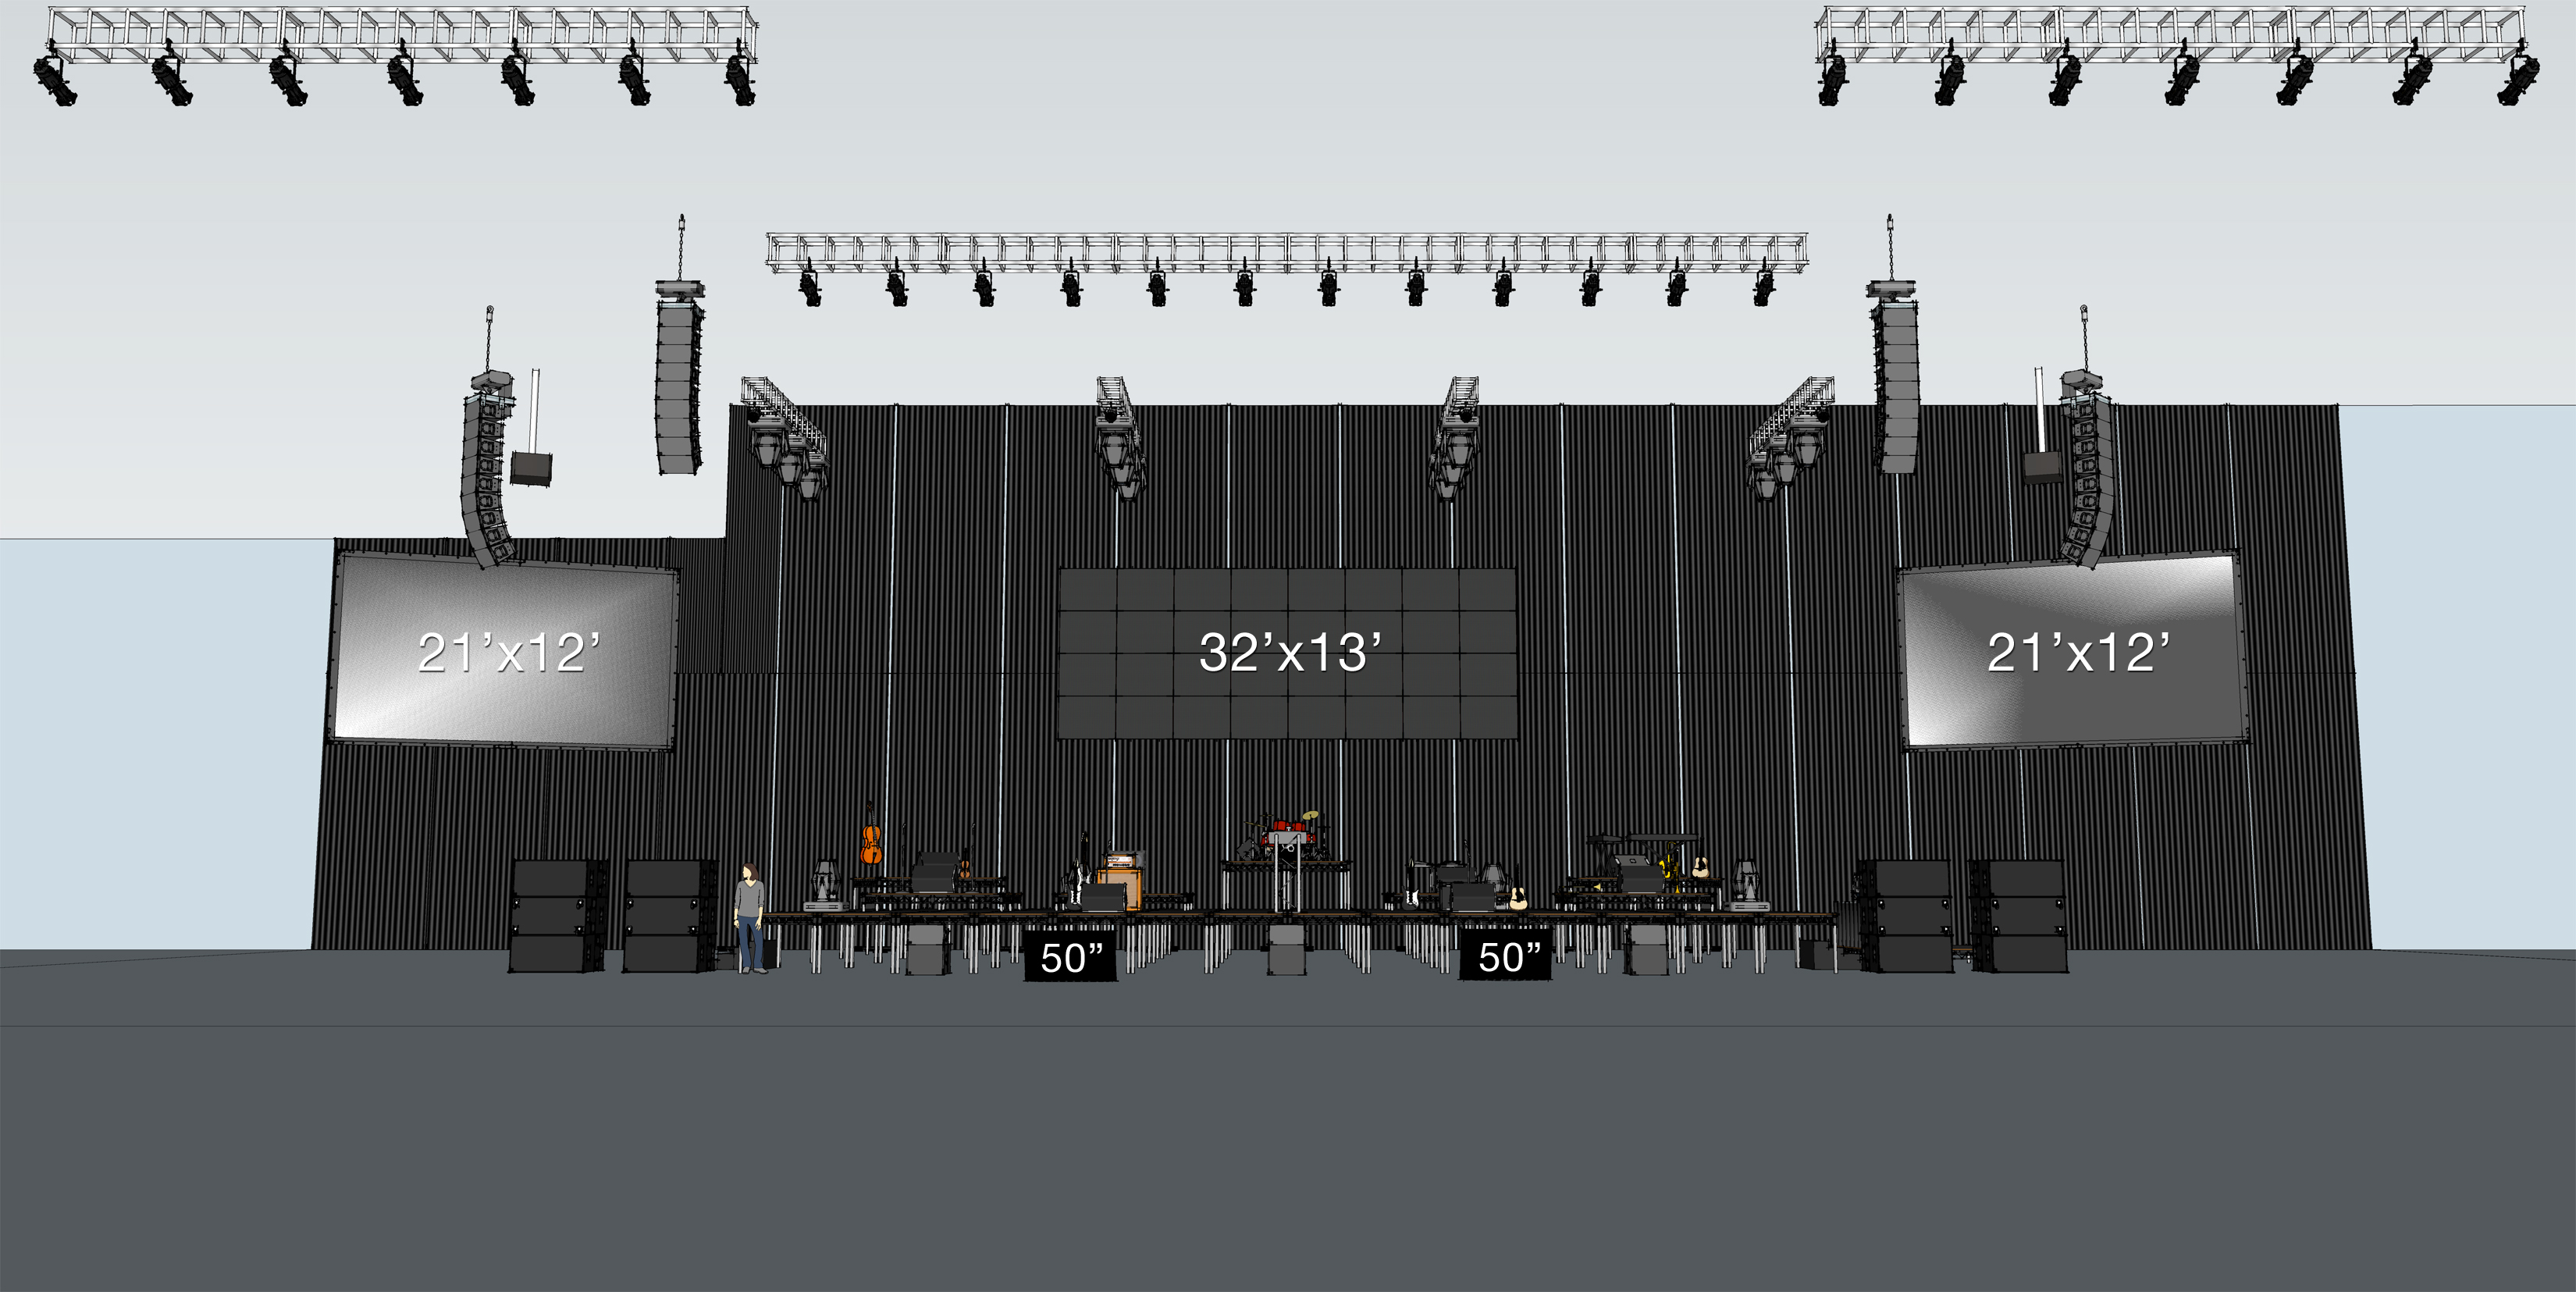
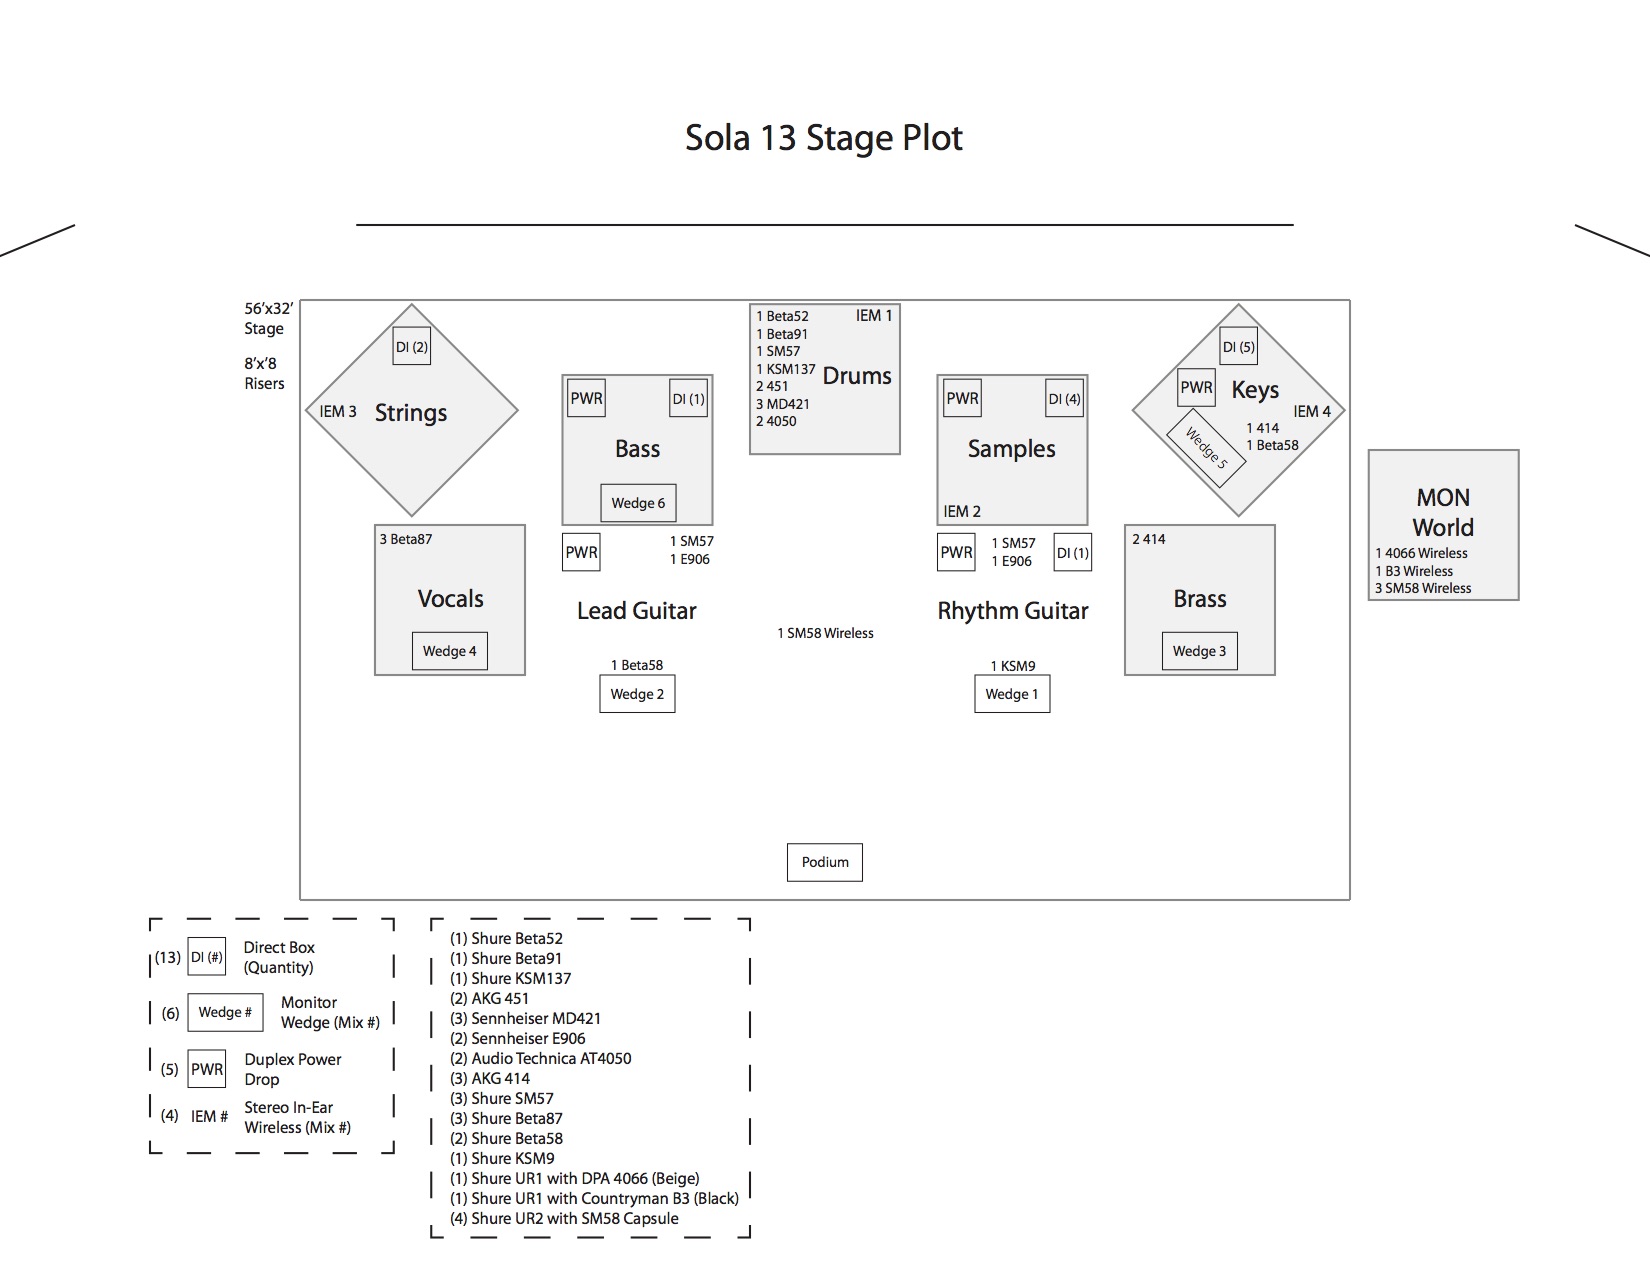
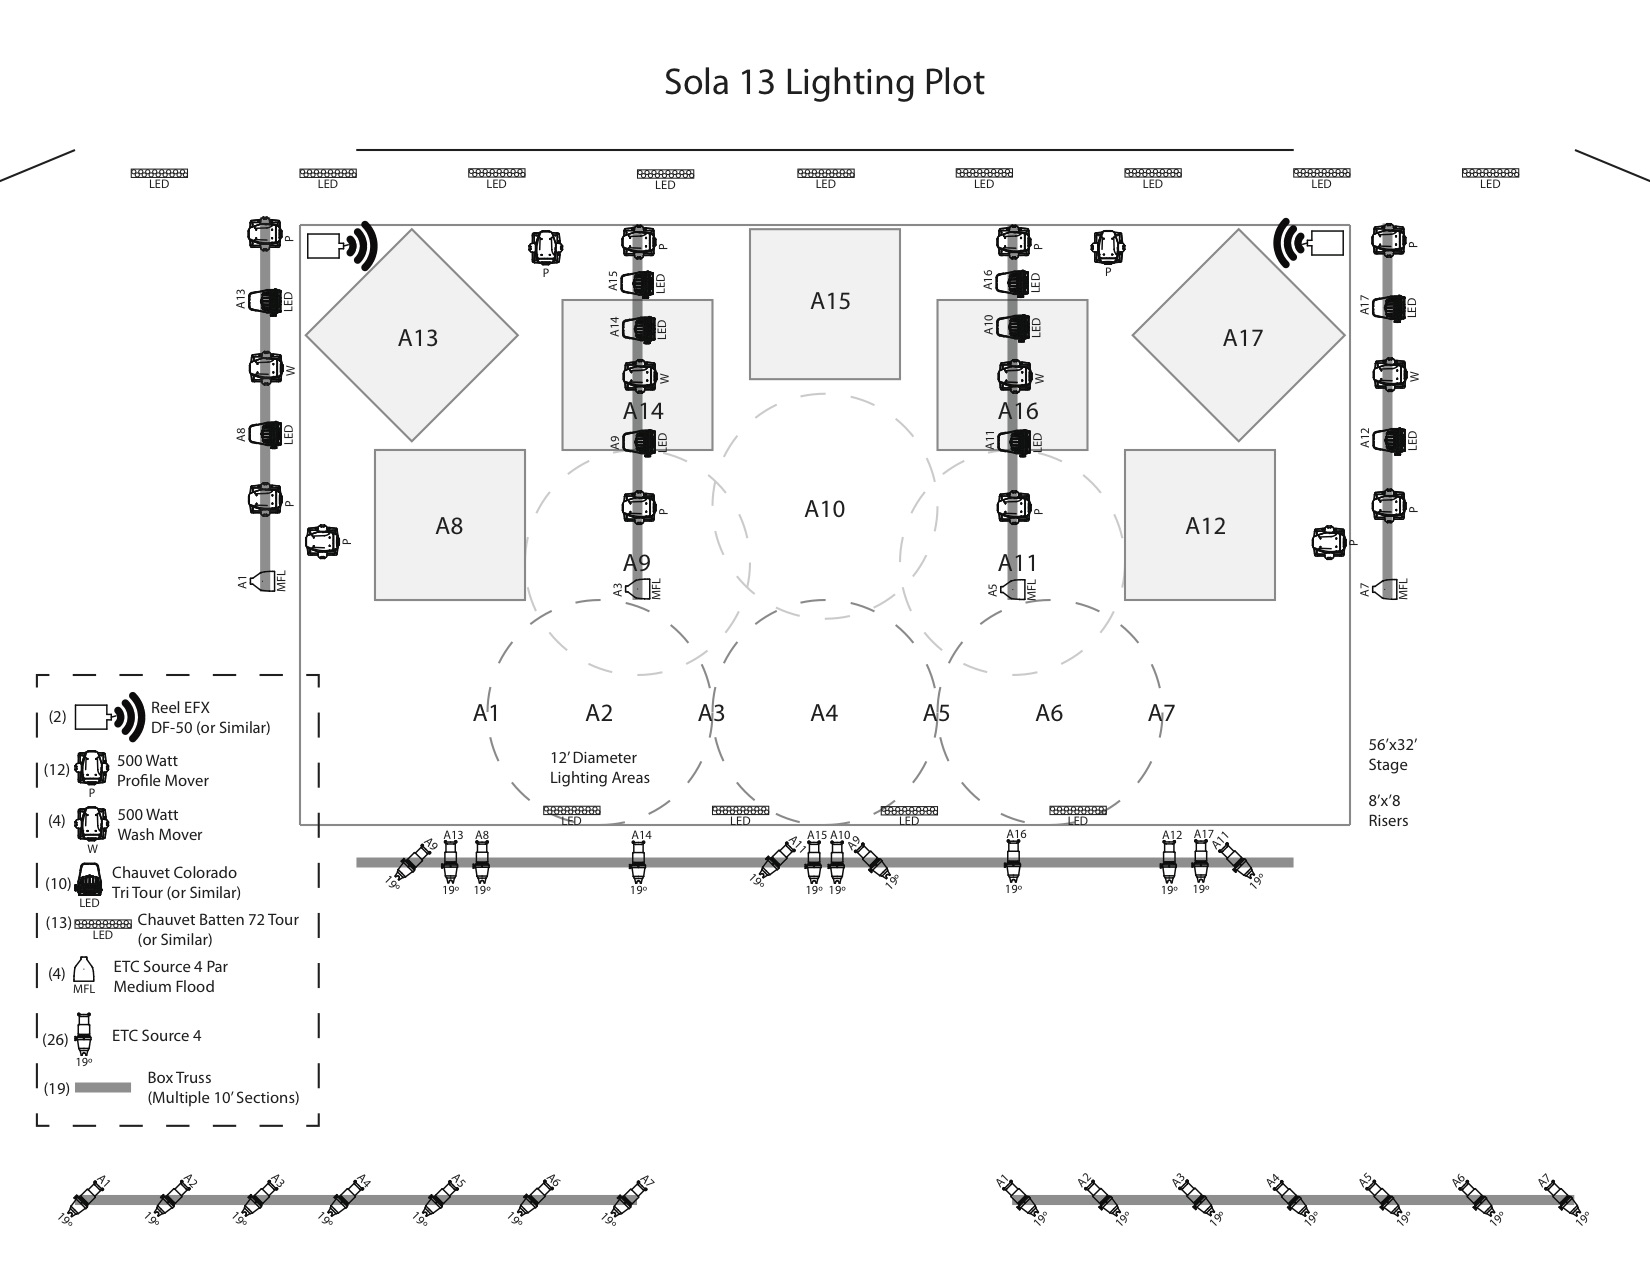
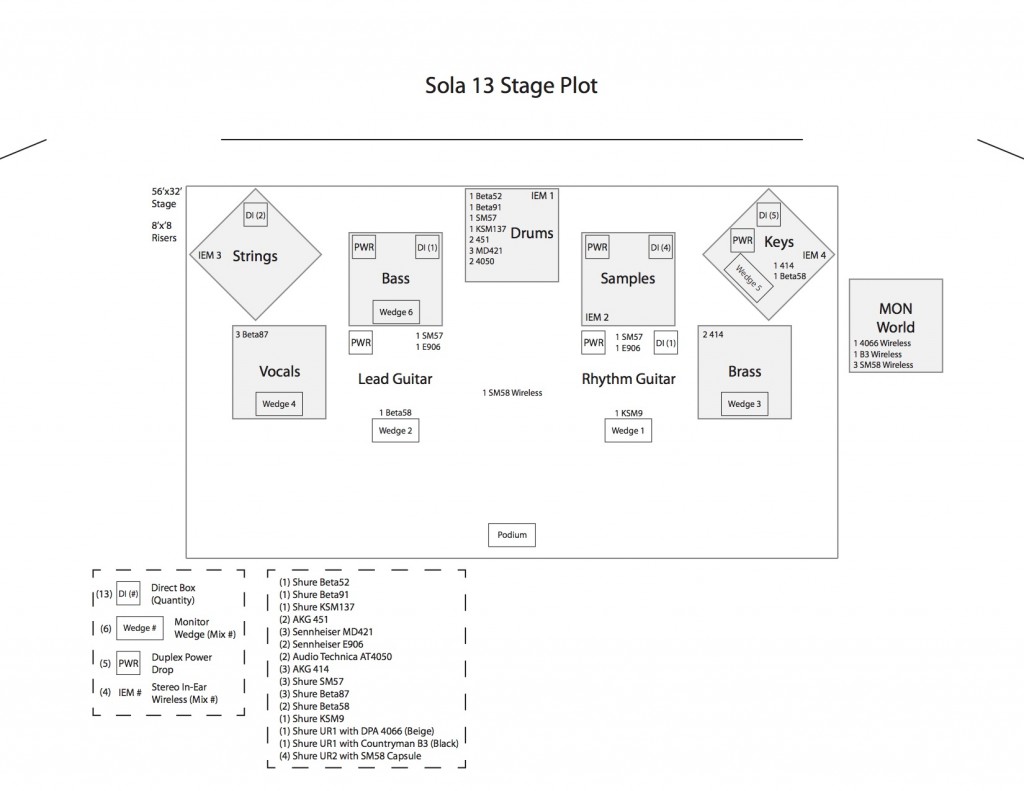
Here’s a little glimpse of how the conference came together. It all started with a 3D rendering and some stage plots drawn up in illustrator.

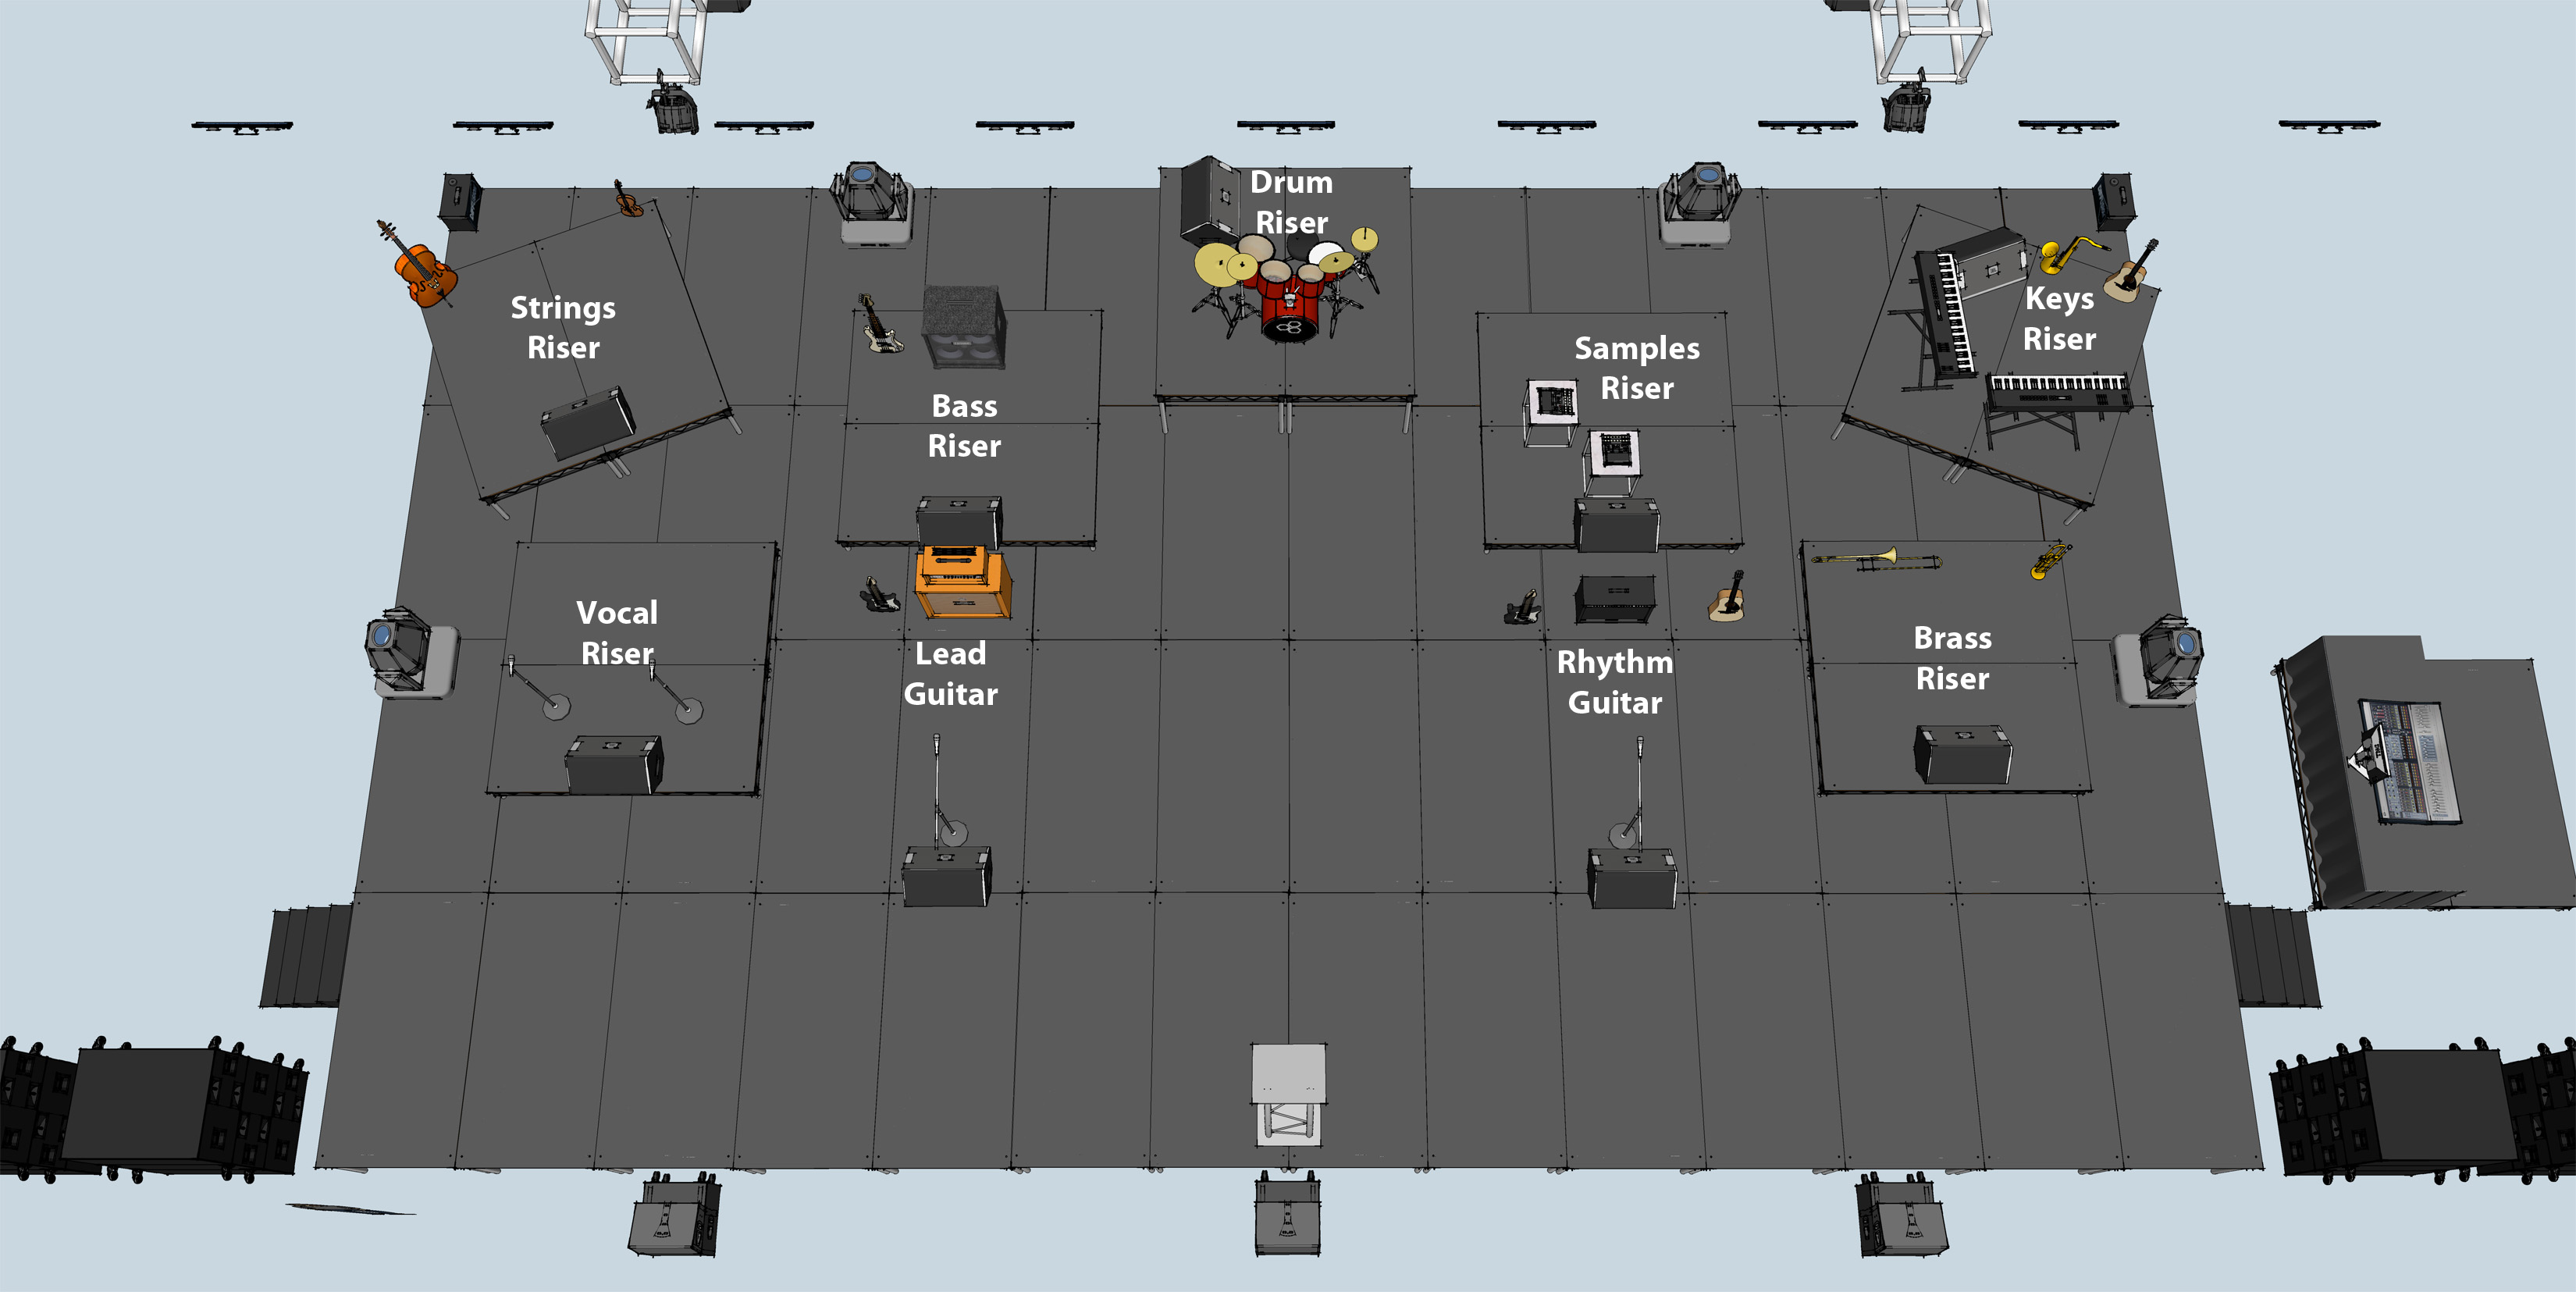
The stage, audio, lighting, and video was drawn in google sketchup.

Untitled

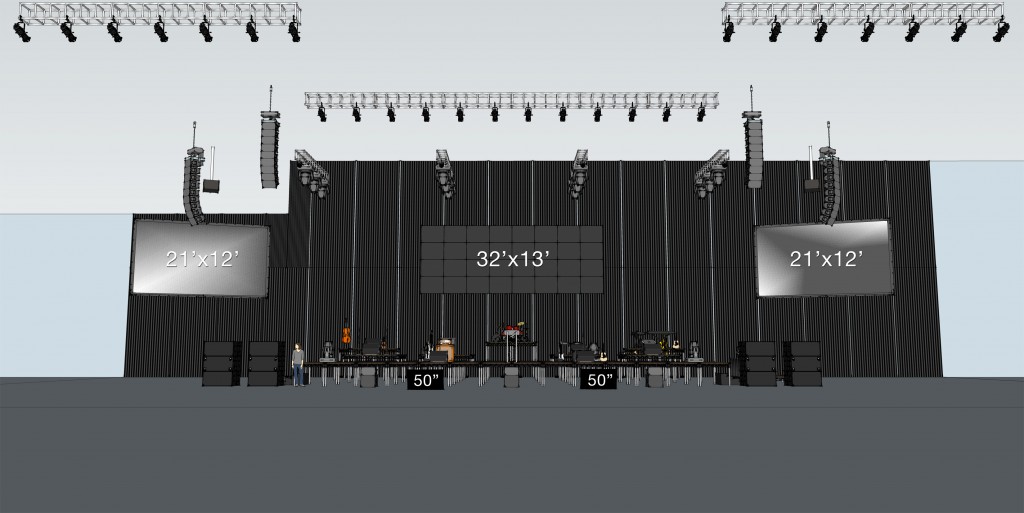
Having a full 3D model allowed us to see every aspect of the setup.

Sola13 Stage Plot

Stage plot documents were also made in illustrator for fast setup of the band.

Sola13 Stage Plot

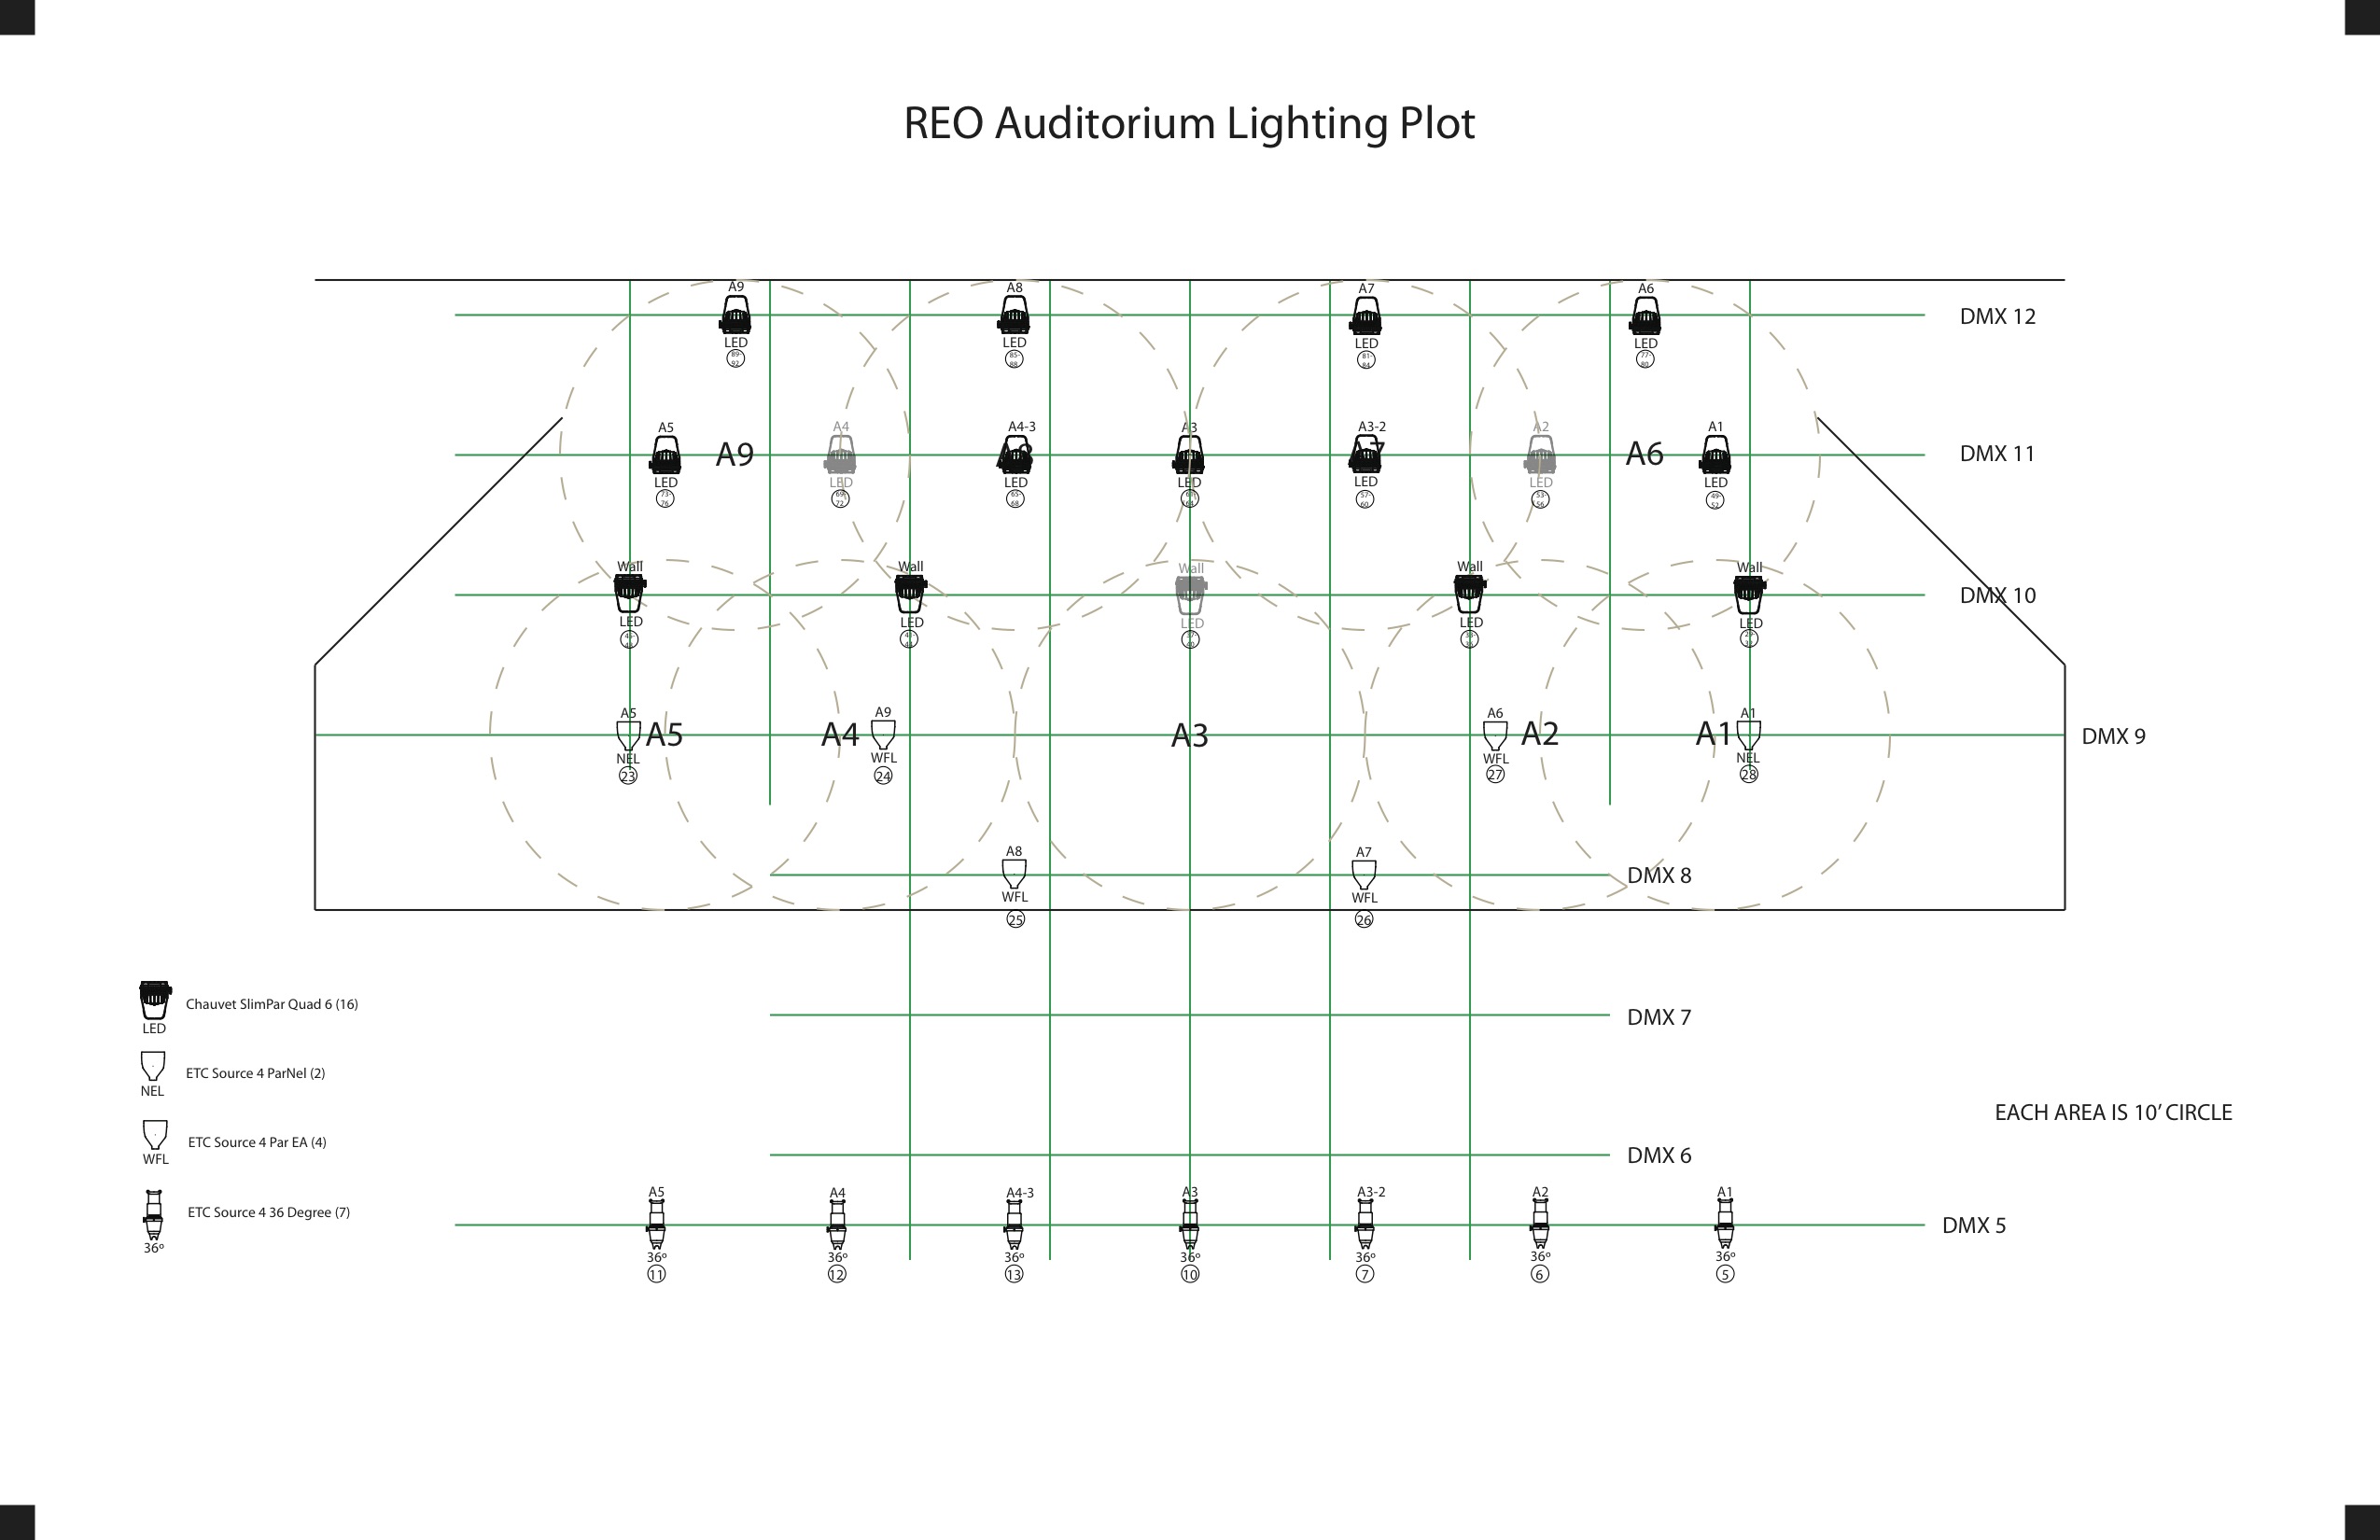
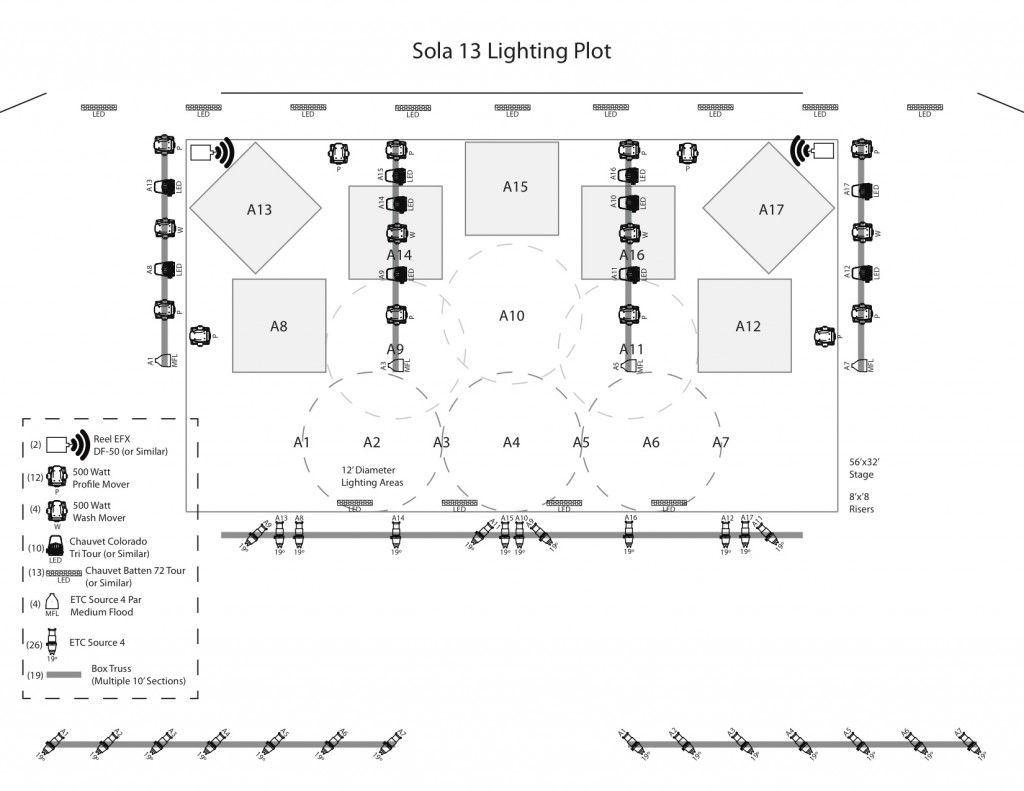
A lighting plot was also drawn in illustrator for the hanging of lighting fixtures, addressing, and lighting focus.

Sola13 Lighting Plot

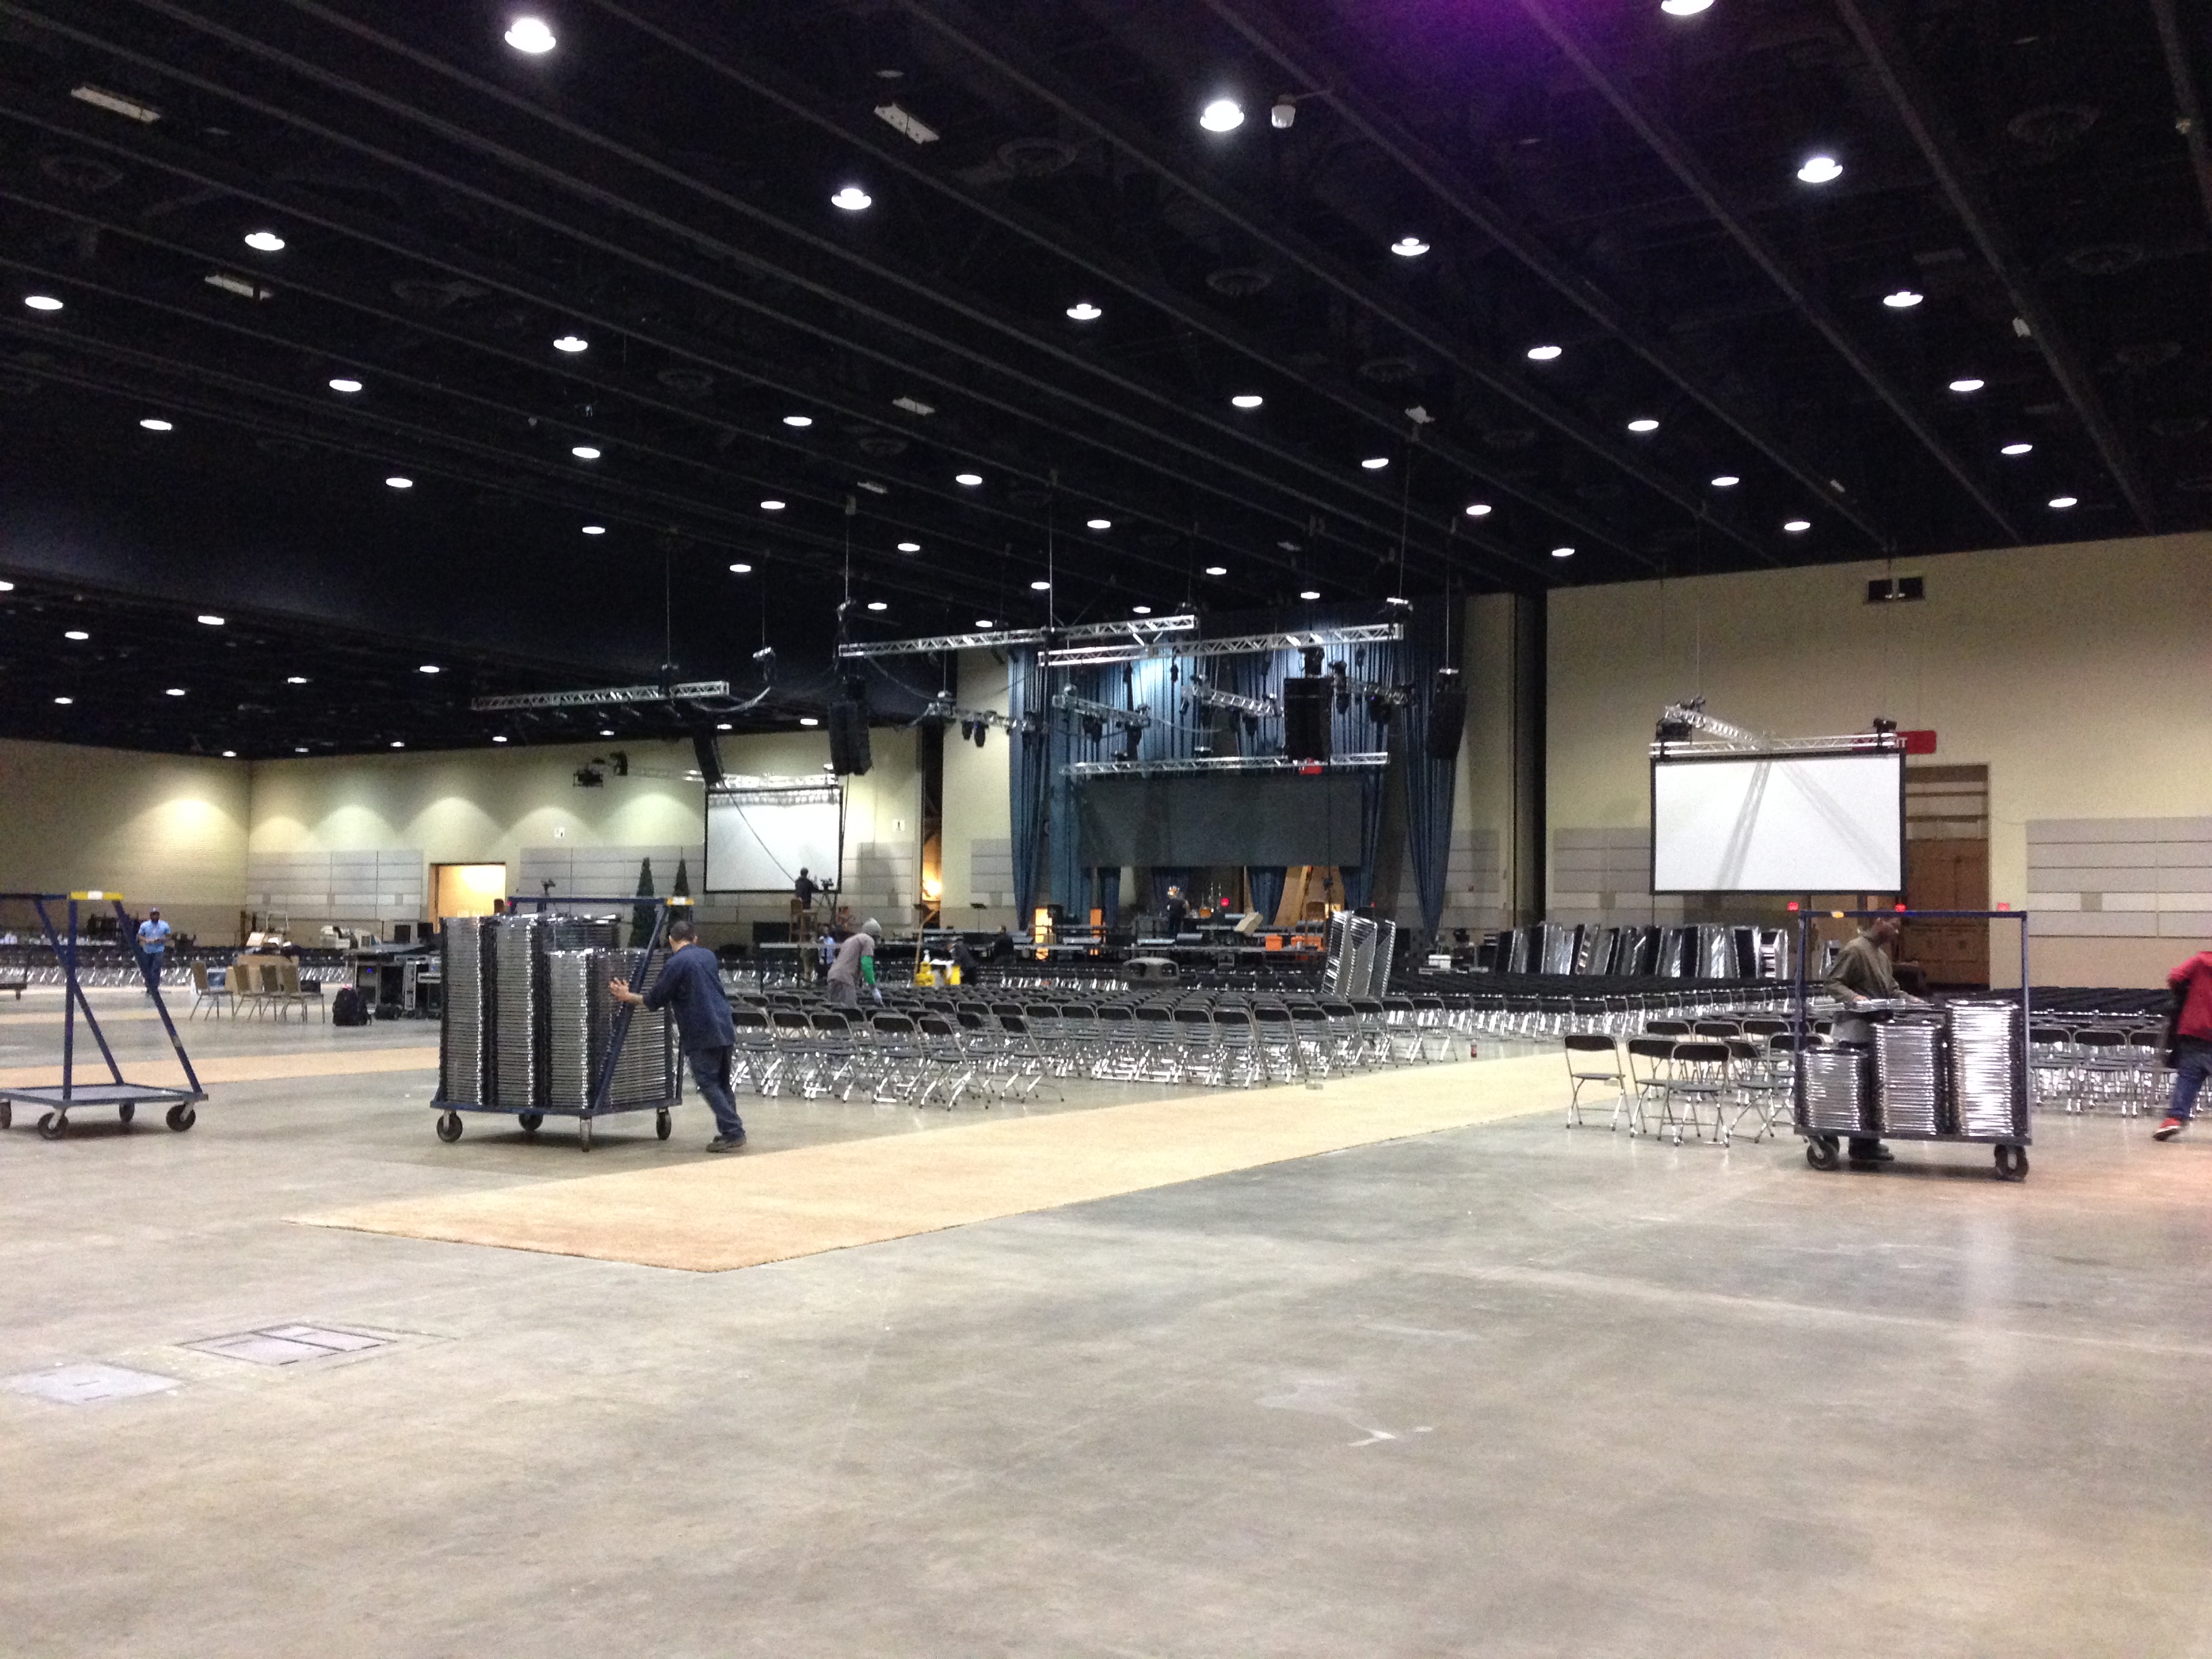
From these documents, LiveSpace and our crew got started around 3:30pm to setup the night before.

01

It took awhile to get all the rigging in place, but once we did things started coming together.

02

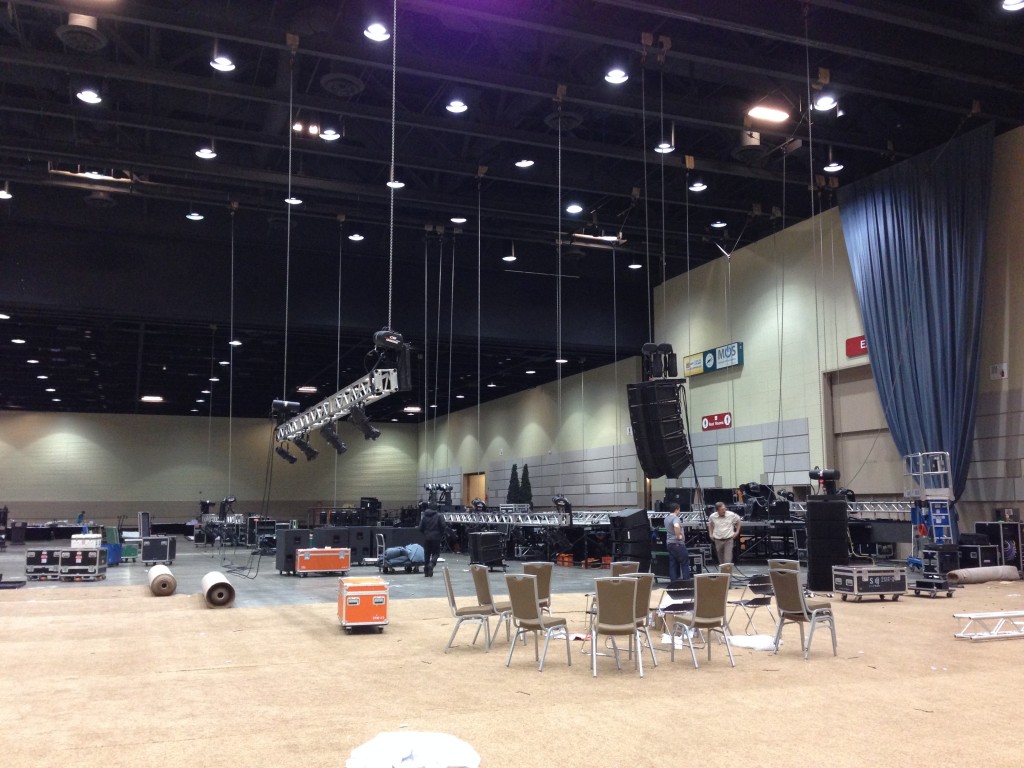
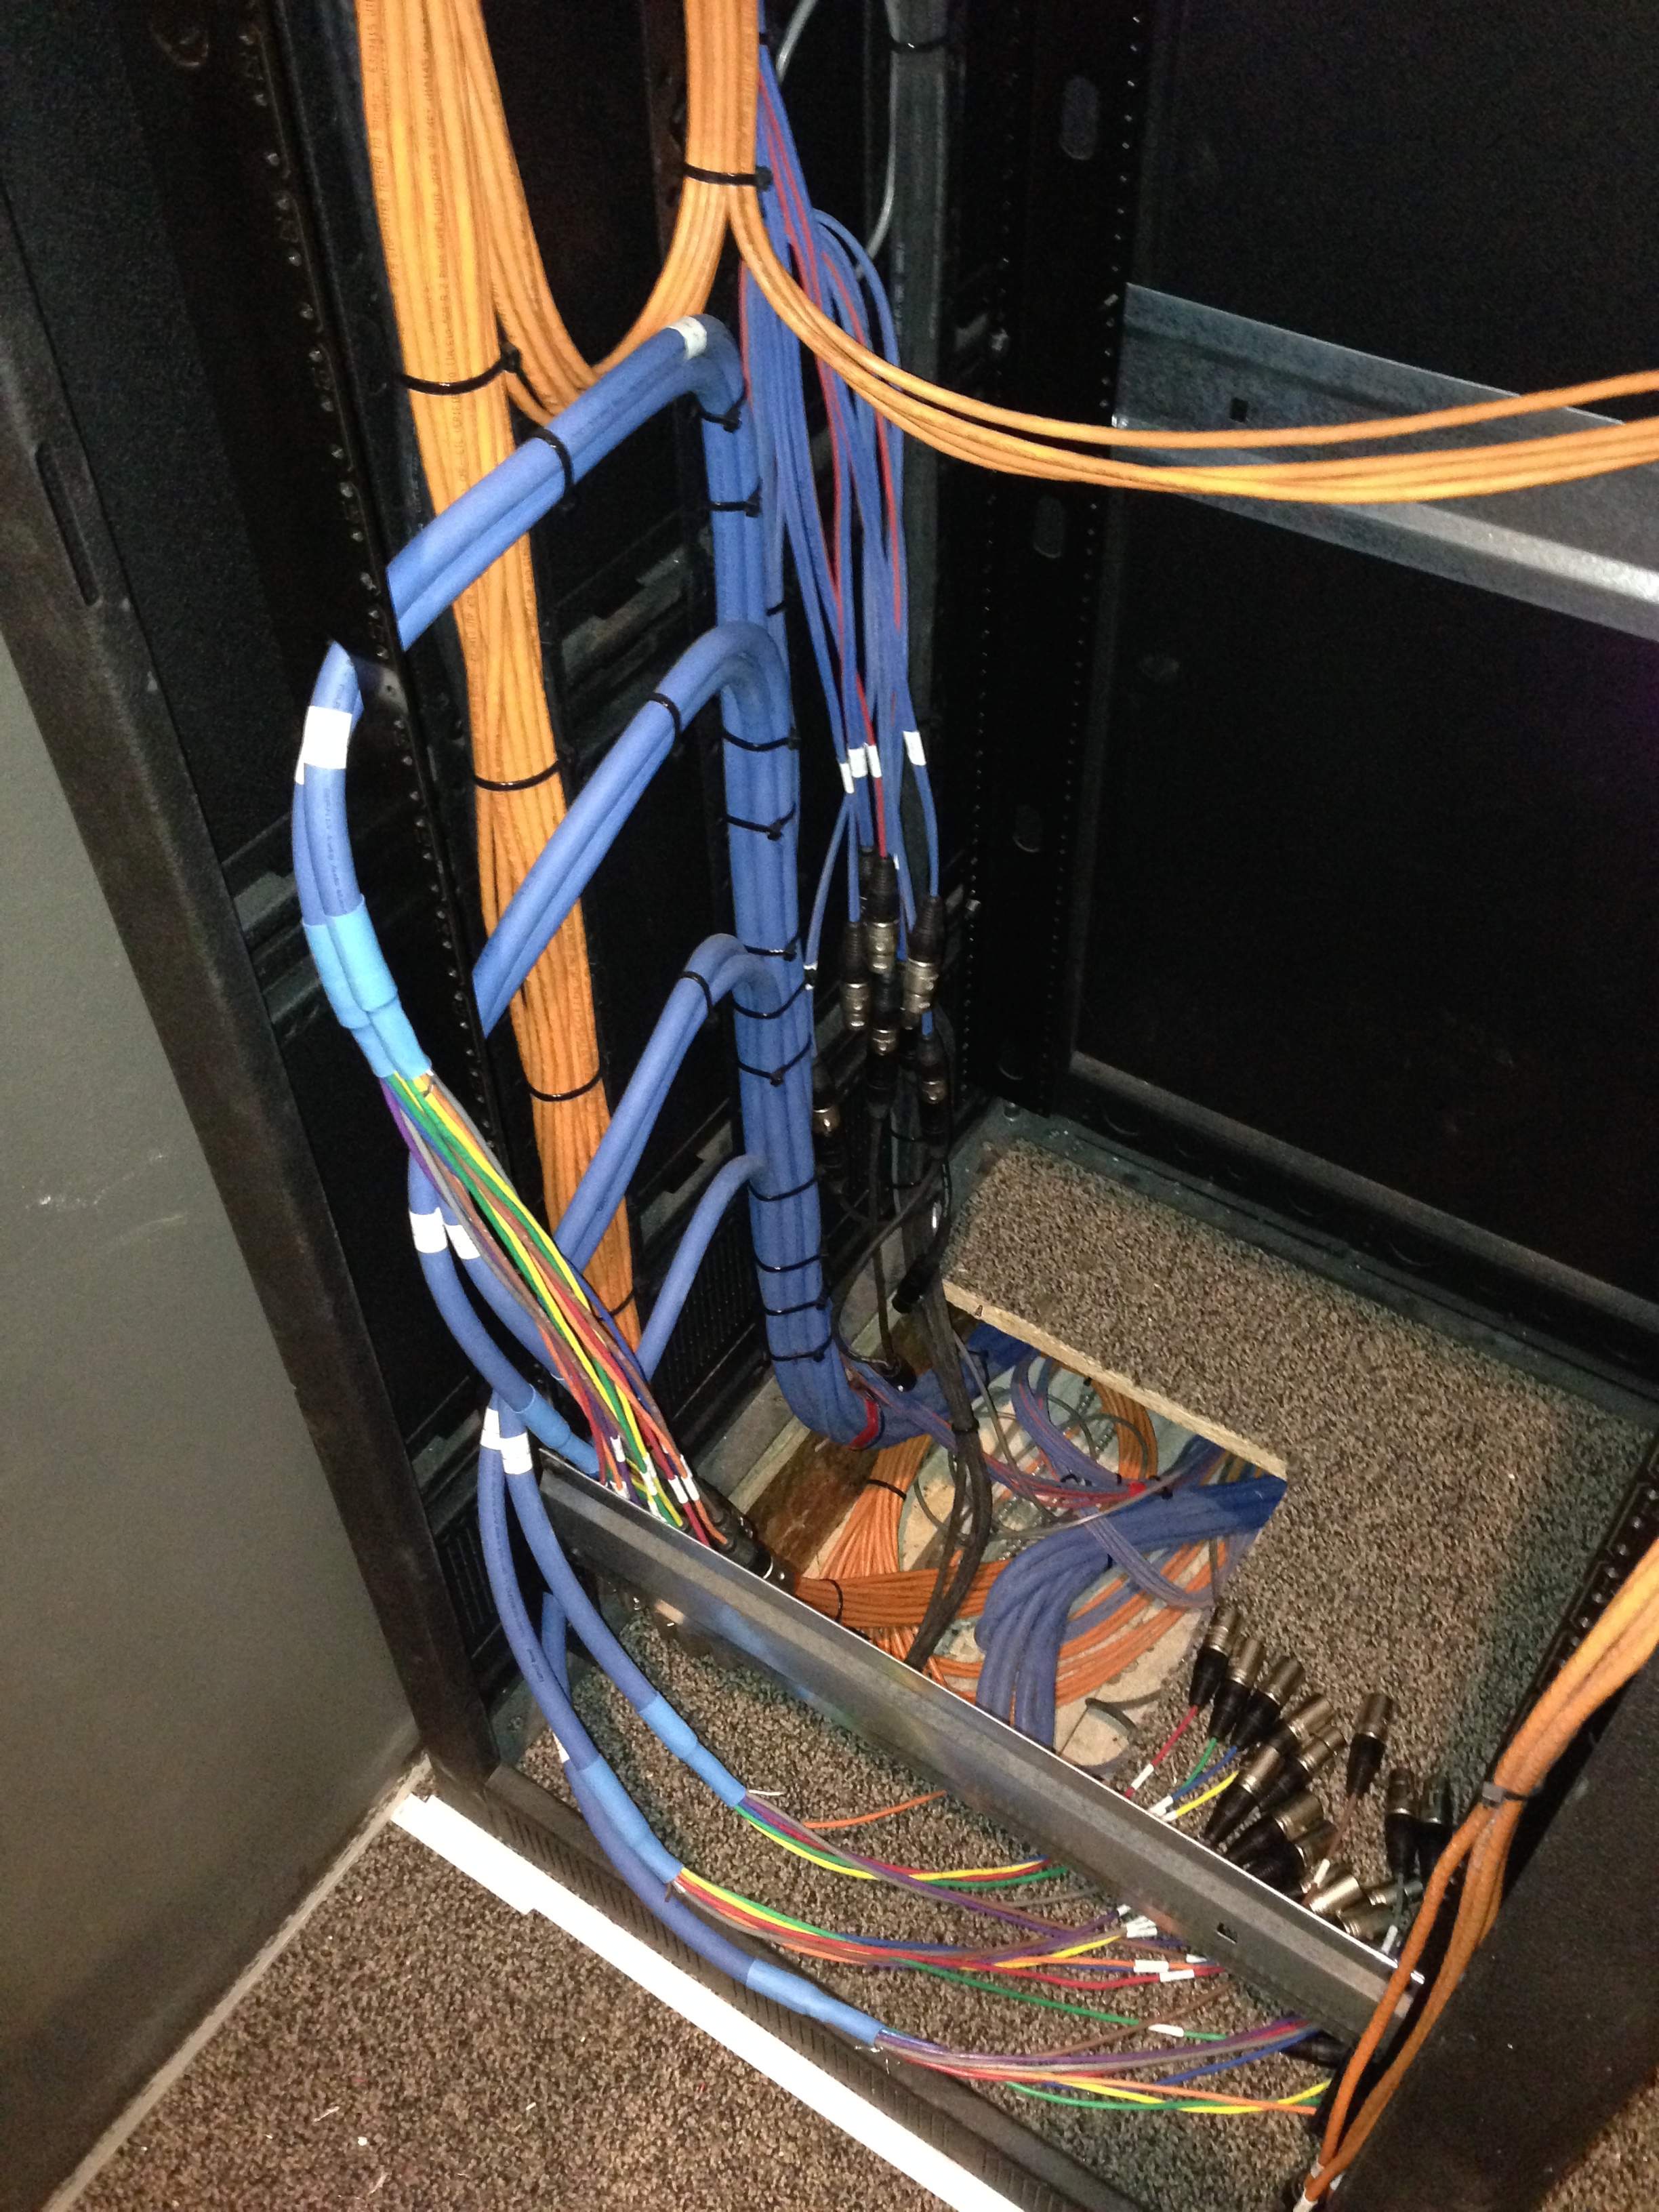
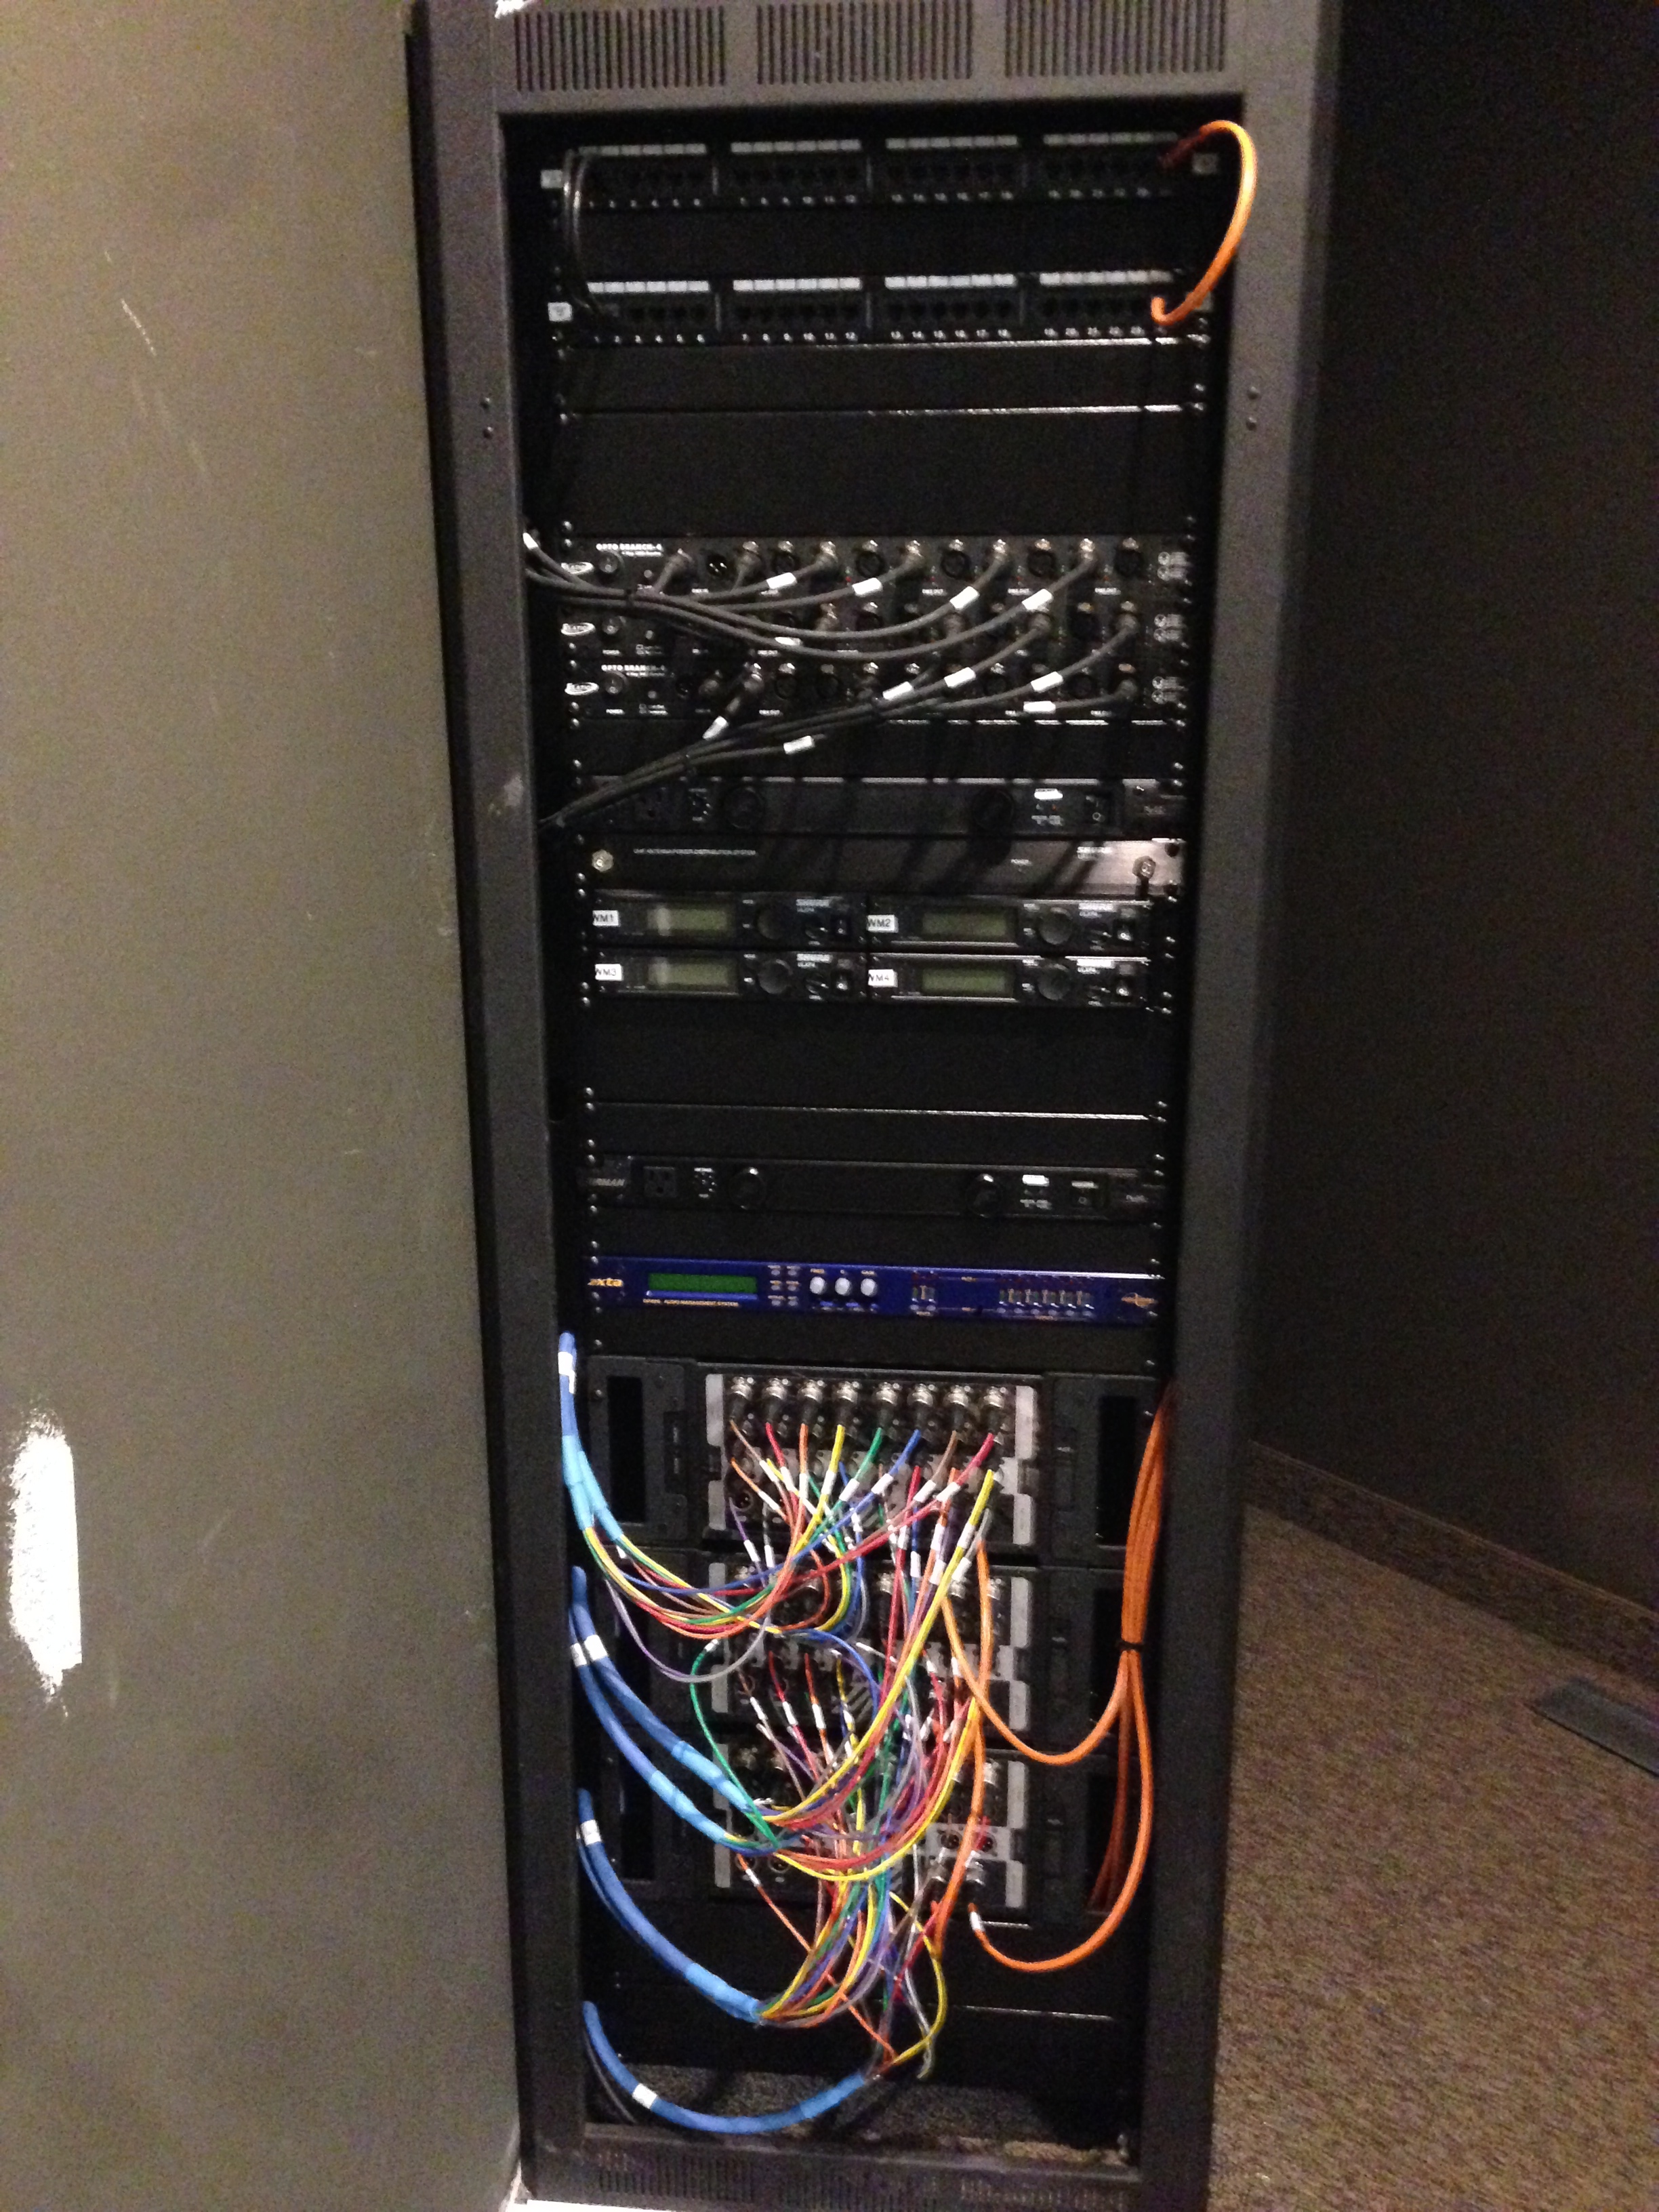
Once everything was hanging, it was just time to get it all plugged in and everything trimmed to the correct height.

03

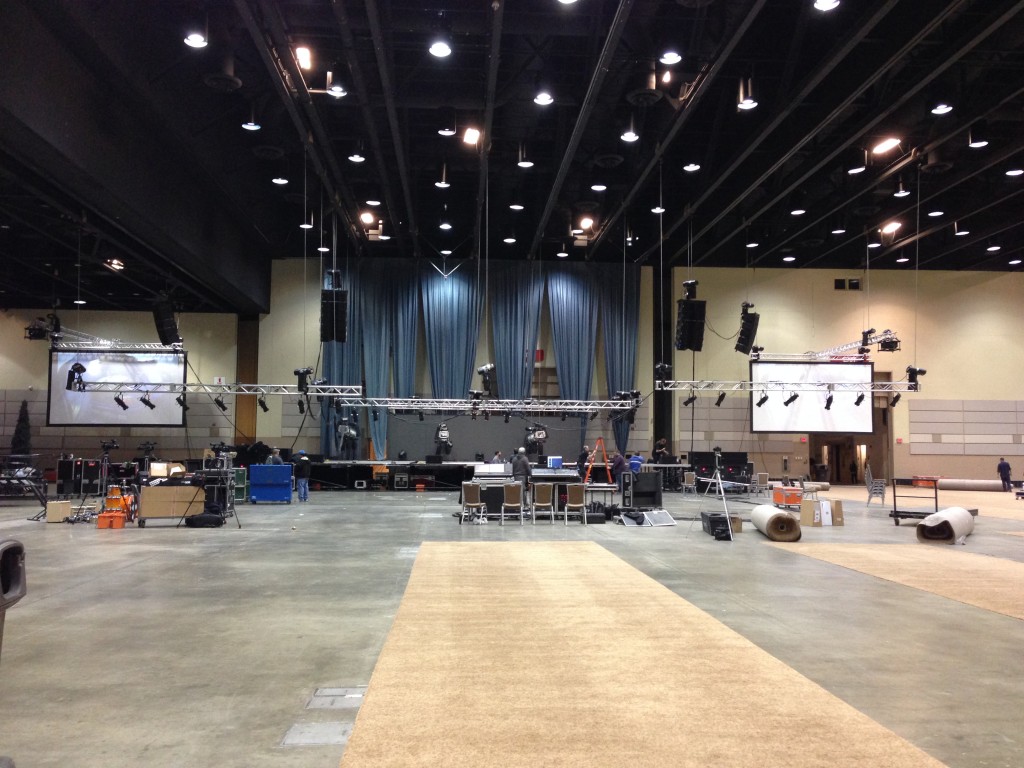
With everything all in place, we left around 3am to get some sleep before rehearsal in the morning.

04

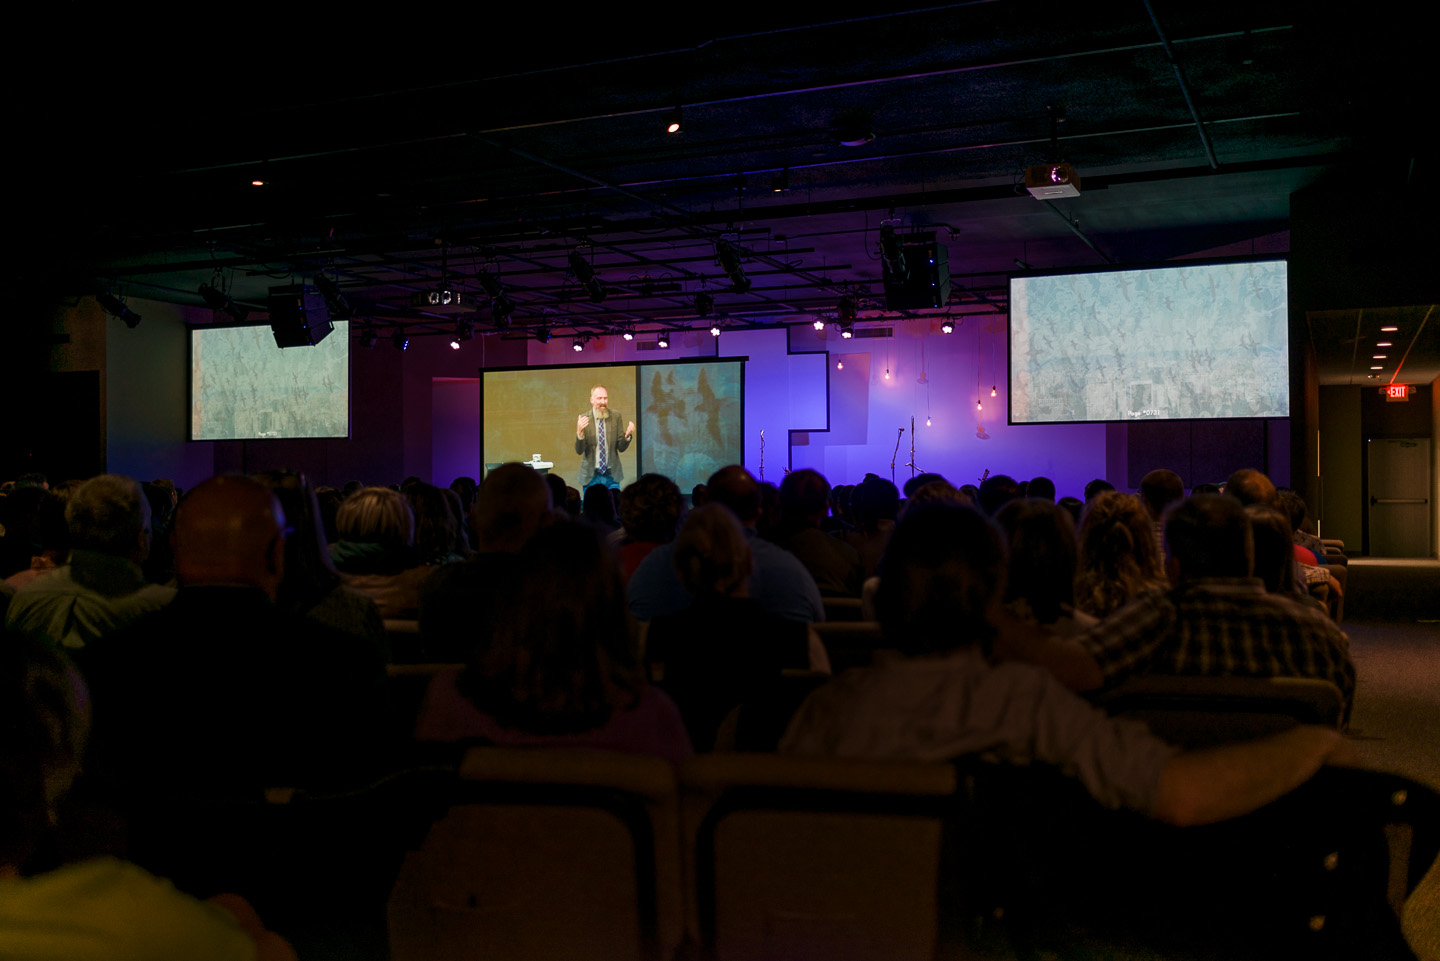
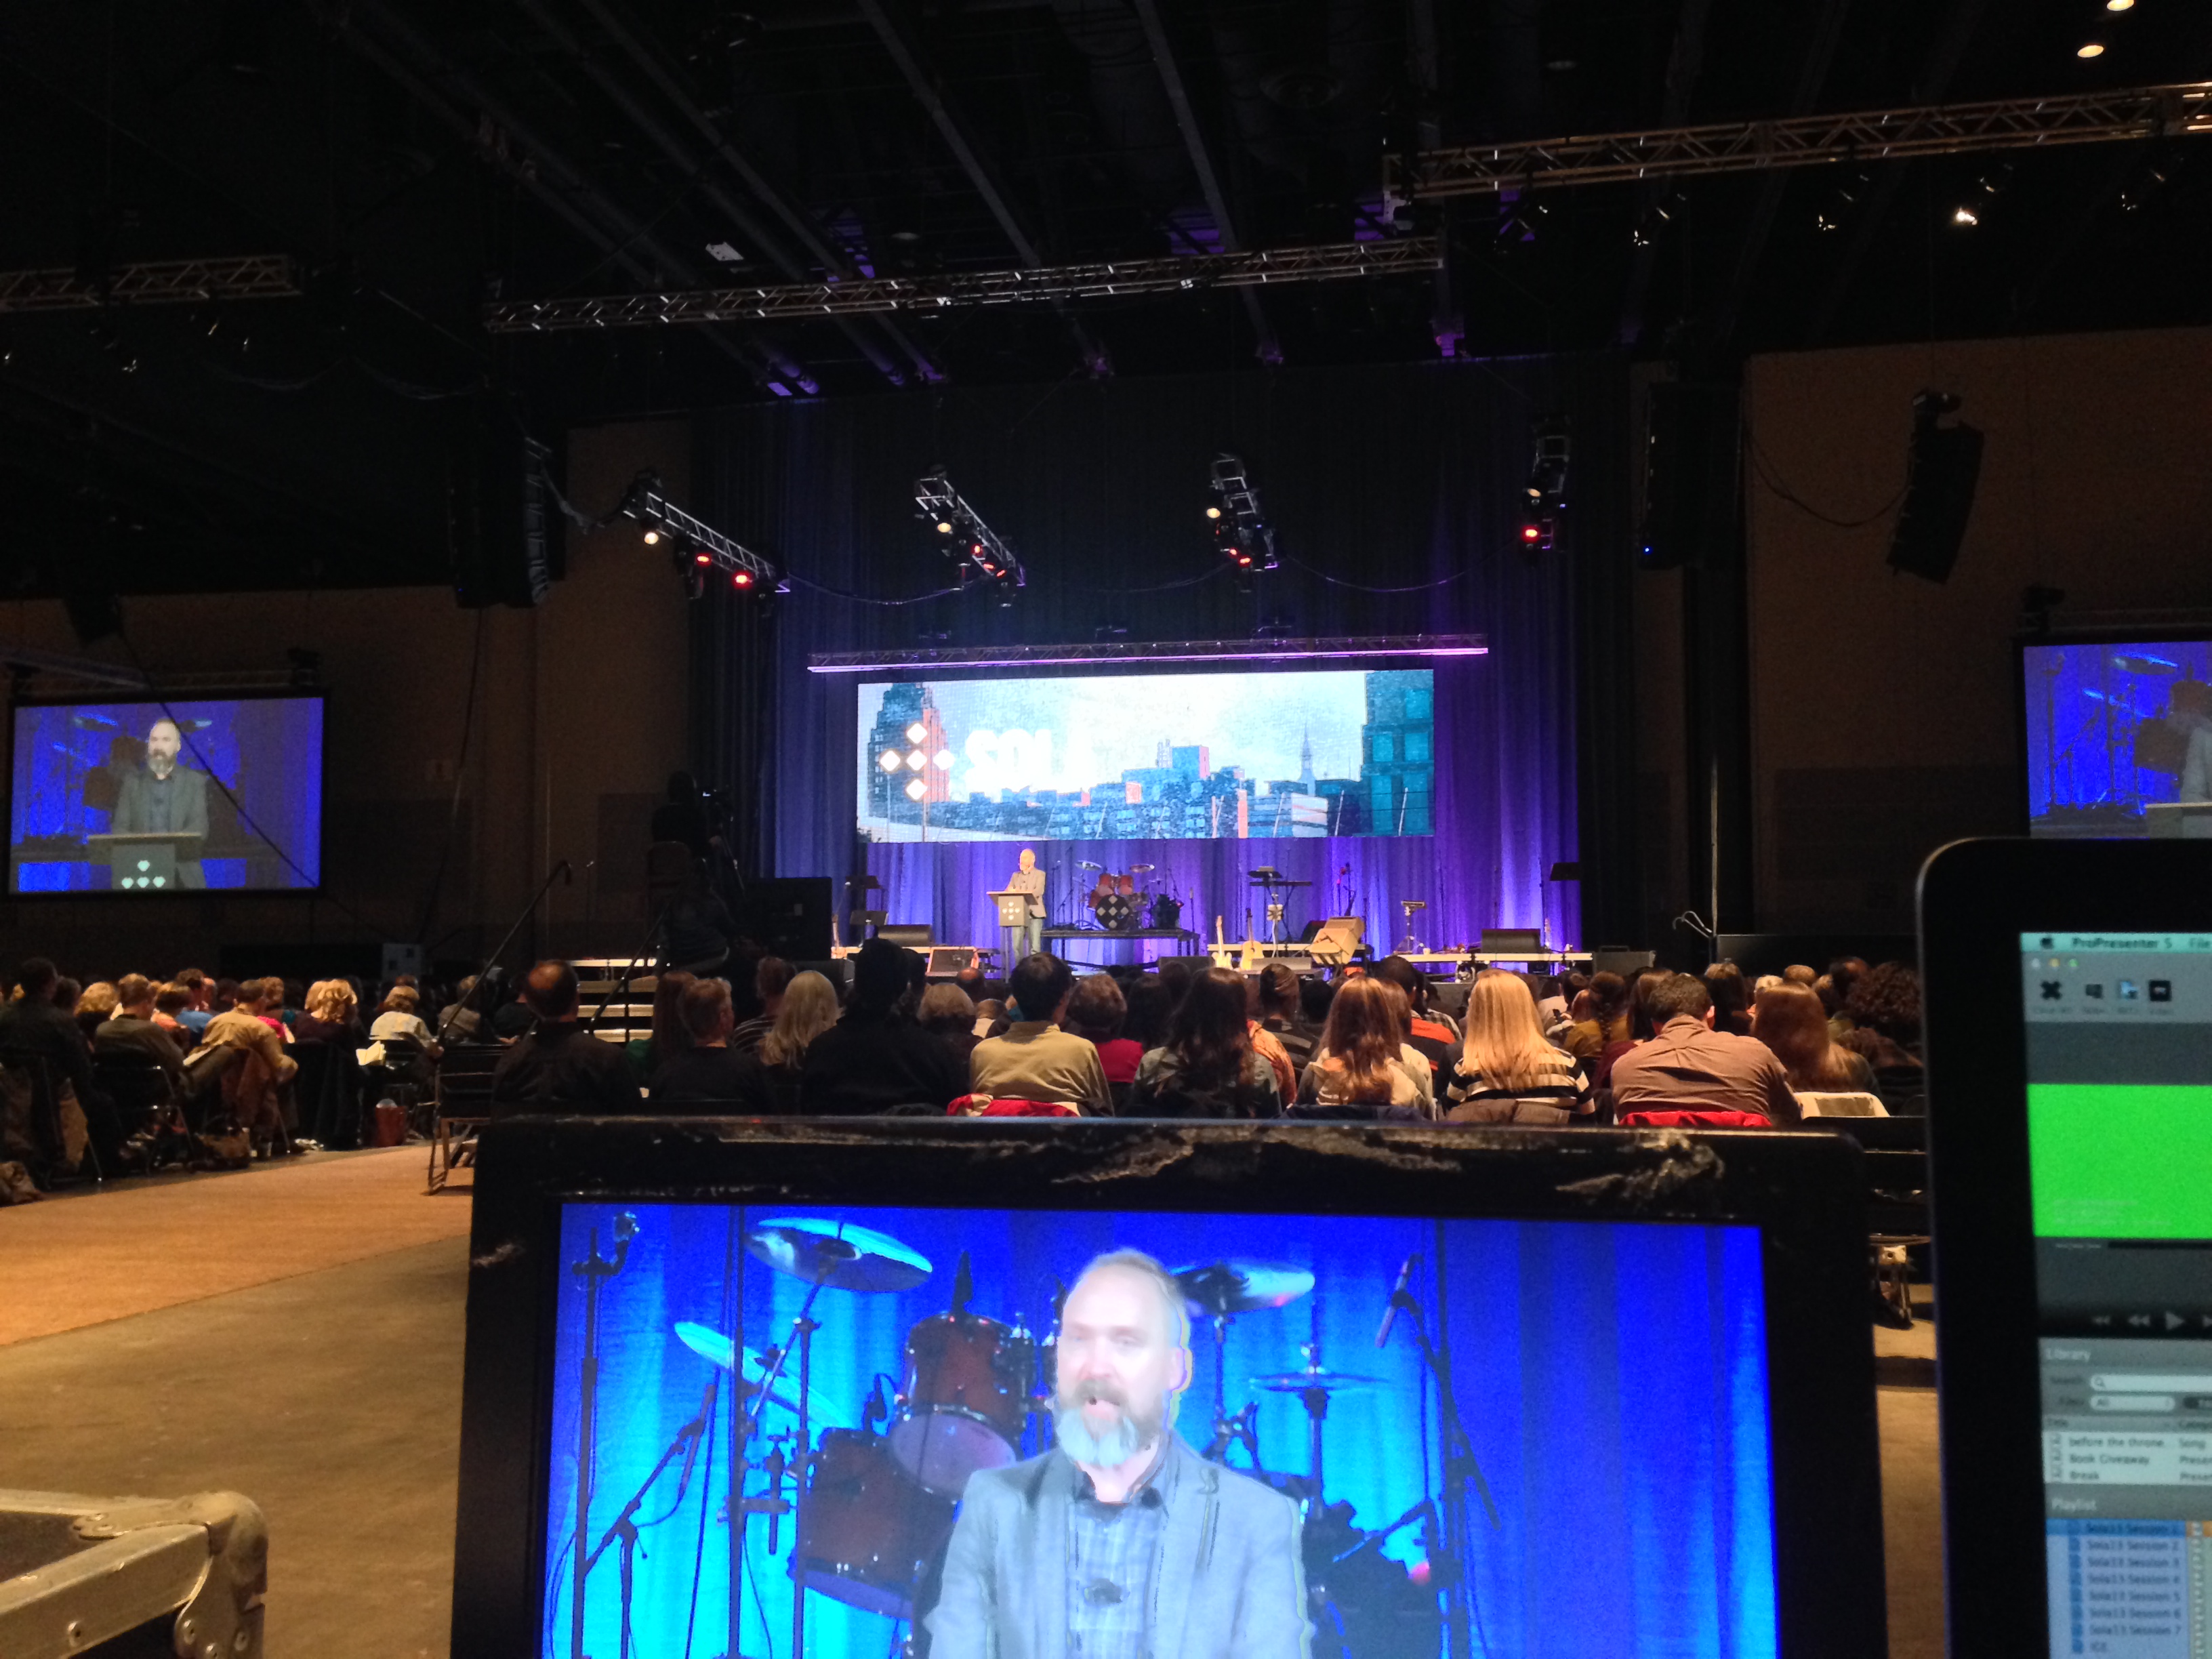
The conference kicked off Friday afternoon with Noel, everything was finally working wonderfully.

05

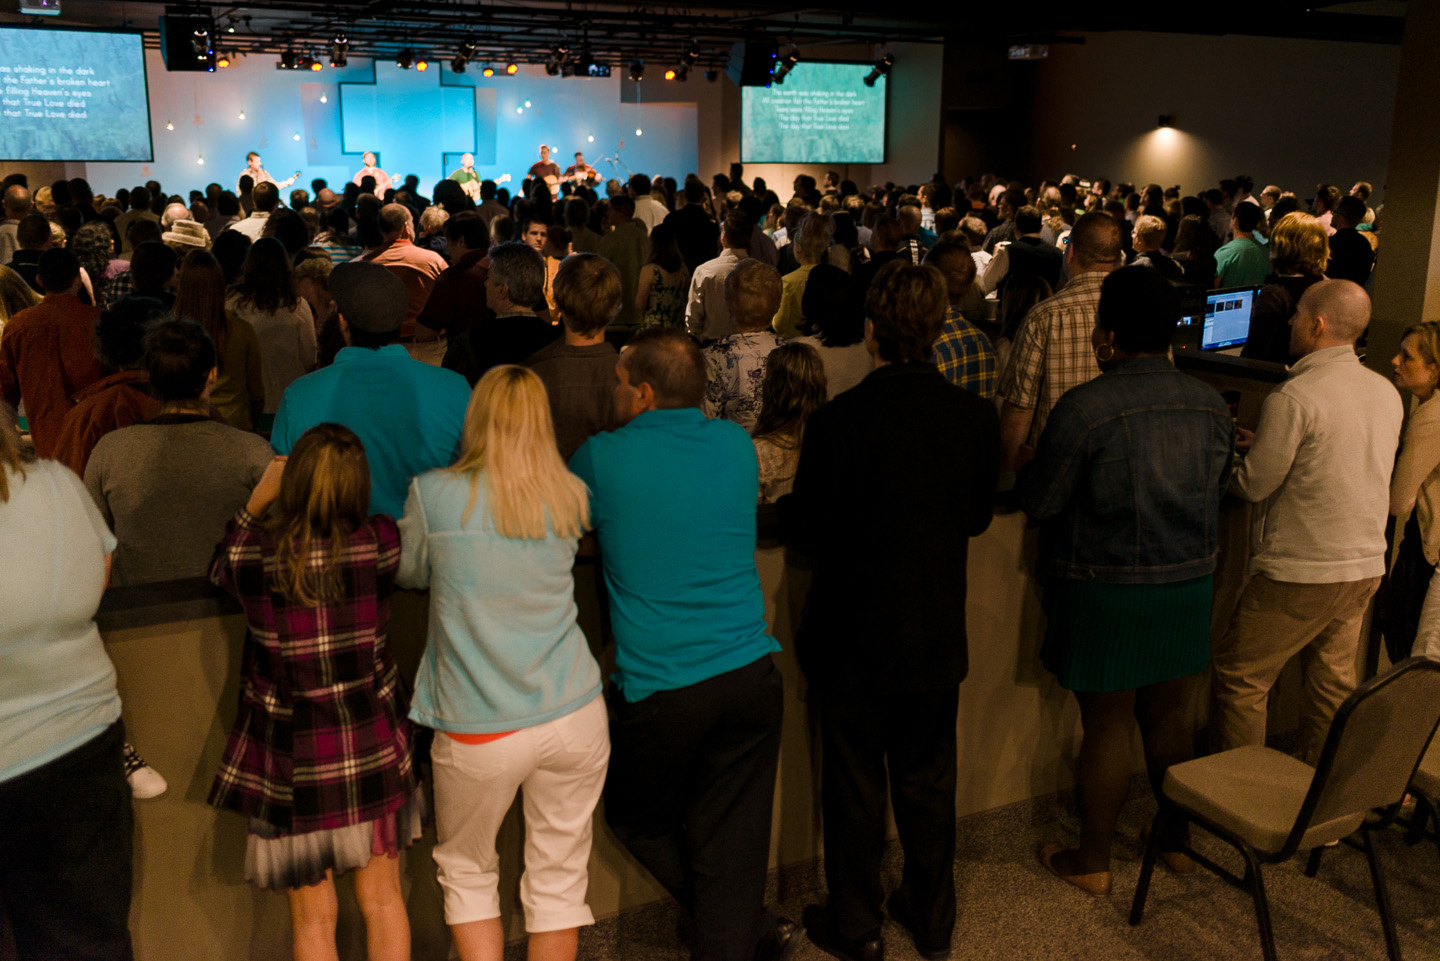
We had a great turnout for the first session, and the conference only grew over the weekend.

07

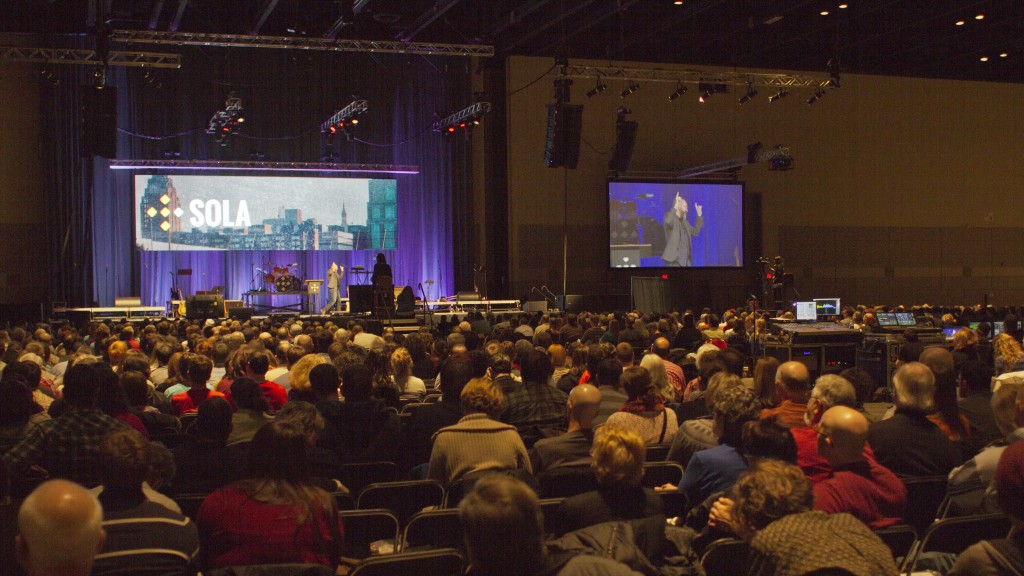
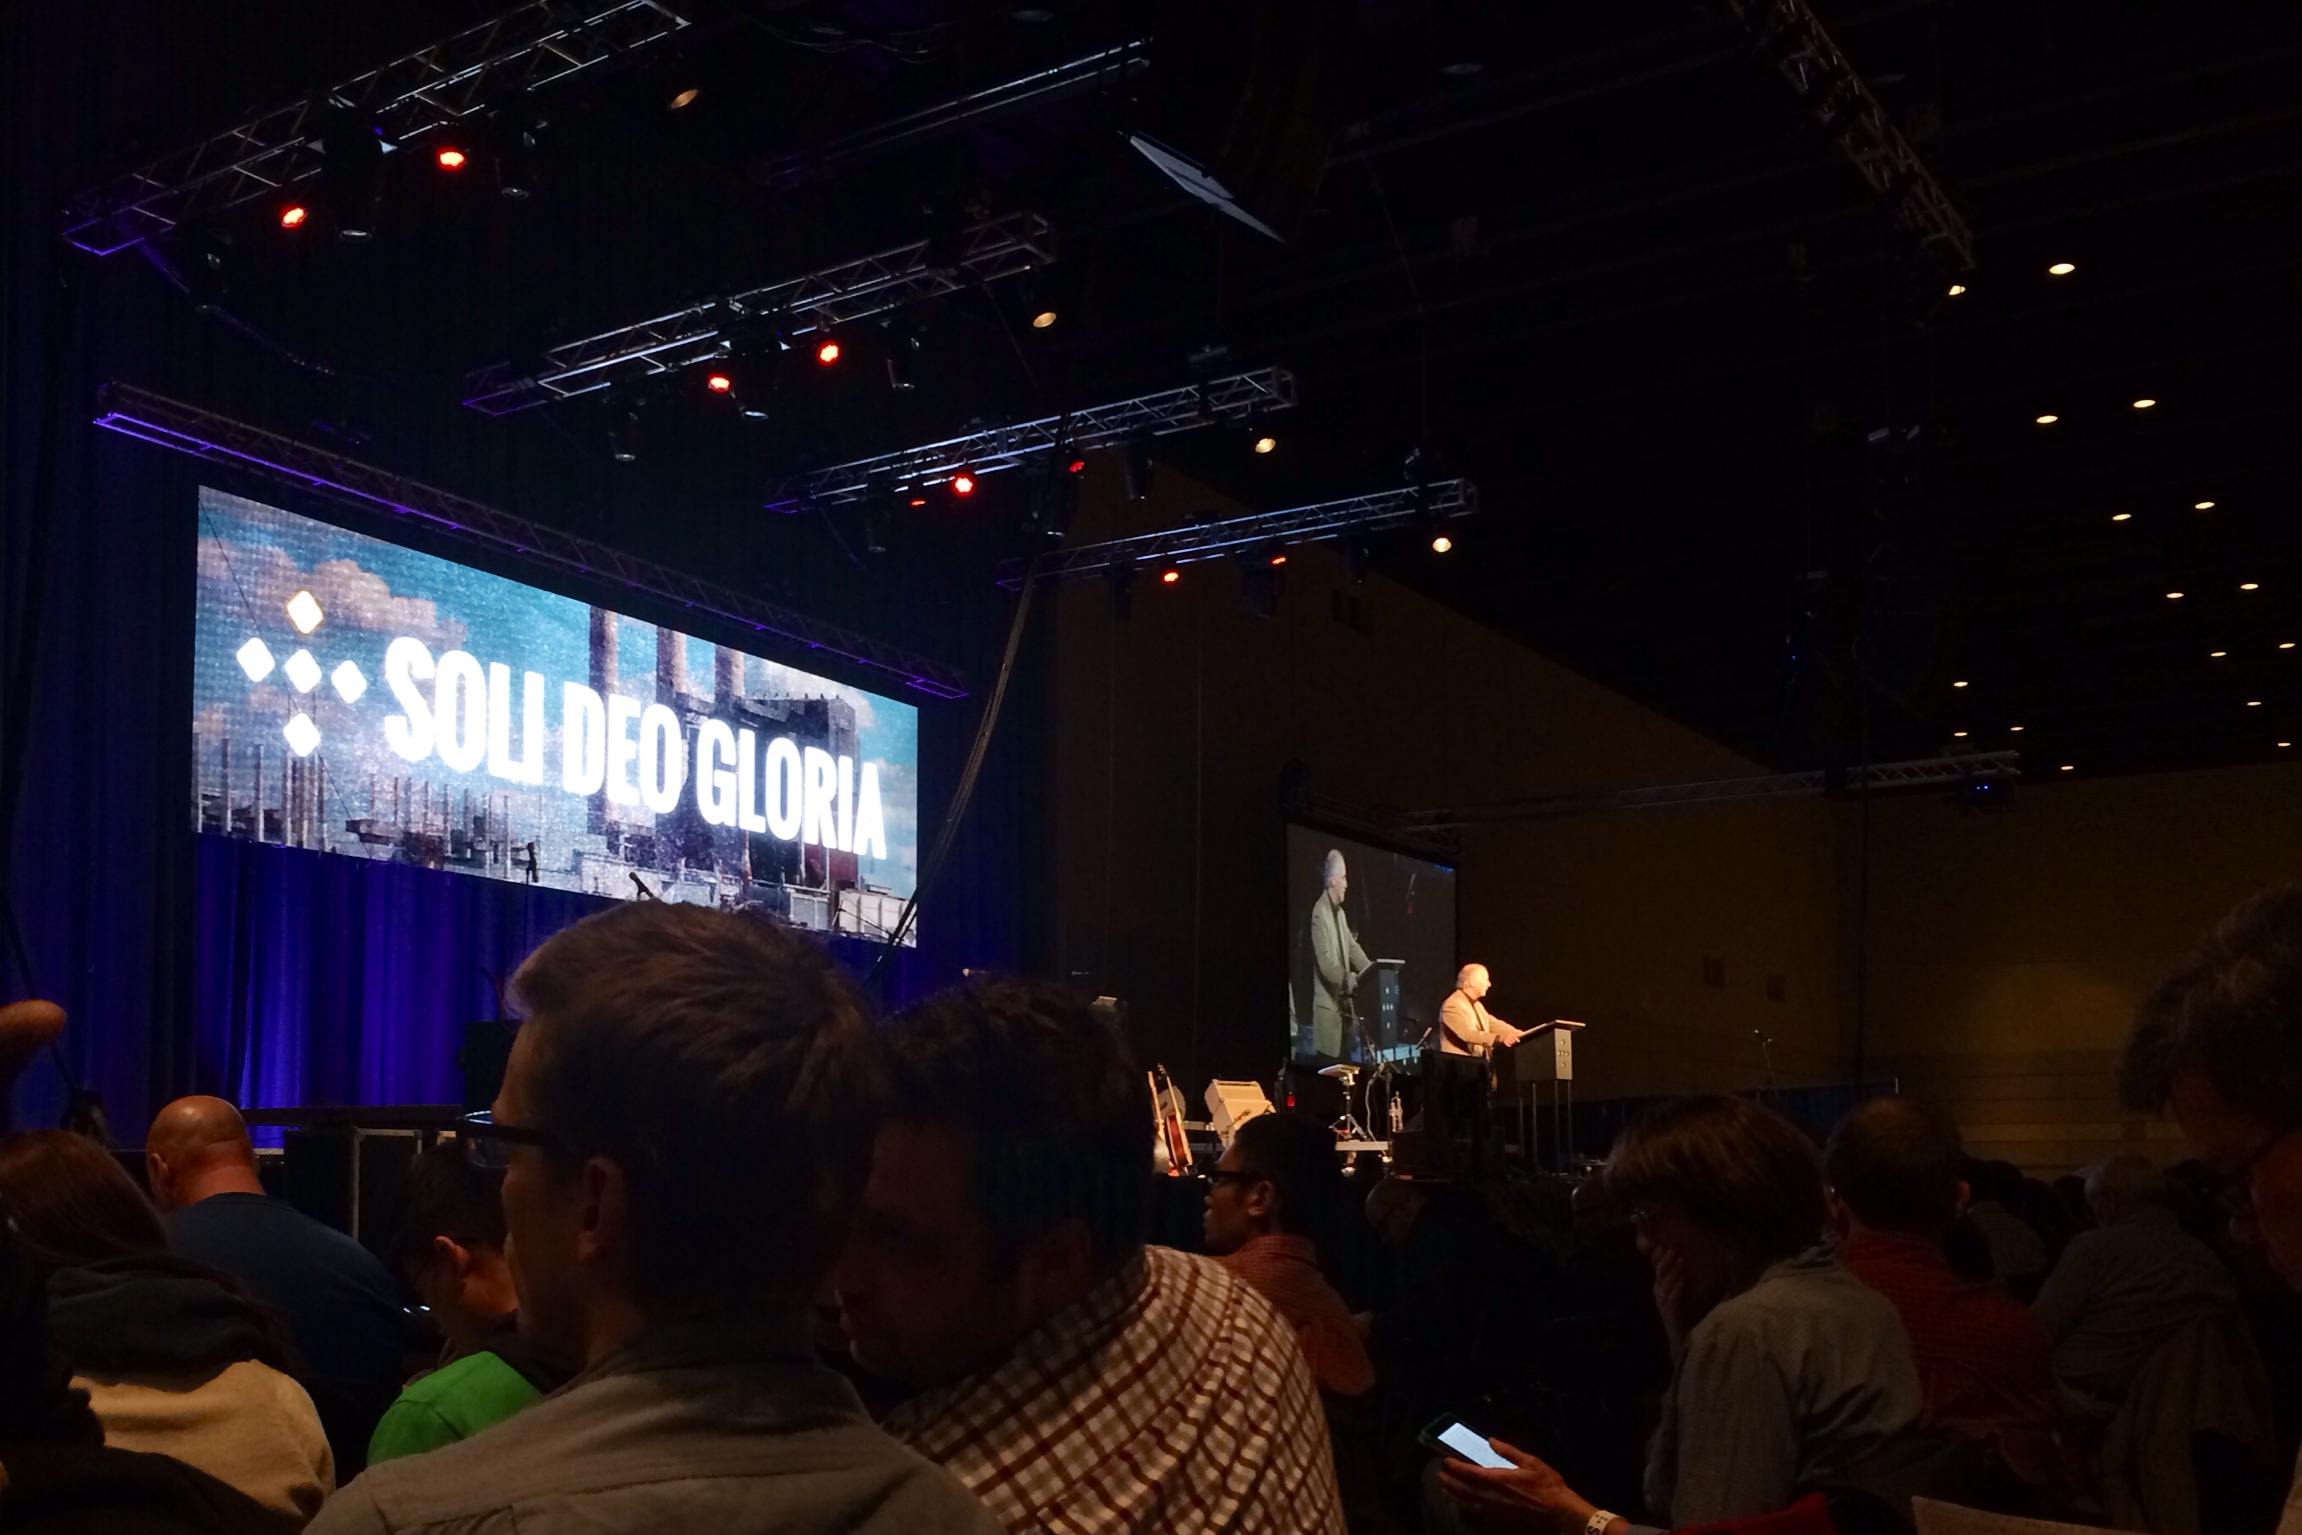
It was encouraging to see how many people engaged in the teaching over the course of the two days.

06

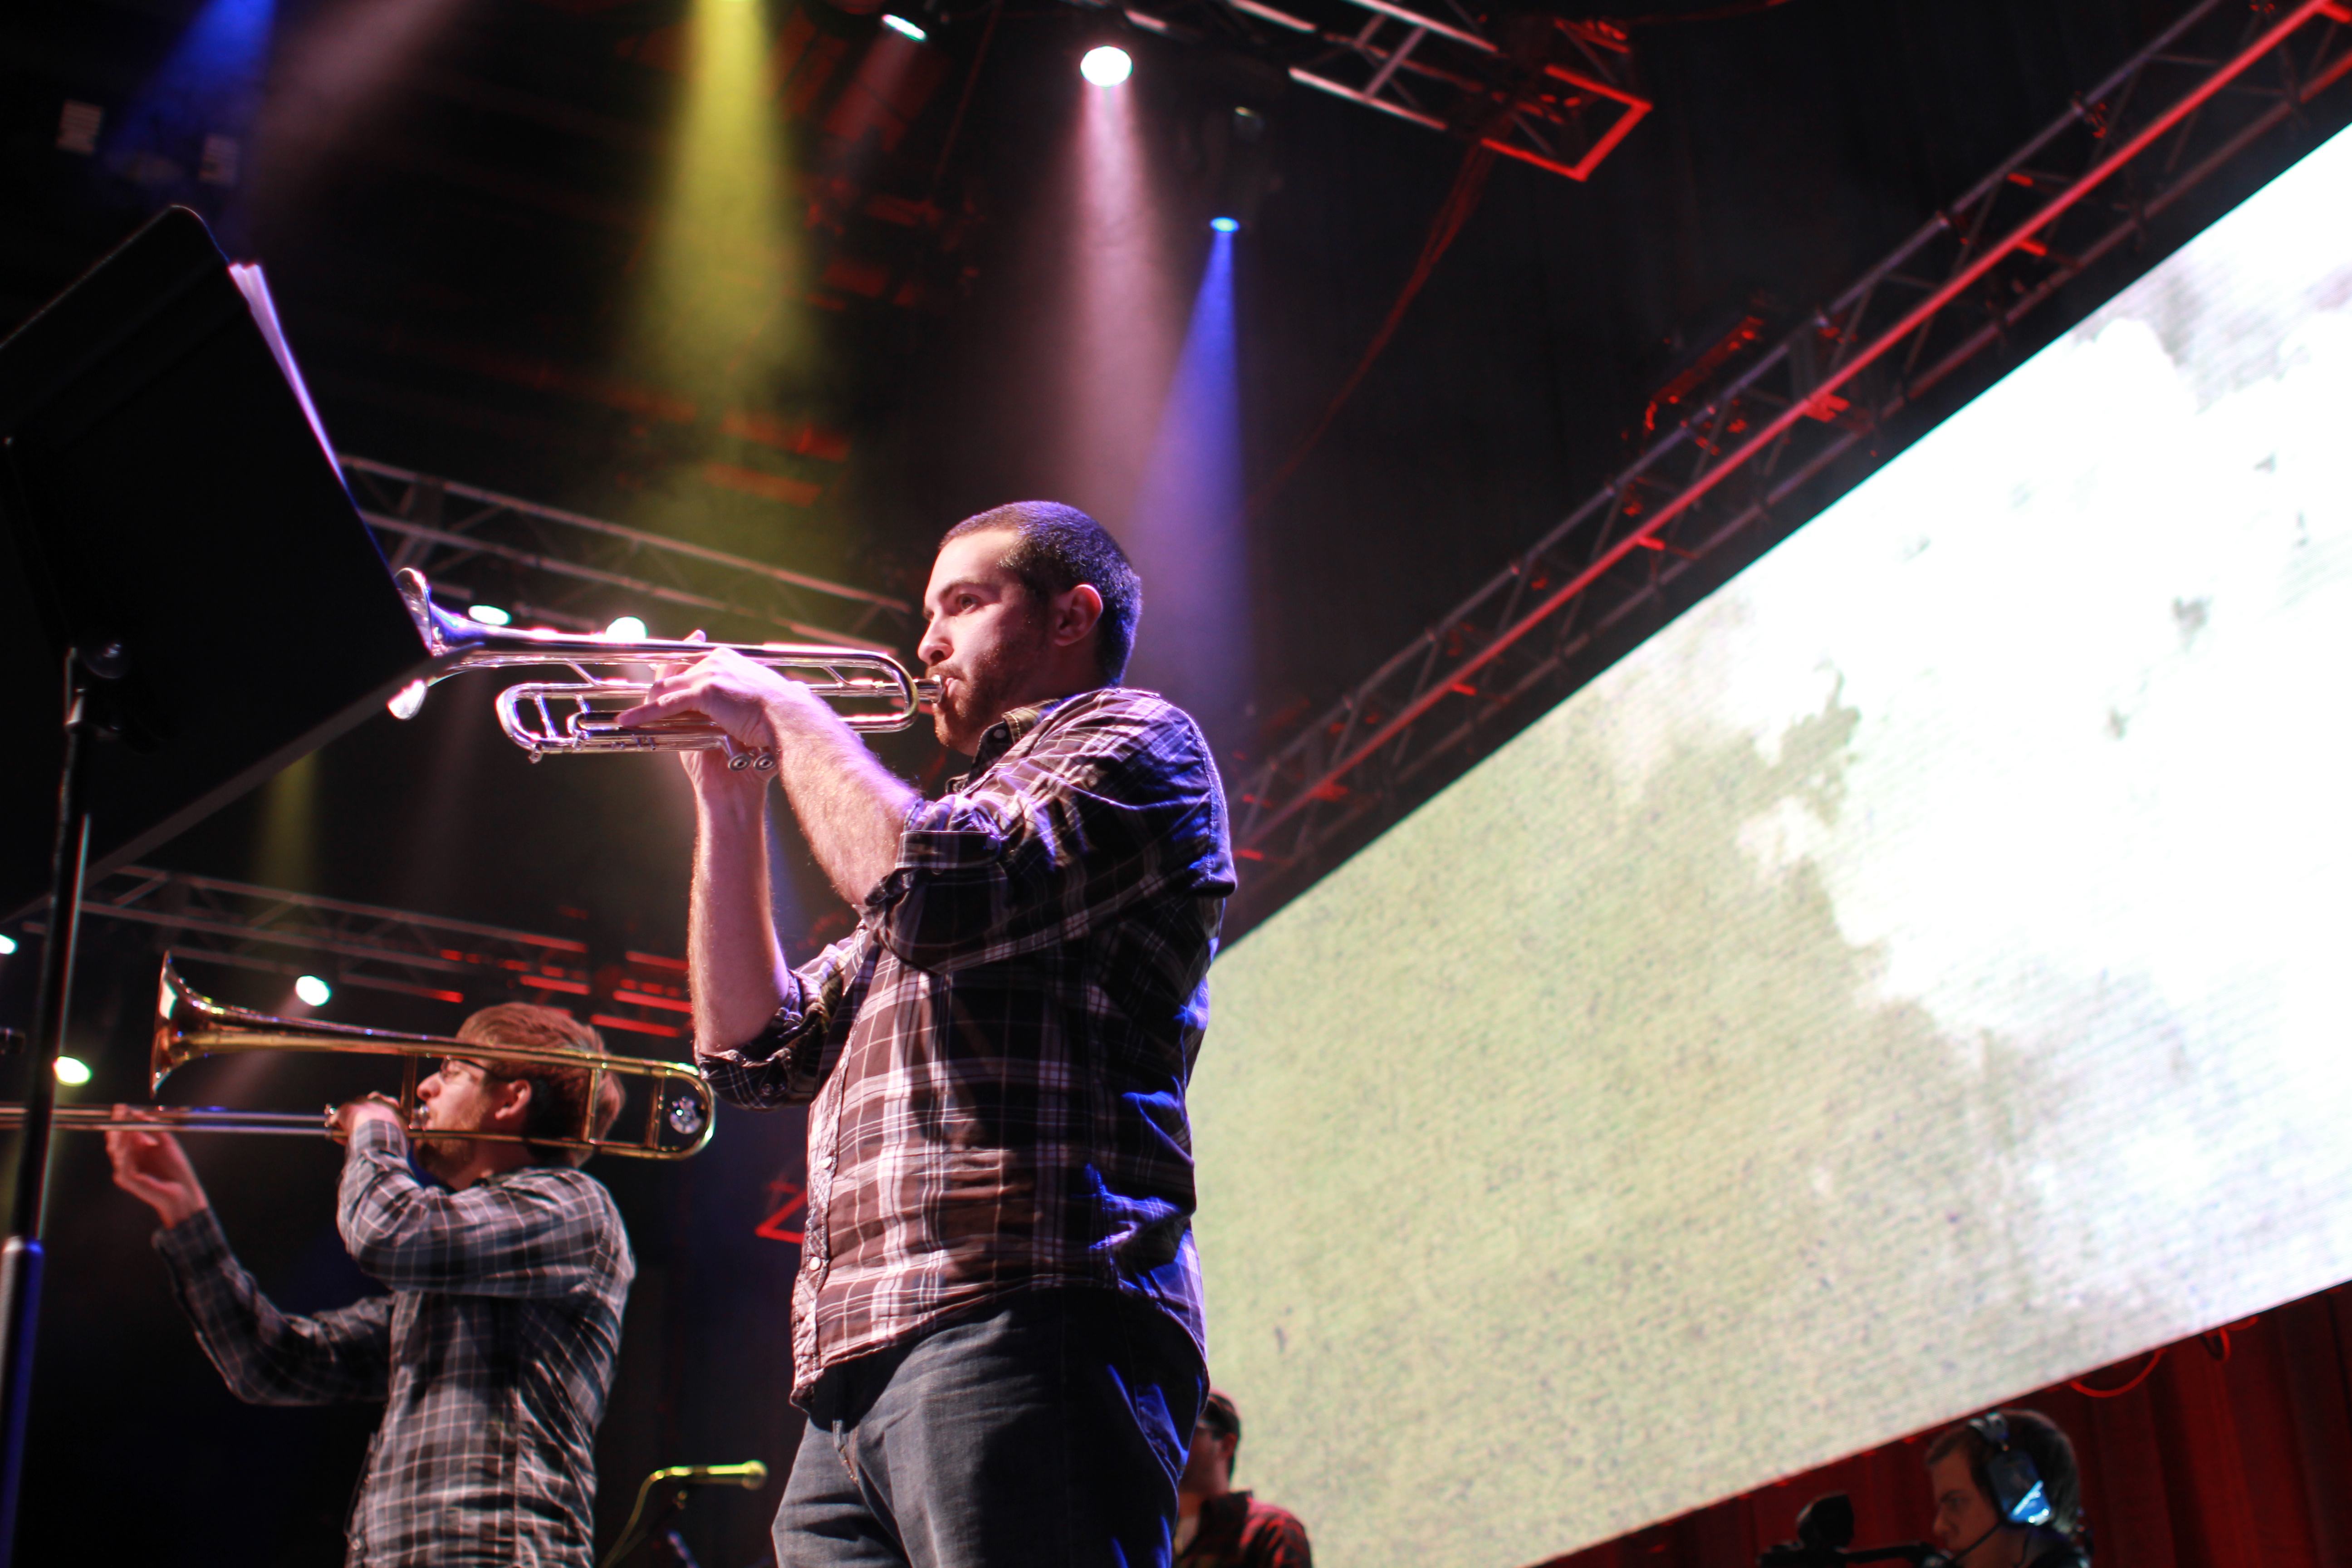
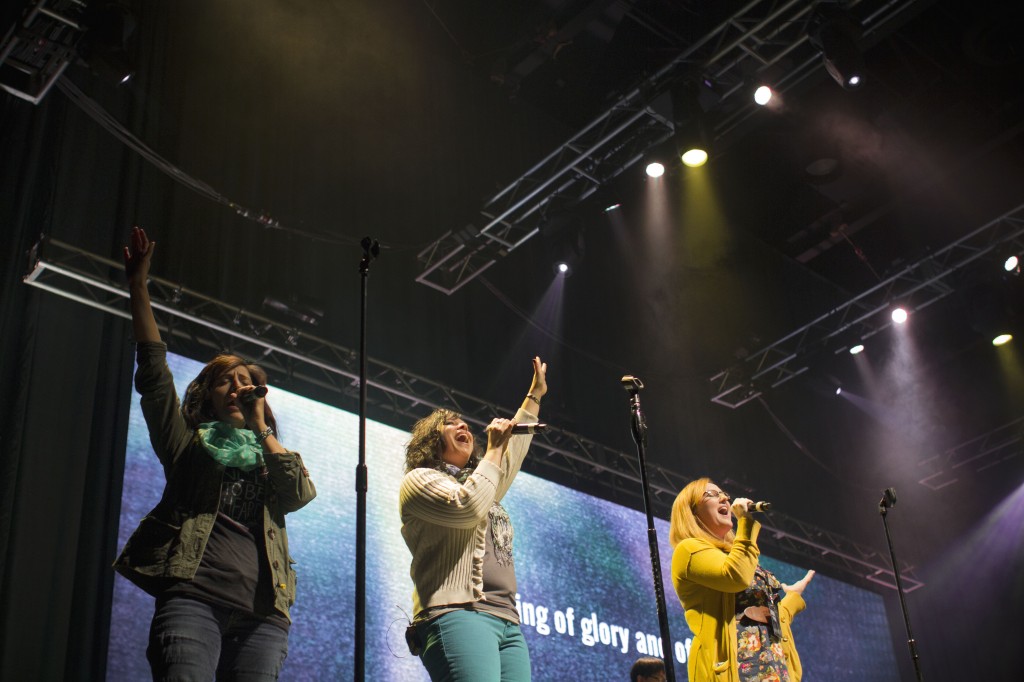
And the band did a phenomenal job leading everyone in worship.

08

All in all Sola13 was a huge success!

09

Many thanks again to all of you who volunteered to make Sola13 happen, and the crew from LiveSpace for going the extra mile!

Holt Lobby Sound System

It’s been a long time coming, but finally it’s here!  This last week we installed a new sound system for the lobby that is separate from the auditorium system.  This will make it a whole lot easier to hold events in the lobby and keep the auditorium systems used only for band practices and weekend services.  The whole setup only took about a day, and was a fairly simple process.

Start by cutting a rack sized hole in the wall between the AV booth and the auditorium entranceway.

lobby1

Rack mount equipment.

lobby2

Pull a couple of cables under the floor.

Mud, sand and paint the gaps.  Add door to keep everything safe.

lobby3

In the end we have a sweet little lobby setup.  Two wireless microphones, auditorium sound feed, and wireless bluetooth audio for music.  Most bluetooth enabled phones can travel the entire lobby and still have good signal, which is quite impressive for being built into an inexpensive mixer.  All in all, I’m certainly very happy with this new setup.