Goodbye iMovie

With the recent release of OS X 10.9 Mavericks, we have upgraded most of our production computers from Snow Leopard to the latest Apple operating system.  In the process of this upgrade however, we lost the old iMovie, and this new one just isn’t going to work for recording the IMAG camera anymore.  So there’s a new program called OnLocation that we will be using instead.  This does not replace our recording on the BlackMagic SSD, so please continue to do that as well.

Here’s what you need to know.

  • To record on the iMac, open the OnLocation program in the dock.  (Square OL Icon)
  • Click the New Project button
  • Type in the date YYYYMMDD (ie. 20131027) and click save
  • The top left corner of the program is your field monitor and record controls
  • Press the Red Record button during the last song before the message
  • Press the Blue Stop button after the intro to the offering
  • At the end of the day quit OnLocation.  The program automatically saves the recordings, so there is no save option.

OnLocation

That’s it for recording the IMAG camera now.  If you have any questions, please contact [email protected]

Video Editing Workflow

UPDATE! There are new video editing instructions available here:


Podcast Team Video Editing Instructions


The Following information is for archival purposes only.

Starting October 27th we are going to be using a new editing software for our weekend messages.  Below is the new workflow for editing the video and audio for our weekend services.

Use the video from the 11:30 service unless the pastor lets you know otherwise.  Noel likes to pick which sermon he uses and will circle his choice on the dry erase board at the top of the stairs in the A/V booth.

  1. Login to the video capture iMac.
  2. Check to make sure the BlackMagic SSD recorder is stopped and turned off.  (There are 4 green lights that always stay on, but the power button should not be lit)
  3. Pull the drive out of the left side of the recorder

Blackmagic SSD Recorder

  1. Carefully plug the drive into the SATA Dock to the right of the iMac.

SSD in Dock

  1. Open Premiere Pro on the iMac
  2. Open the 1130, 930, or 7 template file based on which service you need to edit

 New Video Edit 01

Premiere Pro Layout

New Video Edit 02

  1. In Premiere use the Select tool to click on the Capture.mov in the timeline.
  2. Move the mouse over to the beginning of the Capture.mov clip and the cursor will change to a Trim tool. (Looks like [ )
  3. Click and drag to the right to trim the clip to just before the beginning of the teaching.
  4. Use the Zoom tool to zoom in closer by clicking and dragging a box around the beginning of the clip.
  5. Click the blue marker at the top of the red line and drag to find the exact beginning of the teaching.
  6. Use the Select tool (trim tool) to trim the clip to the exact start point.
  7. Press the “\” key on the keyboard to zoom out.
  8. Click the middle of the Capture.mov clip and drag to the left until it bumps into the clip before it.  The program should cause the clip to snap into the correct location.  There will be little white arrows that appear where the clips line up.
  9. Repeat steps 2 – 7 except starting at the end of the Capture.mov clip and trimming to the left.
  10. Once you trimmed the Capture.mov clip to the correct start and end points, drag the “Video End Graphic” sequence from the Project window onto the “Video 1” track at the end of the Capture.mov clip.  There will be little white arrows that appear when the clip is lined up correctly.
  11. Click the blue marker at the top of the red line and drag to just before the end of the clips.  Press the space bar to start playing the end of the video.  The video should stop automatically at the end of the closing graphic.  Once this happens press the “O” (oh) key on the keyboard.
  12. Click the blue marker at the top of the red line and drag it all the way to the left.  Press the “I” (eye) key on the keyboard.
  13. Press the spacebar to start playback.  Watch to make sure the intro video and message video start and transition nicely.  If the 2 videos overlap, you’ll need to use the select tool to line them up again.
  14. Add any images (maps, photos) the pastor specifically refers to in their teaching.  Images are found under the message slides folder on the desktop, series name, and date.  You can add images by dragging them into the project window area in premiere, and then dragging them onto video track 2 in the timeline.  Click and drag to line images up with the correct spot in the teaching, and the length can be changed by using the trim tool.  Once the clip is in the correct location and the correct length, drag it onto video track 1.  Graphics can be resized in the program window at the top right of the screen.
  15. Now that the intro video, teaching, and end graphic are all in the correct place click File -> Export -> Media
  16. At the top right of the export settings window make sure the format is “H.264” and the preset is “RivChurch.com Message”

New Video Edit 03

  1. Click the “Queue” button at the bottom of the export window.  This will open the Media Encoder application.
  2. In the Media Encoder window click the Output file link to change the name.  Name the file all lowercase “speakerfirstandlastname_messagetitle.”  Click “Save.”
  3. Right click on “Message Template” and click duplicate.
  4. Change the format to “MP3” and the Preset to “RivChurch.com Audio Only.”  Click the Output file link and remove the “_1” from the end of the name.
  5. Press the play button at the top right to start the export process.  This should take about 45 minutes to 1 hour.

New Video Edit 04

Upload and Archive

  1. FTP upload the mp4 and mp3 files from the desktop using Cyberduck to: rivwarehouse.com/resources/messages/[series]/.
  2. While the files are uploading, create the archive versions of the video using the Media Encoder application.
    • Right click on the top “Message Template” and click duplicate.
    • Click on the output file link and add the prefix “H.264_” to the filename.
    • Change the format to “H.264” and the Preset to “H.264 Message Archive.”
    • Right click on the top “Message Template” and click duplicate.
    • Click on the output file link and add the prefix “ProRes_” to the filename.
    • Change the format to “Quicktime” and the Preset to “ProRes Message Archive.”
    • Click the play button to start the archive video encodes.
  3. Once the archive versions are finished encoding, open the Video Archive external drive and drag the archive H.264 & ProRes files into the “Weekend Messages/[series]” folder.
  4. Once the upload is finished, quit Cyberduck, Media Encoder, and Premiere Pro.  Do NOT save changes to the template file.

Create a New Message Post in WordPress

Follow the instructions in the following link: WordPress Message Posting Instructions


If you have any questions about this process, please contact [email protected]

MSU Venue Video Setup

Here’s step by step instructions on how to copy and setup the teaching video for the MSU venue.

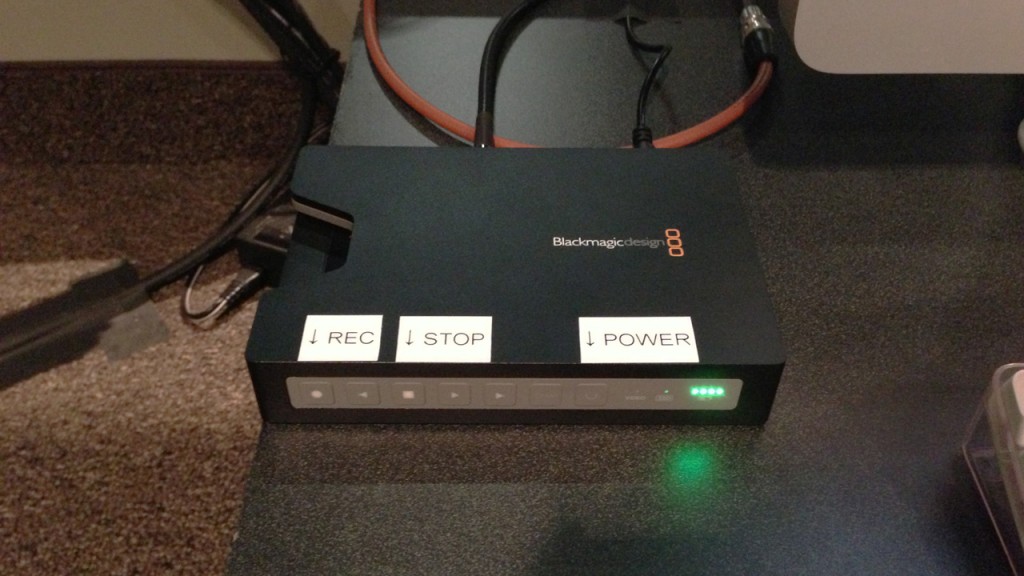
Step 1: The teaching video is recorded on an SSD.  Make sure the unit is turned off before pulling out the drive.  There are 4 green battery lights that always stay on, but the power button should not be lit.

Blackmagic Recorder

Step 2: Pull the drive out the left side of the recorder

Blackmagic SSD Recorder

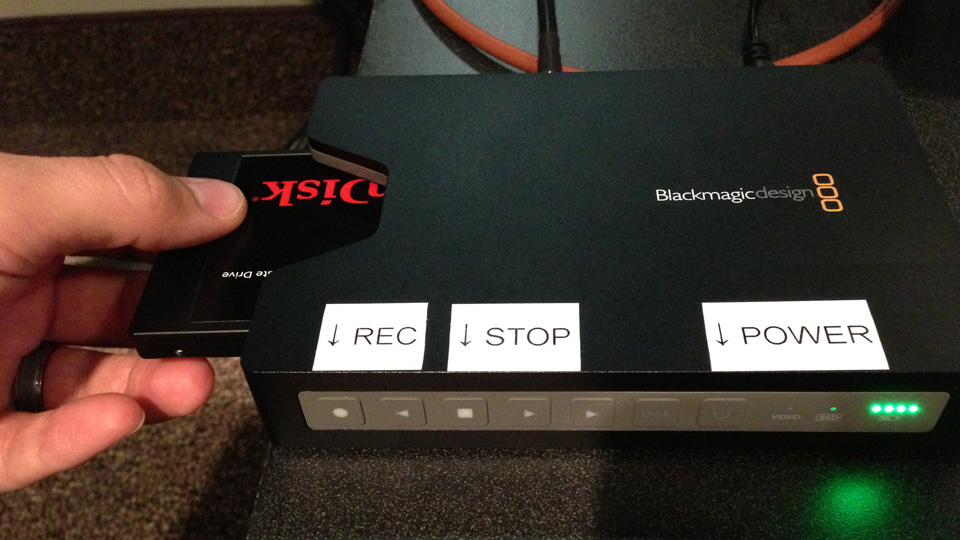
Step 3: Carefully plug the drive into the SATA dock to the right of the iMac

SSD in Dock

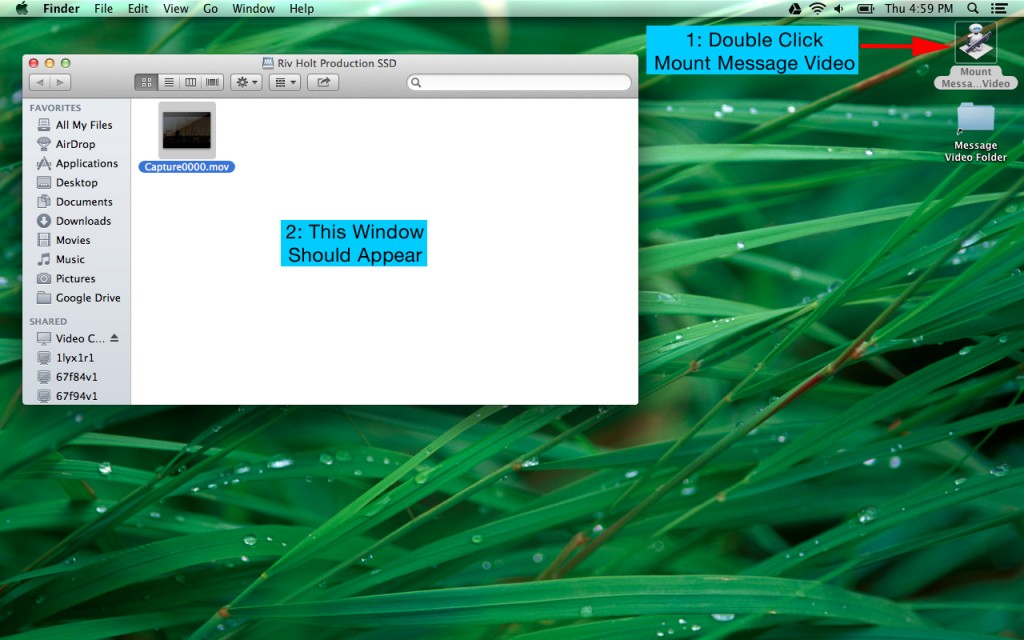
Step 4: Plug the blue ethernet cable into the MSU Macbook labeled “center screen.”  Turn the computer on.  Double click the “Mount Message Video” desktop icon.

Venue Video Step 04

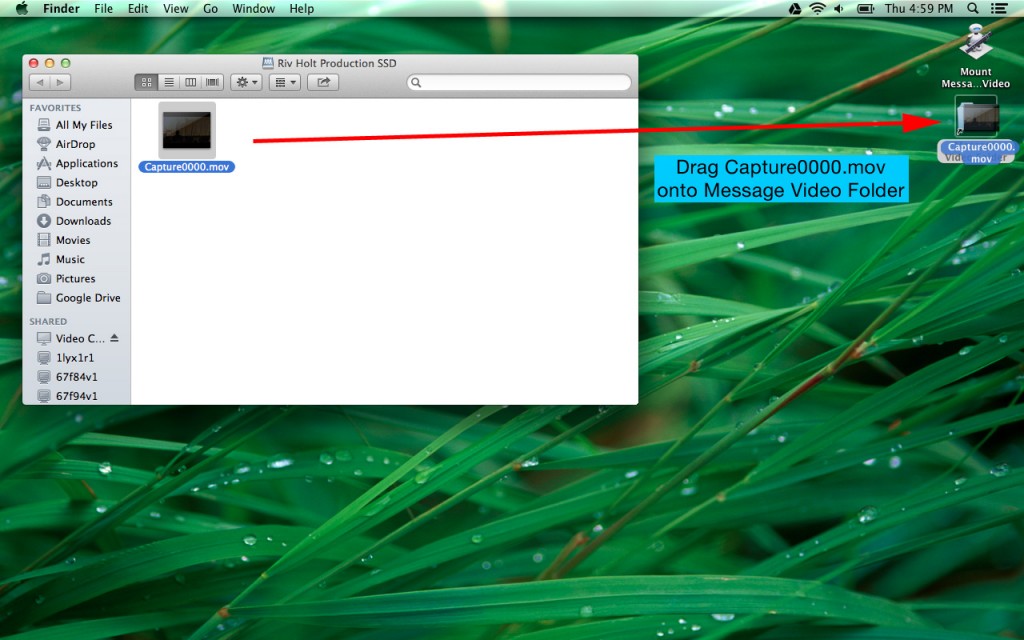
Step 5: Drag the file “Capture0000.mov” onto the message video folder.

Venue Video Step 05

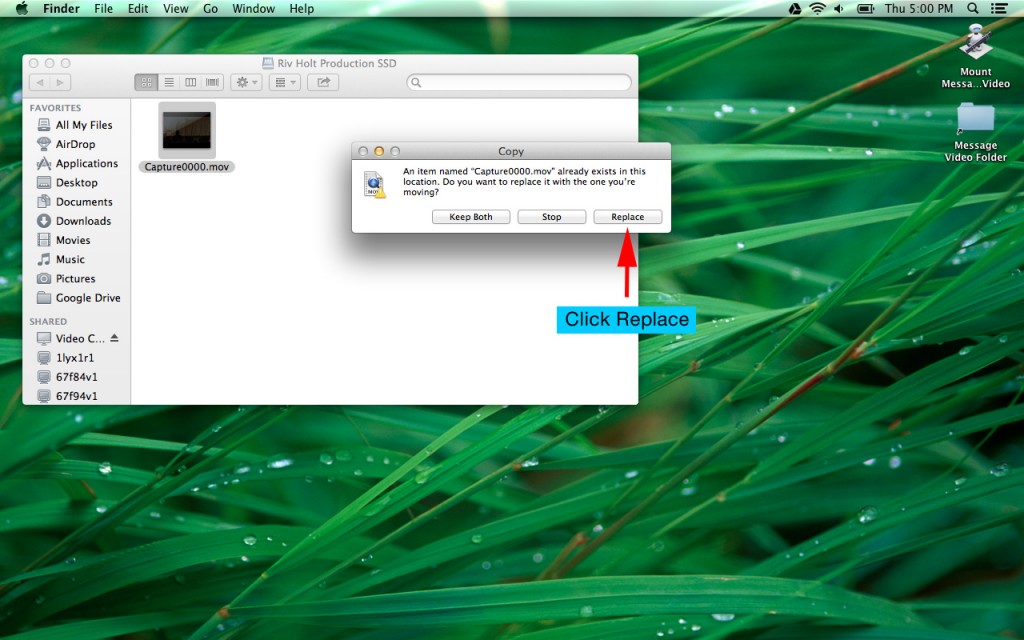
Step 6: Click Replace

Venue Video Step 06

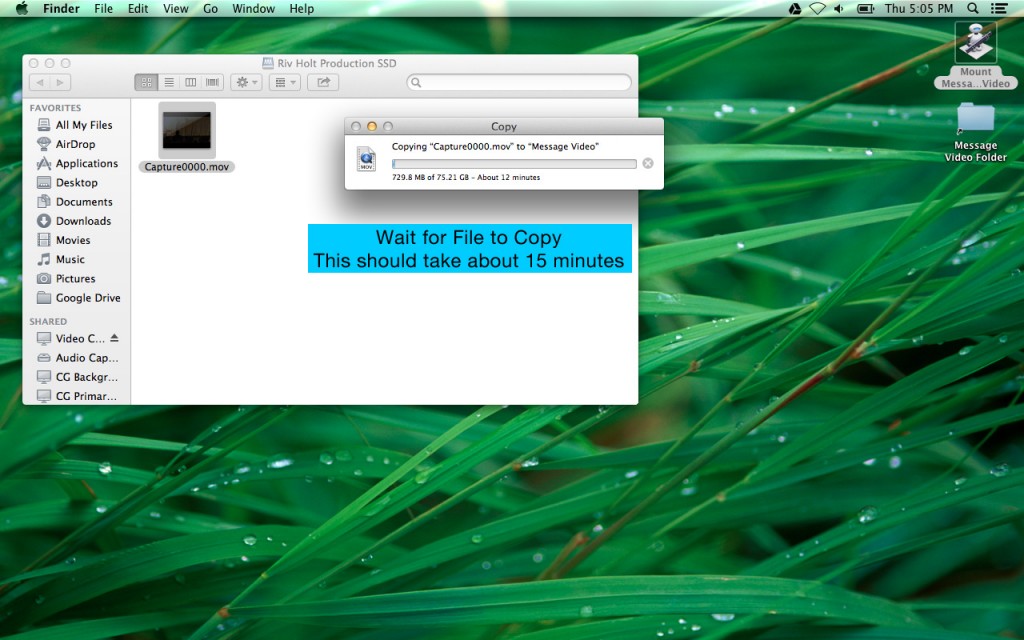
Step 7: Wait for file to copy before continuing.  This should take about 15 minutes to complete.

Venue Video Step 07

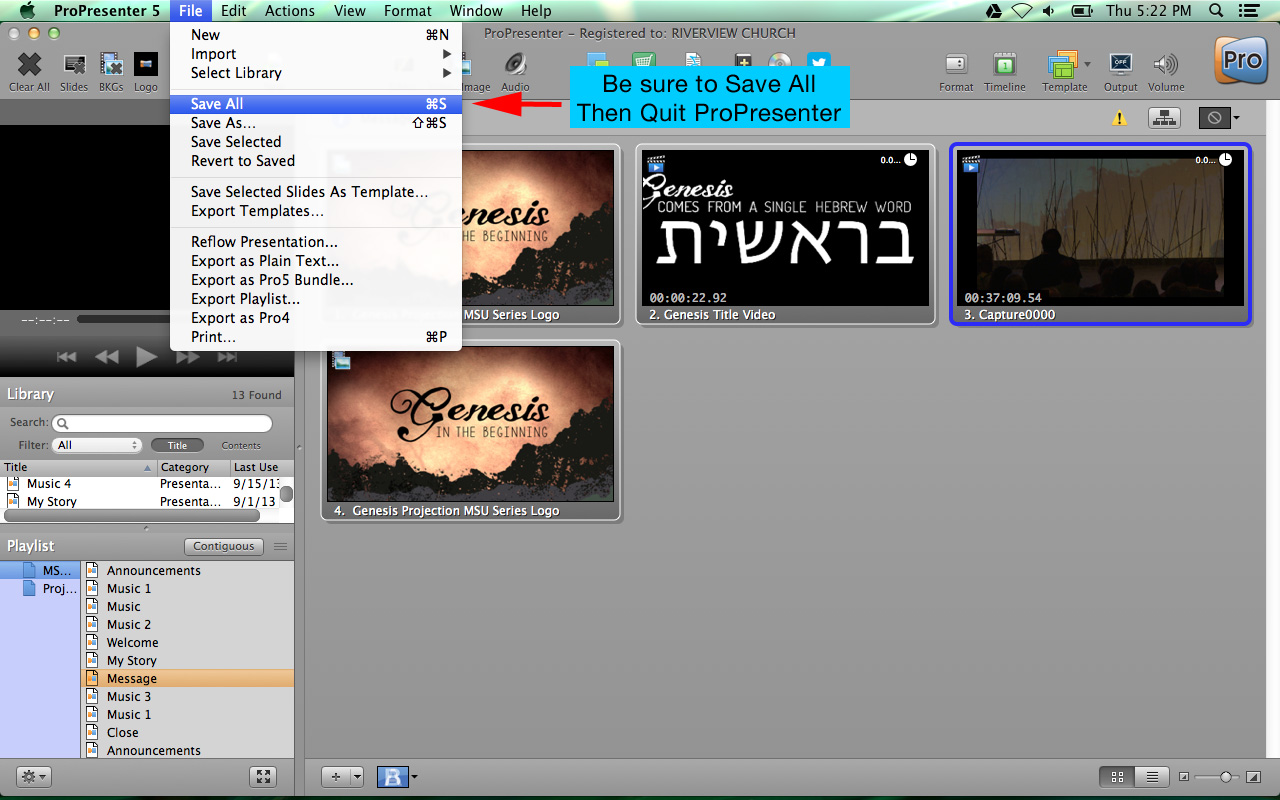
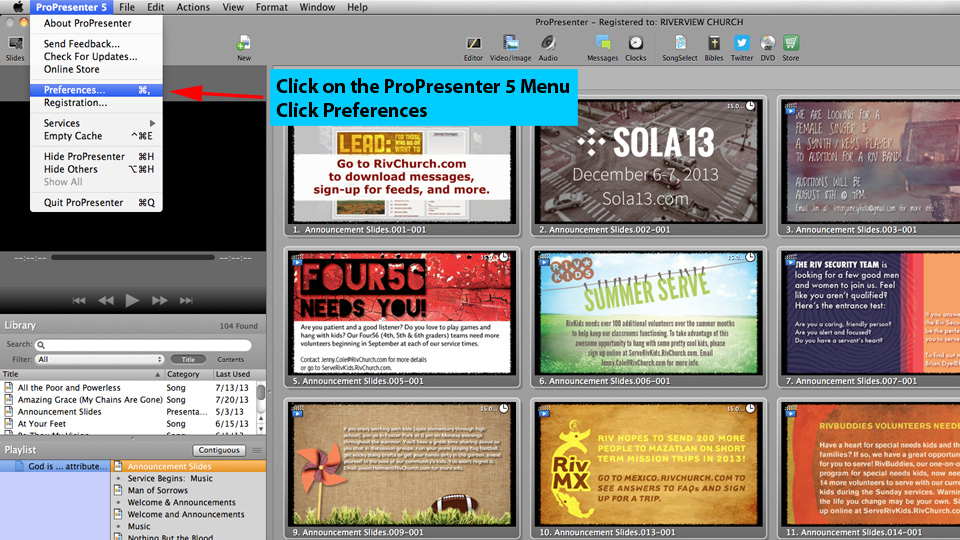
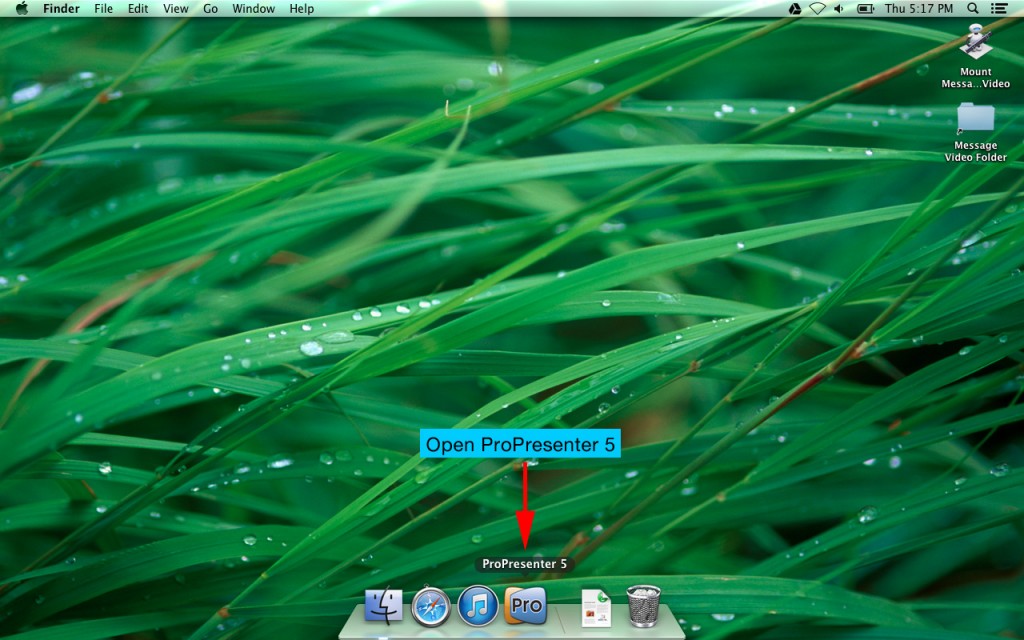
Step 8: Hover mouse over the bottom of the screen for dock to appear.  Open ProPresenter 5.

Venue Video Step 08

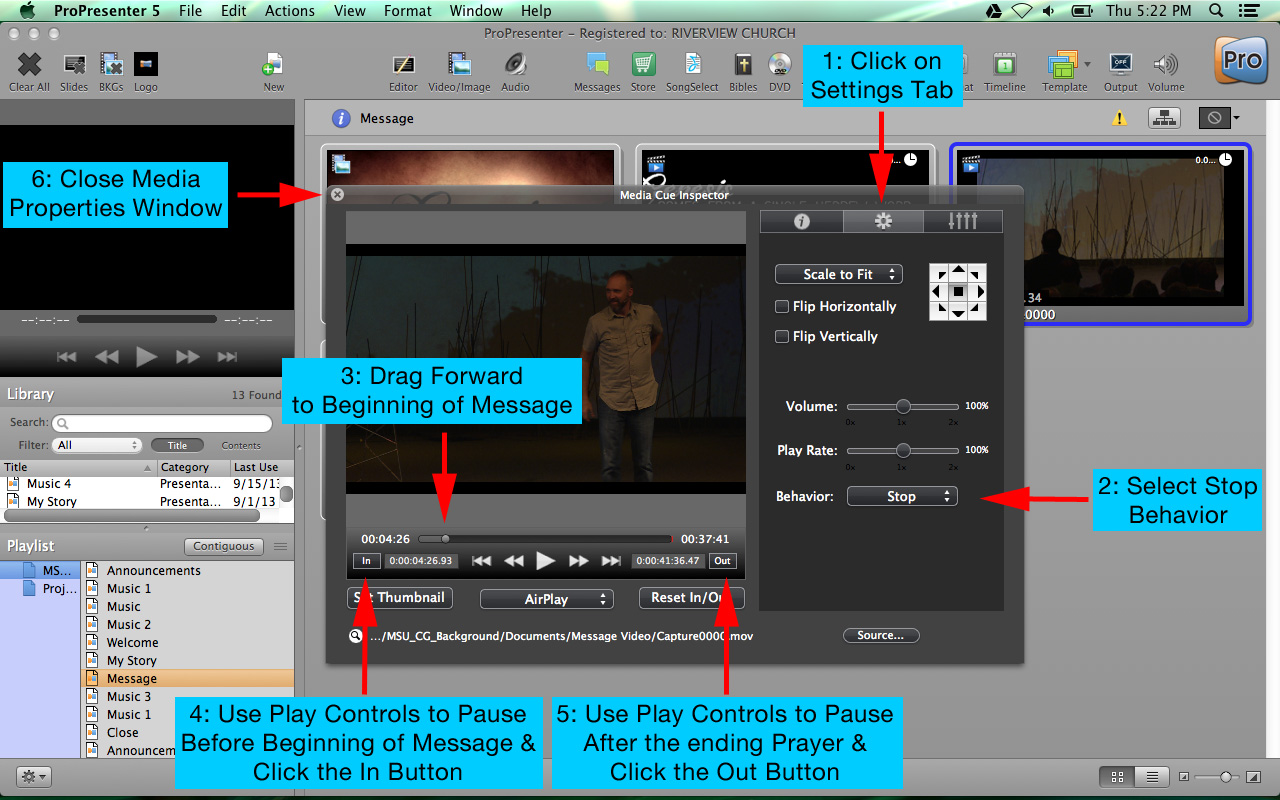
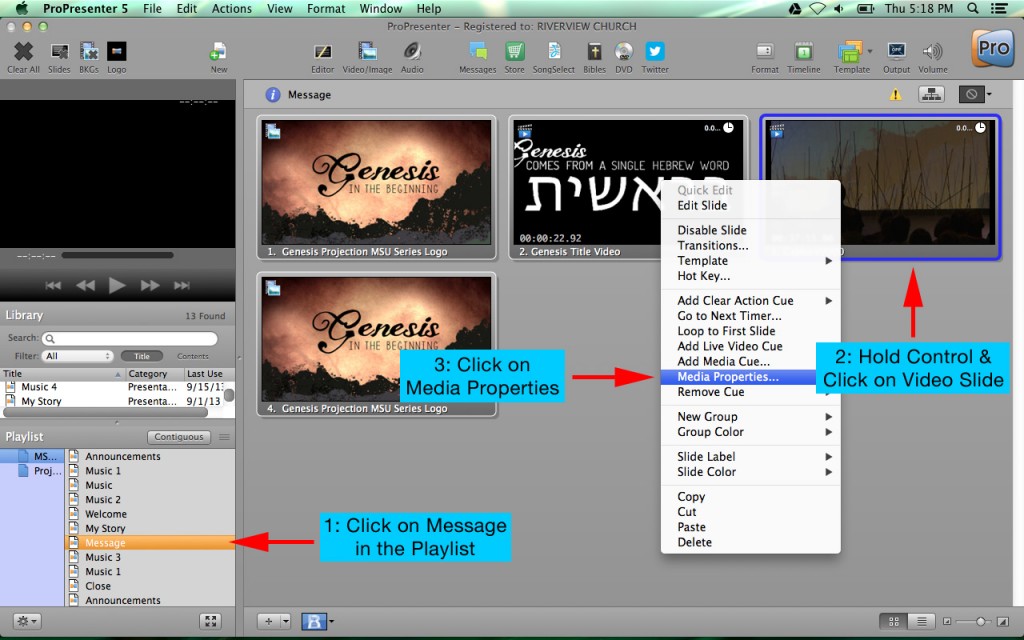
Step 9: Click on the “Message” playlist item.  Find the slide that contains the teaching video.  Control Click (or Right click) on the video slide.  Click on Media Properties.

Venue Video Step 09

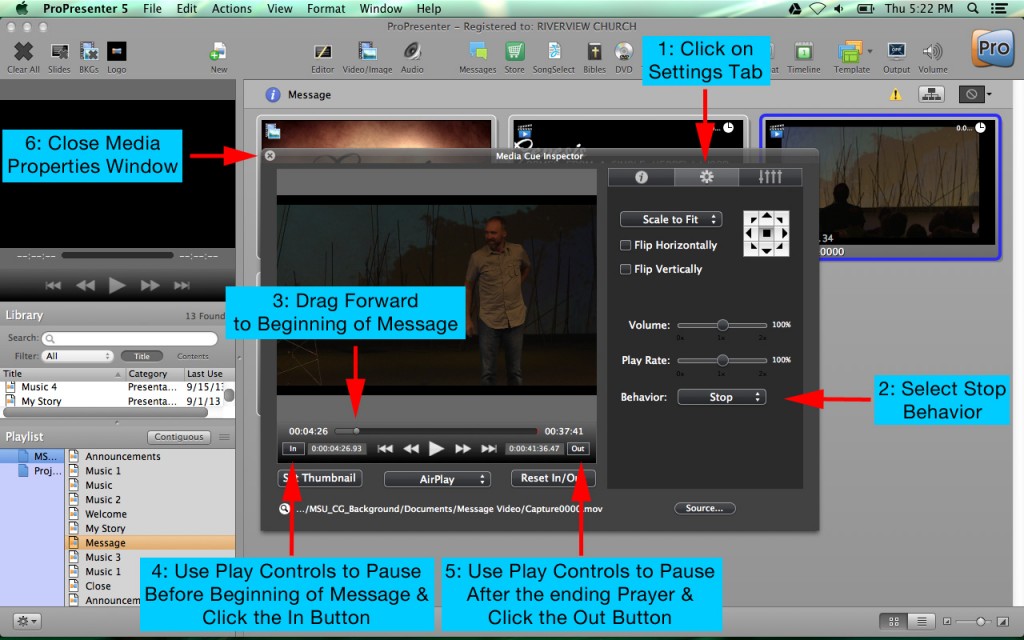
Step 10: Click on the settings tab (gear icon).  Select “stop” from the behavior drop down menu.  Drag the grey bar forward to just before the beginning of the message.  Using the play and pause controls, pause the video before Noel starts to talk.  Normally a good place to pause is when he sets down his coffee mug, or reaches behind his back to turn on his microphone.  Once you are paused at a good starting place, click the “In” button.  Drag the grey bar to the end of the message.  Play the video and pause at the end of the closing prayer.  Click the “Out” button.  Close the media properties window.

Venue Video Step 10

Step 11: Click File, Save All to save your changes.  Quit ProPresenter and shutdown the computer.

Venue Video Step 11

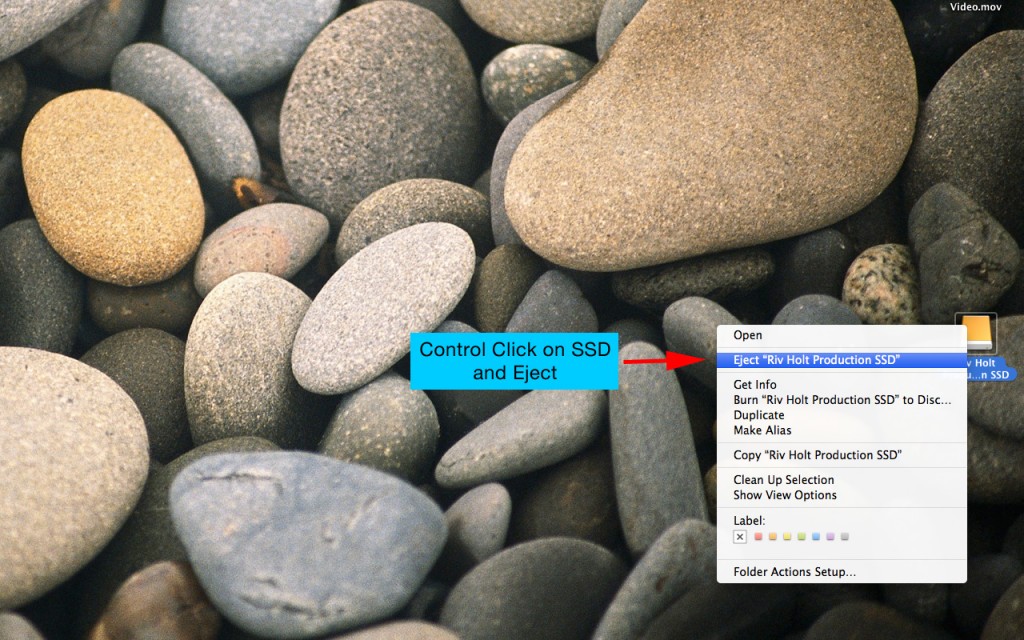
Step 12: On the iMac, hold control and click on the SSD drive on the desktop.  Click Eject “Riv Holt Production SSD.”  Remove drive from dock and return to SSD recorder on the left of the iMac.

Venue Video Step 12

Once this process is complete, place the center screen macbook in the blue handled laptop bag along with the other MSU macbook.  The laptop bag goes in the blue marked wire rack cart backstage for transport to the MSU venue on Sunday morning.  If you have any questions, please contact [email protected].

ProPresenter Arrangements – Video Instructions

As we continue to standardize things here at Riv, we are now using arrangements for each song in ProPresenter. Arrangements allow us to have specific slides and orders established ahead of time for each Riv band. This will accommodate having only the needed slides and order for each weekend, which is an essential step towards adding a confidence monitor for our musicians. When we move to using a confidence monitor the band members will be able to see the current and next slide before of the congregation.

Here is a great video explaining how to use arrangements in ProPresenter.

Life Group Leader Video Instructions

Here are some step by step instructions of how to record and upload the weekly life group leader videos.

Step 1. – Open iMovie

Step 01

Step 2. – Create a new project in iMovie

Step 02

Step 3. – Name iMovie Project and Click “Create”

Step 03

Step 4. – Record video in iMovie (Import from Camera)

Step 04

Step 5. – Capture movie in iMovie.  When finished recording click “Stop” then “Done”

Step 05

Step 6. – Drag recorded movie into project window

Step 06

Step 7. – Export movie (Share)

Step 07

Step 8. – Name video “yyyymmddvenue”  Be sure to use the full 8 digit Sunday date and venue in lowercase.  (ie. “20130929holt” or “20130929msu”)  Using the wrong naming will keep the video from being displayed in the Life Group email.  Select “Large” size and click export.

Step-08a

Step 9. – Open Cyberduck

Step 09

Step 10. – Open finder folder with saved movie and open Cyberduck LG Leader video bookmark

Step 10

Step 11. – Open Cyberduck series folder (ie. genesis)

Step 11

Step 12. – Drag movie from computer folder to Cyberduck folder

Step 12

Step 13. – Wait for transfer to complete.  When upload finishes you are done.  Quit Cyberduck application, iMovie, and close finder window.

Step 13

This completes the instructions for recording and uploading the weekly life group leader videos.  If you have any questions, please contact [email protected].

Genesis Set Sneak Peek

A little sneak peek of what our set design guys are working on for the Genesis series starting September 7th.

Genesis Sneak Peek

(thanks to Captain J for the photo)

Sony Camera Zoom & Focus

Finding the correct focus and framing for the sony lock-down shot can be a bit of a trick.  These things should not change from week to week, but if you do need to reset the zoom and focus on this camera, here’s some tips that will help you get the perfect setup.

Start by zooming in all the way on the teacher while they are on stage.  Carefully adjust the focus ring until the lines on the speaker’s shirt “pop out” or you can clearly read their coffee mug or edge of their bible.  Check your focus by looking at the focus graph on the bottom center of the sony camera display.  The left side of the focus bar should be above the “0” of the 50′ mark.  Once you have set your focus, zoom back out to get the whole speaking area in frame.  On the left side of the camera display there is a zoom number.  That number should be at 85 when you’ve reached the correct zoom.

Sony Camera Setup

Order of Service

Dan, Fred, and I have been thinking through our service order at Riverview and would like to implement some changes to the weekend services.
Here’s basically what we are thinking, although it would change based on communion, baptisms, child dedications and so on.

Welcome (band leader)
-Emphasis on object of worship rather than style and preference of worship
Song 1
Song 2
Song 3
Announcements Prayer (venue pastor)
Message (teaching pastor)
Invitation to respond through the gifts/offering (teaching pastor)
– Explain response through tithes and offering and worship
– Encourage people not to rush off an collect kids
Song 4
Song 5
Song 6
Final Announcements and Close (venue pastor)
– Mention post service prayer teams. 
– If you are new, there are pastors in lobby that would like to meet you. 
– To get connected to serve or get into a LG, please go see someone at Info Central.
Band outro

This new format does a couple things for us.  First, it allows us to platform more pastors.  For instance, if Noel is speaking at Holt, Paul or James or Steve would be able to pray before the message and close out the service.  We’d also like to try to have pastors in the lobbies of our venues to answer questions about Riverview and to meet new folks.   Second, it allows the band leaders to focus more on leading the music time instead of public speaking.

We are also working on a way for folks to meet in the back of the auditorium and pray with trained leaders.  We think this would be a great thing for people who are ready to respond to the Gospel, or deal with other issues in an immediate and appropriate setting.   We know this will take some work to organize and if you have any ideas of how to implement, I’d love to hear them.

We’d like to try this format out on the weekends of August 24th/25th and August 31st/September 1st.   Then we will evaluate it and tweak or go from there.

Please let me know if you guys have any initial thoughts or concerns about this plan.

Re-Sync ProPresenter Slides

From time to time there may be a network issue that causes the 3 ProPresenter computers to lose sync.  Here are some simple steps to re-sync the Background and Side Screens with the Primary CG computer.

On the Primary iMac, open the preferences menu in ProPresenter.

Resync 1

Click on the Network Tab, then click disconnect for both CG Side Screens and CG Background iMac.

Resync 2

Click Connect for both CG Side Screens and CG Background iMac.  Close the window.  Click on the playlist in the bottom left, click the desired playlist item, then click on the desired slide.  All 3 computers should now be in sync, displaying slides on the Primary, Background, and Side Screen Projectors.

Resync 3